Using the History Palette Productively
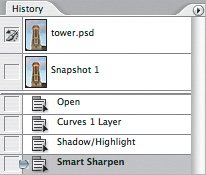
| On the surface, the History palette looks like a simple list of your most recent edits, but the History palette is much deeper than it looks. You can use the History palette not only to back out of mistakes, but also as a temporary idea book where you can store different iterations of a document and recombine their best parts. To begin with, let's map out the History palette. When you open a document, the History palette appears divided into two sections (Figure 14.2). The lower section lists history states; you'll see it grow as you edit the document. The upper section lists history snapshots, which I get to later. Figure 14.2. The top of the History palette stores snapshots, and the bottom stores history states. The list of history states grows longer until it reaches the History States number specified in the General panel of the Preferences dialog box (see the nearby sidebar "Why Limited Undo?"). When the number of history states exceeds the History States setting, Photoshop removes the oldest history state. Only actual edits add a history state; changes that don't affect the document contents, such as scrolling the window, don't create a history state. Going Back in TimeOne of the most productive ways to use history states is to paint from one history state to another. This is useful when one of the history states contains content that you'd like to combine with the current iteration of the document. For example, suppose I colorize a photo, but then I decide I want to restore the original color to just a portion of the photo. To get the best of both worlds, I can use the history brush tool to paint in only the areas that need to be cleaned up.
To use the history brush tool:
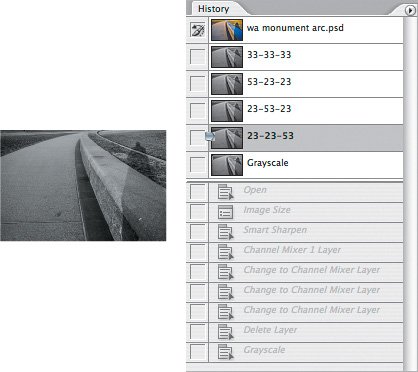
Using Snapshots to Preserve History StatesThere may be times when you recognize that a particular history state would be useful in the future, and you don't want to lose that history state as new states are added. You can retain a history state by creating a snapshot. To create a snapshot, select a history state in the History palette and click the Create New Snapshot button at the bottom of the History palette. History states and snapshots are best used for keeping iterations of a document that involve alternate sets of edits that can't be stored any other way, because there's one catch: History states and snapshots belong to the current editing session only. Once you close the document, they're gone. If you want to maintain different versions of a document across sessions, you might look into using Adobe Version Cue, which comes with Adobe Creative Suite 2. If you simply want to save alternate layer configurations with a document, you can do that using a layer comp (see Chapter 10). Here's an example of how I use snapshots. I sometimes convert color photos to black-and-white using the Channel Mixer, but I can't predict which way will work out the best for a particular photo. So, I created an action that runs the image through several methods and keeps snapshots of each method. I can then decide which one to keep. I don't cover actions until Chapter 17, but what I want to show here is how you can make snapshots and choose from them. To use history snapshots:
Like history states, history snapshots are stored on your Photoshop scratch disk during an editing session. The size of your scratch disk limits how many snapshots you can store, and the size and complexity of the document determines the size of each snapshot.
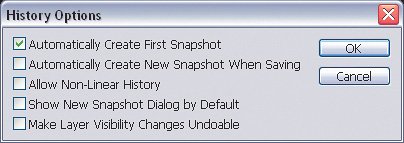
Setting History Palette OptionsYou can fine-tune the operation of the History palette by choosing History Options from the History palette menu. In the History Options dialog box (Figure 14.8), three options affect how many states and snapshots are created: Automatically Create First Snapshot (that is, when you open the document), Automatically Create New Snapshot When Saving, and Make Layer Visibility Changes Undoable. The reason they aren't all on by default is that many more history states would be created, which means that the History palette wouldn't remember back as far before it started dumping the oldest history state. It's reasonable to enable these options if you've increased the number of History States in the General panel of the Preferences dialog box (see "Why Limited Undo?"). Figure 14.8. You can change the behavior of the History palette using the History Options dialog box. If you enable the Show New Snapshot Dialog Box by Default checkbox, clicking the Create New Snapshot button will act as if you Option/Alt+clicked it. If you enable the Allow Non-Linear History checkbox, when you back up a few history states and branch off in another direction the History palette remembers the old branch of your edits. Again, this option is more practical if you have the disk space to increase the number of history states you can store; otherwise, it may not be able to remember much of each branch. |


EAN: 2147483647
Pages: 161