| Editing a step in an action is easysimply double-click the step. If an alert appears telling you that the feature is not available, that means there's a missing condition that the feature requires. For example, if you try to edit a step that uses the Free Transform command to apply rotation, but nothing is selected, the Free Transform command can't be used. Before you can edit that step, you need to select what you want to transform in that step. You can also edit actions in other ways: To rearrange the sequence of steps in the action, drag steps up or down in the list. To record from any point in the sequence, select the step before the point where you want to start recording, and then click the Begin Recording button in the Actions palette. To display a dialog box for a step, click the dialog toggle icon next to the step in the Actions palette (Figure 17.9). When the dialog toggle is enabled for a step, the action pauses at that step to display the dialog box so you can enter values. When you click OK, the action continues. Figure 17.9. When the dialog toggle icon is enabled, the dialog box for a step is displayed when you play back the action. 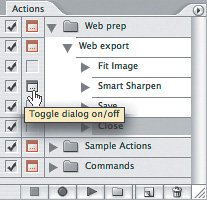 To adjust the playback speed of an action, select the action (not a step) and choose Playback Options from the Actions palette menu. To adjust how the action is displayed in the Actions palette and set a function key shortcut, double-click the empty area to the right of an action name, or choose Action Options from the Actions palette menu. While testing my Web export action, I discovered that some files didn't process as I expected. As a result of testing, I decided to add the following steps after step 1 of my original plan (see the earlier section, "Planning an Action"): Flatten the document. Layered documents take more time and memory to process, so flattening speeds things up a bit. Convert the document color space to sRGB. I might be preparing documents that exist in the Adobe RGB or ProPhoto RGB color spaces, and if they aren't converted to sRGB before uploading to the Web, the colors look washed out. Convert the document bit depth to 8 bits per channel. I've learned that some steps don't work on 16-bit documents, so it's good to get this out of way early, too.
Here's how my final action looks after I add the steps suggested by my test results (Figure 17.10): Figure 17.10. My final Web action includes the steps I originally recorded and the new steps I added after testing. 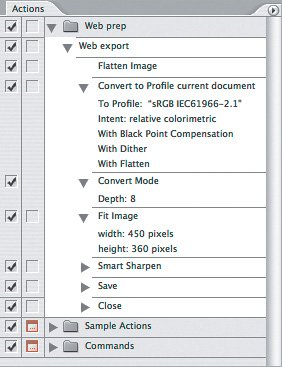
Optimizing Actions Here are a few tips you can use to help an action run faster and more smoothly: Reduce the amount of data to be processed by including steps that merge or flatten layers, lower the document bit depth, and reduce the document dimensions before applying steps that involve a lot of processing, such as the Smart Sharpen filter. Of course, only add those steps if they're acceptable for your final result (don't flatten if you want the final document to retain layers). If you include a step that resizes an object, and you want the action to resize the object in proportion to its size, enter the scaling value as a percentage instead of as an absolute number. When you're done testing and editing an action, choose Playback Options from the Actions palette menu and select Accelerated.
|
|