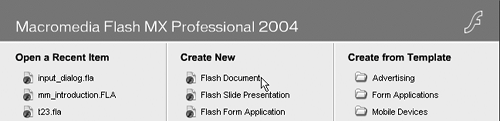
| Once completed, the dialog box will allow you to enter training data for a given date. It will appear within the training application whenever you click on a day of the month. I chose to use Flash not only to include a lesson on it, but because it has some nice features for text entry, easy-to-use vector drawing tools and pre-made componentsone of which, the check box, you'll use in the dialog box. Setting Up Let's begin by setting up the movie size, and then creating some simple colored rectangles to serve as background graphics. 1. | Open Flash MX 2004 and on the Start Page select Flash Document under Create New, to create a new file.
 After you select Flash Document, a new movie will appear with default settings. The first thing you'll want to do is set the movie to a size appropriate for a dialog box. After you select Flash Document, a new movie will appear with default settings. The first thing you'll want to do is set the movie to a size appropriate for a dialog box.
| 2. | Select Modify > Document from the top menu and change the movie's dimensions to 250x380. Press OK to close the dialog when finished.
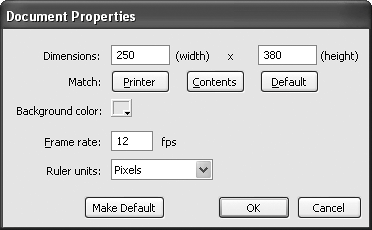
Don't worry about the frame rate setting because you're creating a dialog box, that doesn't have any animation. With the movie dimensions set, you can use Flash's drawing tools to draw two rectangles that will serve as the background.
| 3. | Within the Flash tool palette select the Rectangle tool and click the Round Rectangle Radius button. Set the corner radius to 10 points in the Rectangle Settings dialog, then press OK to close the dialog.
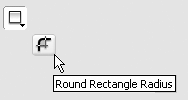
Using the Round Rectangle Radius button allows you to easily create smooth-cornered rectangles. Before drawing the background rectangle however, let's set the colors that you'll be using.
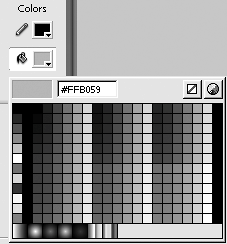
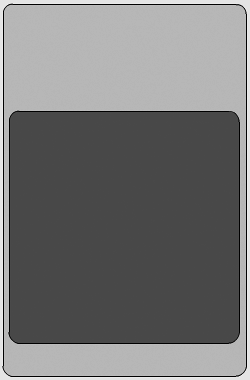
| 4. | Within the Colors section of the Tool Palette, set the Stroke color to black and the Fill color to the hexadecimal value #FFB059, as shown. Next, draw a rectangle on the Stage that covers the entire Stage.
Don't worry if the rectangle you draw doesn't quite cover the full Stage. If there's a little border around the edge showing the background color, you'll be able to get rid of that later by setting the sprite to Background Transparent ink within Director.
| 5. | In the Timeline, double-click the layer name, Layer 1, and rename it bg orange. Next, click the New Layer button to create a second layer. Rename the new layer bg blue, as shown.
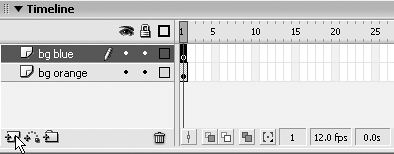
The second layer will hold a smaller blue rectangle, above the orange one. Layers in Flash work opposite from the way they do in Director, with the bottommost layer being furthest in the background.
Tip Because you can single-click a layer name in the Timeline to select all elements in the layer, creating separate layers for your elements makes it quick and easy to select individual items without having to try and pick them on stage. | 6. | Change the Fill color to #3C5B97 and then draw a rounded-corner rectangle, at about the same size and position as shown.
With the two rectangles in place you can now create and program the input fields.
|
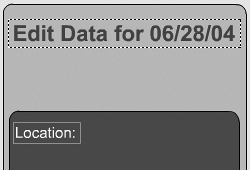
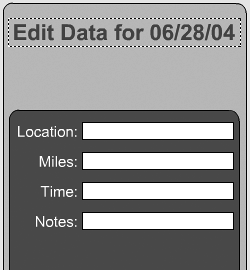
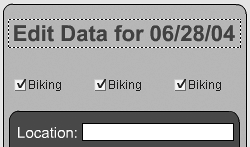
Creating the Input Fields Using Flash's Text tool, you can create three different kinds of fields: static, dynamic, and input. Static fields are simple text fields you can use for labels, or other text that you or the user doesn't need to change. Dynamic fields allow you to change their contents through code. Input fields let you or the user edit their contents. For the dialog box, you'll need to use all three types. 1. | Create a new layer in the Timeline and name it title. Next, choose the Text tool and draw a text field at the top of the dialog that is nearly as wide as the dialog itself. Enter Edit Data for: 07/01/04 into the text field.
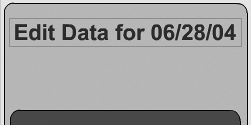
Don't worry if your text doesn't look like the text shown in the image. You still need to adjust the text using the Properties panel.
| 2. | Use the Properties panel to set the text to Arial, 22 pt, centered. Change the text color to a dark blue#003399 is what used in the image. Next, make sure that the Text Type is set to Dynamic, then enter title for the instance name, as shown.
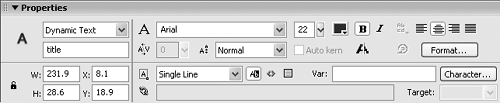 Giving the field an instance name allows you to change and access the contents programmatically. The date you entered only served as a placeholder so you could properly size the field's contents. You'll change the contents through Lingo whenever a day's data needs to be edited. Now, let's create the labels for the input fields. Giving the field an instance name allows you to change and access the contents programmatically. The date you entered only served as a placeholder so you could properly size the field's contents. You'll change the contents through Lingo whenever a day's data needs to be edited. Now, let's create the labels for the input fields.
| 3. | Create a new layer and name it labels. Next, select the Text tool and draw out a text field near the top of the blue rectangle as shown. Enter Location: for the text of the field and set the text properties as follows: Arial, 14 pt, White. The text type should be Static and the alignment should be set to Align Right.
To create the other three labels, copy and paste the text field you just created, then change the text within the pasted fields.
| 4. | In the Tools palette, choose the Selection Tool and select the text field. Press Ctrl/Command+C to copy the text, then press Ctrl/Command+Shift+V to paste the text in place. Finally, hold down the Shift key and press the down arrow key three times.
Using the Ctrl/Command+Shift+V tells Flash to do a Paste in Place as opposed to a standard paste. Pasting in place places the copy exactly where it was copied from; a regular paste centers the copy on the screen.
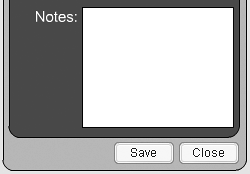
| 5. | Double-click the newly pasted text to edit it and change the text from Location: to Miles:. Repeat steps 4 and 5 two more times to create two new labels. Change the text in each one to be Time: and Notes: respectively. When finished, you will have something like the following:
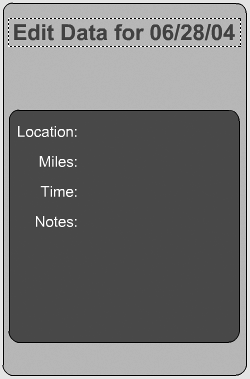
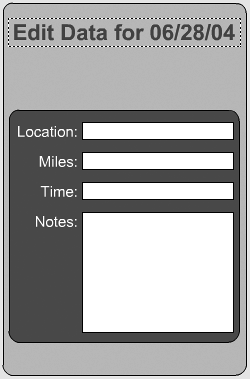
The Notes field is placed high in the dialog in order to allow it to have a large, multiline input field. To add the input fields, just repeat what you did to create the labels: create one and then copy and paste the others.
| 6. | Create a new layer and name it inputs. Select the Text tool and draw out a field to the right of the location label as indicated. Don't enter any text into the field.
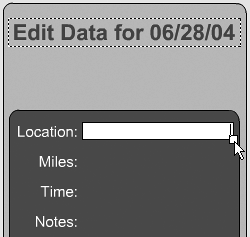
Don't worry if you don't get the field the right size to begin with. After it's created you can double-click and adjust it by dragging the little white handle in the corner of the field, as shown in the image.
| 7. | With the field selected, use the Properties panel to set the Text type to Input Text. Name the instance location. Change the font to Arial 12 pt, and make the text color black. Finally, set the Line Style to Single Line, select the Show border around text button, and change the alignment to Align Left.
Note If the field you created disappears before you set its properties, it's likely you clicked somewhere to deselect it. If that happens, simply click the inputs layer to select the field, and then change its properties. 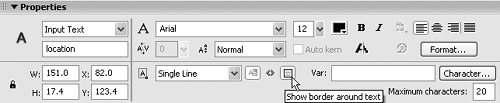 Like the Dynamic text field, you gave the Input field an instance name as well. Because you'll want to pull the data from these fields into Director, the fields need instance names in order to get to them using Lingoor ActionScript, for that matter. Like the Dynamic text field, you gave the Input field an instance name as well. Because you'll want to pull the data from these fields into Director, the fields need instance names in order to get to them using Lingoor ActionScript, for that matter.
Making the font two points smaller allows a little more data to be placed into the location and notes fields. Using the Show Border Around Text option not only gives the field a thin black outline, it makes the background of the field white, which is good for a text-entry field.
| 8. | Copy the location field, paste it in place, and then move it down 30 pixels. Repeat this two more times so you end up with four fields to match the four labels.
Because you copied each field, the instance name of each one is location and needs to be changed to reflect which one it is. You'll also want to set the maximum characters for each field and change the notes field to multiline so more than a single line of text can be entered into it.
| 9. | Change the instance name of the new fields to miles, time, and notes respectively, so that the names correspond with the labels.
To finish the input fields all that's needed now is to make the notes field larger. To do that, you'll first need to change the field's text type to multiline.
| 10. | Select the notes field and then use the Properties panel to change the Text Type to Multiline. Next, double-click the field so you can resize it with its handle. Resize it so it takes up the rest of the blue area below it, as shown.
With the input fields in place, you need to still do one final thing. Recall that one reason you're using Flash here is the ease with which you can restrict user input to only those characters you want. For the miles and time fields you don't want people to enter anything but numbers, though you'll also want to allow a period in the miles field to allow for fractional numbers, and also a colon in the time field as a separator. To restrict a field to only certain characters, you set the restrict property of the field to a string of characters to use. To do this you'll need to use a line of ActionScript.
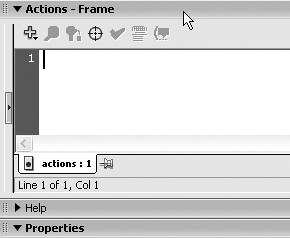
| 11. | Create a new layer and name it actions and then open the Actions panel by clicking its title bar as shown in the image. Enter the two lines of ActionScript code shown.
miles.restrict = "0-9."; time.restrict = "0-9:";
As you might've guessed, you use the instance names you gave the fields in order to target them from ActionScript. Notice that for the miles field you're restricting input to the numbers zero through nine and also the period character. The time field is similar except that in addition to the numbers, you're allowing a colon instead of a period.
Let's do a test to see if the fields are working as expected.
| 12. | Press Ctrl/Command+Enter to test the movie within the Flash player.
With the movie playing, try entering data into the four fields. You should be able to enter anything into the location and notes fields, but the miles and time fields will be restricted.
Next, you'll finish up the dialog by adding buttons to save the data and close the dialog, as well as checkmarks that will let you pick between cycling, running, and walking as the type of exercise.
|
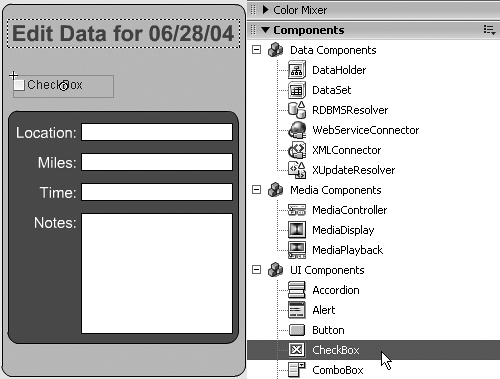
Using Components Components, first introduced in Flash MX, are movie clips that give Flash extra functionality. Components have parameters that you set while authoring, and they feature a programming interface (API) that allows you to modify them through ActionScript. Some of the features provided by components include allowing you to connect to a remote database, providing numeric spinners, showing data grids, tree views, and more. For the dialog box you're creating you'll use three check box components and a couple of button components. Let's begin by creating a new layer to hold the components. As a kind of standard, many developers place the actions layer as either the very top or very bottom layer in the Timeline. Because the actions layer is currently at the top, let's keep it there. 1. | In the Timeline, select the inputs layer, then click the Create New Layer button to create a layer between inputs and actions. Name the new layer components.
Just to keep things organized, you'll place the button and check box components on their own layer.
Tip In Flash you can change the layering order by simply dragging layers into new positions within the Timeline. This is different from Director, where channels are immovable, and you must move sprites to change their layering order. | 2. | Open the Components panel either by clicking its title bar in the right-hand dock or by choosing Window > Development Panels > Components. Next, from within the UI Components section, drag an instance of the Check box component from the panel and drop it under the dialog title, as shown.
When you drop the check box, the Properties panel changes to the Parameters tab to allow you to modify the component settings. If the Properties panel doesn't automatically switch to the Parameters, simply click the tab at the top-right corner of the Properties panel.
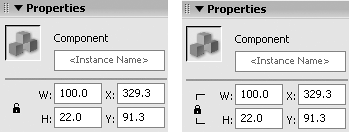
| 3. | Within the Parameters tab, change the check box label to Biking and set selected to True. Next, change the component's width to 65, from the default of 100. Finally, set the component's instance name to biking.
When you change the width to 100, make sure the height of the component remains at 22. If it changes, you just need to click the little lock icon to the left of the height and width settings, in order to unlock the proportion constraint, as shown here.

When you set selected to true, a check appears in the component. Next, you need to copy the component you just created to make two more instances of it.
| 4. | Make sure the Selection tool is active, then select the check box on the Stage. Press Ctr/Command+C to copy it and paste it in place by pressing Ctrl/Command+Shift+V. Next, hold down Shift and press the right arrow eight times to move the copy 80 pixels to the right. Repeat the step with the copy to make a third instance.
With the three check boxes in place, you can modify the labels and instance names of the two new copies in order to allow three different exercise options.
| 5. | Select the middle check box and change its label to Running and then set its selected property to False. Change the instance name to running. Repeat the step with the last check box but change its label to Walking and its instance name to walking. Be sure and set its selected property to False as well.
If you were to test the movie at this point, you'd find that while the check boxes work, they need to be mutually exclusive. Right now you could check all three activities, whereas you should only be able to check one. You can handle this with a little ActionScript code attached to each button. Any time the button is clicked, the code will check to see if the button's selected property is true. If it is, the selected property of the other two check boxes should be set to false.
| 6. | Select the biking check box and open the Actions panel. Enter the following ActionScript.
on (click){ if (this.selected == true){ _root.running.selected = false; _root.walking.selected = false; } }
Now, whenever the component is clicked, the if statement will execute and check to see if the component is selected. In Flash, this refers to the movie clip instance that is executing the script, which in this case is the Biking check box. If the check box's selected property is true (i.e., the box is checked) the selected property of the other two check boxes is set to false, unchecking them.
Note that you must use the _root before the instance name of the check box in order to target the check box. Because each instance of the check box is actually a movie clip, they contain their own independent Timelines and the script is therefore executing in the context of the movie clip's own Timeline. Since the check boxes are located on the main, or root, Timeline, you must precede the instance name with _root.
To get the other check boxes working you can copy and paste the script, and then modify which check boxes get deselected.
| 7. | Select the entire script you just created and press Ctrl/Command+C to copy it. Next, select the Running check box and paste the copied script into the script panel. Modify the two check boxes that get deselected to be biking and walking. The script for the Running check box should look like this:
on (click){ if (this.selected == true){ _root.biking.selected = false; _root.walking.selected = false; } }
You can probably guess what you need to do next: paste the script into the Walking check and modify the deselected instances.
| 8. | Select the Walking check box and again paste the script into the Actions panel for the component. Change the check box instances that get deselected to be biking and running. Select Control > Test Movie to test the movie in the player.
With the code attached to each check box, you can now select only one exercise at a time. But you may have noticed that you also can select something else: no exercise at all! All the script does is see if the current check box is selected and then uncheck the other two if it is. But it doesn't do anything for the case when one check box has been selected, and then clicked again to deselect it. We want the check box to remain selected so that one exercise is picked at all times.
Can you figure out what the code should be to do this? Examine the script attached to the Walking check box. In English it says, "If I'm selected, deselect the others." But it also needs to say, "If I'm not selected, and nothing else is selected, then select me." You can accomplish this by adding another if statement to each of the three scripts.
| 9. | Close the test movie if it's running, then select the Biking check box component. Modify its script to add the new if statement shown on lines six through eight as follows.
1 on (click){ 2 if (this.selected == true){ 3 _root.running.selected = false; 4 _root.walking.selected = false; 5 } 6 if (_root.biking.selected == false && _root.running.selected == false && ¬ _root.walking.selected == false){ 7 this.selected = true; 8 } 9}
The if statement looks to see if all three of the check boxes are deselected and if they are, the one running the script (this) is selected. With the if statement in place you won't be able to deselect the Biking check box unless you click on one of the other exercise checks. Perfect!
To complete the check boxes, copy the if statement that you just added, on lines 6, 7, and 8, then paste it into the same location in the other two scripts.
To complete the dialog box, the only thing left is to add two buttons at the bottom. One to save the data that's been entered, and one to close the dialog.
| 10. | From within the UI Components section of the Components panel, drag an instance of the Button component to the bottom of the dialog as shown. Use the Properties panel to change the width to 60 and the label to Save.
Again, be sure that the proportion constraint is unlocked so that you only affect the width, and not the height.
 To make the Close button, simply copy and paste the save button and change its label. To make the Close button, simply copy and paste the save button and change its label.
| 11. | Select the Save button and then press Ctrl/Command+C to Copy it. Press Ctrl/Command+Shift+V to paste it in place, then move it to the right so it's evenly spaced between the Save button and the edge of the dialog. Change the button's label to Close.
Because this Flash movie will be imported and used as a sprite in Director, the buttons need a way to send information outside of the Flash player to the hosting environment. For this you can use ActionScript's getURL() method. The getURL() method can pass information, normally a URL, to the hosting application. The hosting application will usually be a Web browser, but in this case, it's Director. By writing a corresponding on getURL() event handler in Lingo, you can receive the information sent from Flash.
| 12. | Select the Save button, then enter the following script into the Actions panel for the button.
on (click) { getURL("save"); }
There's no need to send to Director any more than the name of the button that was pressed. Whenever Save is pressed, you'll use Lingo to grab the data out of the fields instead of trying to send it using the getURL() method.
| 13. | Select the Close button and enter the following script:
on (click) { getURL("close"); }
The dialog is now complete and ready for importing into Director.
|
Publishing Like Director, Flash allows you to publish to a number of different formats. However, for this dialog you'll only need to use the standard Flash SWF formatthe same one as that used for Flash on the Web. That's because Director, like your Web browser, uses a plug-in (Xtra) to play Flash assets. 1. | Create a project_two folder on your hard drive and save the Flash file to that folder. Save the movie as input_dialog. Next choose File > Publish Settings from the top menu.
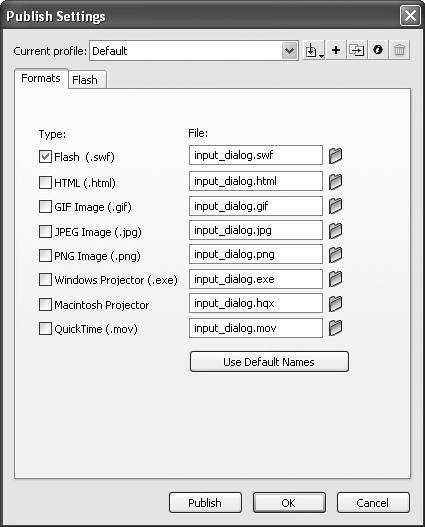
The Formats tab of the Publish Settings dialog lists all the available options for publishing. By default, Flash and HTML will likely be selected, although Flash is the only format you'll need.
| 2. | Unselect the option to save as HTML, then click the Flash tab to bring up the options specific to saving as SWF.
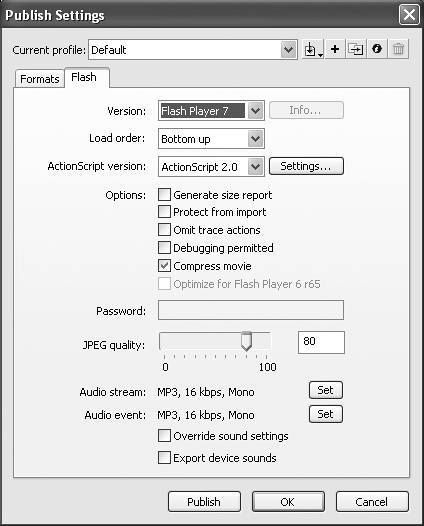
Within the Flash options, be sure to use Flash Player 7 as the version. You can leave all the other settings at their default values.
| 3. | Press the Publish button at the bottom of the dialog.
Although it may go by too fast to see, the Publishing progress bar should appear momentarily while Flash creates the SWF file. Unless you specify otherwise, the file is saved to the same folder where the original file is located, which should be in your project_two folder.
| 4. | Close the Publish Settings dialog by clicking OK, save the Flash movie, then close Flash.
The dialog is now finished and ready for importing and testing within Director.
|
|