| In the last section you did some testing using a Flash-based video, as well as an MPEG-1 video using an Xtra. In this section you'll import a QuickTime movie, compressed with the Sorenson 3 codec, into the portfolio movie, and then learn how to control it with Lingo. Without using an Xtra, QuickTime is probably your best option for the widest range of support, especially if you're developing for cross-platform play. QuickTime is also better suited to multimedia development, than say, AVI, because of its accurate internal timing mechanism. As you will learn as you progress through this section, QuickTime is accurate enough so that you can create your own virtual cue points. Linked Media You learned previously that when cast Members are imported they can either be fully imported or they can remain linked. Video members (except for Flash video) are a little different in that they are never fully imported; they are imported as linked media only. This means that if you use video in your projects you will need to include the video when you create your projector; otherwise it won't be available to the end user. A benefit to keeping the video linked is that it can be modified at any time and simply resaved over the old file. Being linked, the new file will automatically appear in Director. If you're working on a project where other people are involved in creating graphics assets for you, keeping things external can make changes much easier. For example, let's say you're working with a designer who is doing the interface graphics. Being both picky and scatterbrained, the designer makes many changes to the look of the interface over the course of the project's lifetime. By importing the interface graphics as linked members, the designer can change things to his or her heart's content. The new stuff will show up in Director automatically each time the graphics are changed. For better performance you should copy close_call.mov from the Lesson04\media folder on the CD to your local dmx2004_source folder before continuing. 1. | Open your saved copy of portfolio.dir from the dmx2004_source\project_one folder on your hard drive and then import close_call.mov into the internal cast.
Because you'll only be adding a single video to the portfolio, there's no need to create a new cast to hold videos. If you're faced with a dialog asking you whether to import the file using the Mpeg Advance Xtra or QuickTime, choose QuickTime.
Once the video is imported it appears in the cast with a small Q icon, with the top right corner folded over:
Recall that when the member's icon is shown with a folded right corner like this, it means the member is linked to an external file.
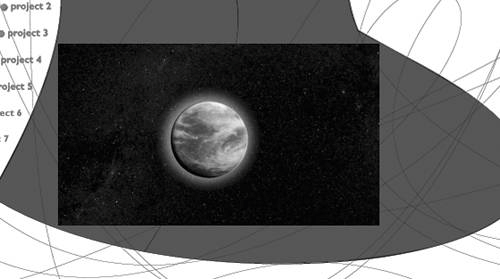
| 2. | In the Score, select frame 50 of channel 4, which should be the first frame in the Project 2 section. Drag the video from the internal cast onto the Stage as shown. Adjust the sprite span so that it spans the entire length of the Project 2 section.
 Notice that even though the new video sprite is in channel 4, behind the curtains, the sprite appears above the curtains, because of its DTS setting. Notice that even though the new video sprite is in channel 4, behind the curtains, the sprite appears above the curtains, because of its DTS setting.
There are a couple of problems here. First of all in the Project 1 section, the art fades in once the ball animates in and the curtains begin to open. Ideally, the video should fade in the same manner and then begin to play once the curtains are open.
As you know you could turn the sprite's DTS property off so that Director would composite it along with the other sprites on the Stage, but that can slow things down. Depending on your circumstances, this might be completely acceptablemaybe you're building a kiosk and the machine has plenty of horsepower. But when you're creating a CD that will go to an unknown audience, you need to plan for the lowest common denominatorand this means not turning DTS off.
The easiest solution, and the one many developers use, is to simply capture an image of the first frame of the video and use that for fading up with. Once the appropriate time is reached, the bitmap sprite's member can be swapped with the video member and told to play with Lingo.
|
Getting Frame 1 There are various ways you could get the first frame of a video as a bitmap, to use in a project. In the case of a 3D animation like you have here, you could simply render out the first frame from the 3D application as a still. If you were creating a video using a package such as Adobe After Effects you could have it save out the first frame for you. But in a case such as this, where you are just given the video, you can use Lingo to capture an image of the Stage and then crop out the section with the video in Fireworks. To do this, you will need to turn the sprite's DTS setting off; otherwise the resulting screen grab will be sans video. 1. | Select the video sprite in channel 4 and then, in the Property inspector's QuickTime tab, turn DTS off as shown here.
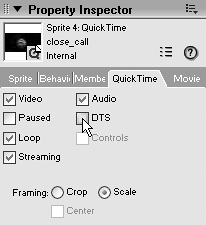
With the sprite's DTS mode turned off, you are almost ready to do the screen grab. But first, you'll want to hide the curtains that are now likely covering the non-DTS video.
| 2. | Turn off channels 6 and 7 (the channels the curtains are in) by clicking the small square channel visibility button to the left of the channel.
You should now have a clear view of the video and can take the screen grab with a couple lines of Lingo executed in the Message window.
| 3. | Open the Message window and enter the following lines of code.
n = new(#bitmap)
As soon as you press Enter you will see a new bitmap member appear in the cast. By assigning the new(#bitmap) to a variable (n) you store a reference to the new bitmap that you can use later. Now enter the next line to capture the Stage's image:
n.image = _movie.stage.image
This time, when you press Enter you will see a thumbnail version of the Stage image appear in the new bitmap member you created. If you double-click the image, in the cast, it will open in the Paint window where you can get a better look at it, and even crop it. However, it's easier to just select it within the cast by clicking it, and then pressing Ctrl/Command+C to copy the bitmap to the computer's clipboard. From there you can paste it into Fireworks and crop it with standard tools.
However, instead of going through the process of cropping the image, you can instead import it from the Lesson04\media folder on the CD. The important thing here was learning how to get the image when you need it.
| 4. | Delete the new bitmap cast member you just created, and then import close_call_frame_one.png from the Lesson04\media folder on the CD, into the internal cast. You should also select the video sprite and use the Property inspector to turn DTS back on.
You can import the image at 32 bits, but after doing so you should select the member, then choose Modify > Transform Bitmap from the top menu and transform the image to 16 bits to save space.
You can now use this bitmap to fade in as the curtains are opening. By doing this, you can retain the performance gain you get by leaving Direct to Stage turned on.
| 5. | Turn on channels 6 and 7 containing the curtains, then drag the first frame of the video sprite in channel 4 ahead in time so that the video doesn't appear until the curtains are open far enough to not touch it.
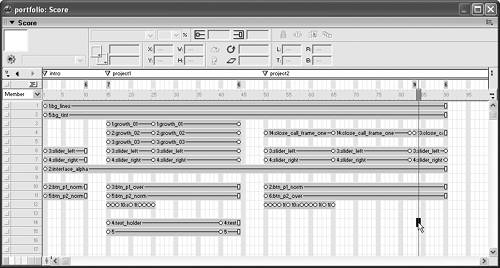
Depending on the length of your ball animation, the exact frame your video begins on may differ, but you should have a Score and a Stage that looks like the following. Note that the curtains are just barely past the video when it appears.
 You can now place the still image of frame 1 so it can fade in. You can now place the still image of frame 1 so it can fade in.
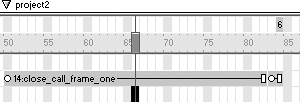
| 6. | Drag the close_call_frame_one member from the cast into the Score, and drop it so that it is in channel 4 and begins at frame 50. Adjust the end frame of the span so that it butts up against the video sprite. Finally, use the Property inspector to position the two sprites in the exact same location on Stage.
The two sprites should now appear like so in the Score:
Your next task is to hide the bitmap as the ball animates in, then fade it in as the curtains open.
| 7. | Select the very first keyframe of the bitmap sprite in channel 4 and, using the Property inspector, set its blend value to 0 percent. Next, Alt/Option-click the keyframe and drag it ahead in time to coincide with the curtains opening.
When you Alt/Option-click and drag a keyframe, you make a copy of the keyframe. This is quicker than making a new keyframe and setting its Blend to 0 percent.
| 8. | Click to select the last frame of the bitmap sprite's span, then choose Insert > Keyframe from the top menu, to turn the frame into a keyframe. Finally, use the Property inspector to change the blend to 100 percent.
With the final keyframe's blend set to 100 percent, the bitmap now fades in as the curtains open, and the video then plays.
You still haven't created a script for the Project 2 button, so when the movie is played you won't be able to use the interface to jump to the video section. Don't worry about that for now. In the next lesson you will modify the current behavior to generalize it, and allow it to be used on both buttons.
For now, you can test the movie by clicking in the Score to advance the playhead.
| 9. | Rewind and play the movie, and then click in the frame bar at frame 50 to jump the playhead to that frame.
The movie continues to play and shows Project 2 as if you had clicked on the button. Of course you could have entered _movie.go("project2") in the Message window to achieve the same result but it's nice to be able to just click in the Score while the movie is playing.
Except for getting the Project 2 button working, the portfolio is coming together nicely, but the video needs a text description like the art in Project 1. For this you will use a cue point, or pseudo cue point, to make the text appear when you want.
You should stop and then save the movie before continuing on.
|
Using Cue Points Cue points in a video or a sound file are very much like markers in Director's Score, in that they allow you to mark a particular point in time. Using various Lingo methods, or the Score's tempo channel, you can wait for cue points before moving on, which allows you to easily synchronize elements of your production. Unfortunately, adding cue points to a video or audio file isn't very straightforward. While many applications support cue points internally, they aren't all compatible with Director, and the job also depends on what platform you're developing on. On Windows, Sonic Foundry's Sound Forge application will let you add cue points (called markers in the application) to both WAV audio files, and AVI video files. Shown here is a WAV file inside Sound Forge with four markers: 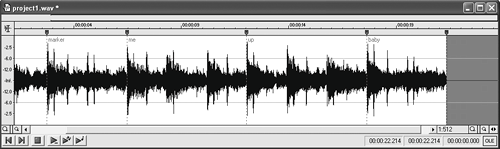 If you're using QuickTime videoas you are in this lessonyou're kind of stuck. There is no way in Windows to add cue points to a MOV. (Well, there is, but it requires spell casting and invocations that are beyond the realm of this book.) One option with QuickTime in Windows is to use the aforementioned Mpeg Advance Xtra, but for this lesson you'll learn to do without it. On the Macintosh, you can add cue points to a QuickTime using QuickTime Pro. You can also use Sound Edit 16, which further gives you the ability to add cue points to AIF files. Without using an Xtra, QuickTime seems to be the clear choice for cue points on both platforms, but not being able to add them in Windows is definitely an issue. Luckily, you can achieve the same results using Lingo to create pseudo cue points. The technique is really quite simple: you get the millisecond timing of the spots you want cue points to be, then you monitor for those times when the movie is played back. Faking It As you did with the MPEG version of the movie, you'll bring the text in at around the 6-second mark, when the meteor just misses the Earth. But because you don't know the exact timing, you'll need a means to get the time as the movie is playing. The simplest way to do that is to just play the video while monitoring its currentTime property with Lingo. 1. | Drag the video from the cast and drop it at frame 100 of channel 2 in the Score.
Using an empty section of the movie is perfect for testing purposes and avoids the need to use a new movie.
| 2. | Drag the loop on frame behavior (member 6 in the internal cast) from the cast to the behavior channel in the Score, where the last frame of the video isit should be frame 129 if you haven't modified the default span length.
When figuring out time within the video, being able to pause and scrub the video, as well as frame-by-frame review, will make your job much easier.
| 3. | Select the video sprite, and turn on Controls in the Property inspector's QuickTime panel.
Note If Controls is not available, it's because DTS is turned off. The last thing to do is add a behavior to the video sprite that traces the currentTime property to the Message window.
| 4. | Right-click the video sprite and select Script from the context menu. Or select the sprite and choose Modify > Sprite > Script from the top menu. Create the following Lingo script:
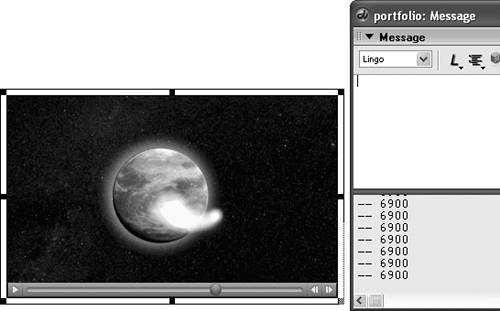
on enterFrame me trace(sprite(me.spriteNum).currentTime) end
Now, every time the playhead enters a frame with this sprite, the sprite's currentTime property will be traced to the Message window. The currentTime property of a sprite, which is only available to digital video sprites, indicates the current time of the video, in milliseconds.
| 5. | Open the Message window and play the movie.
As the movie plays, you see a stream of 0s appear in the Message window. By default, the video is paused at the start, so when the controls are turned on, the currentTime is zero.
| 6. | Press Play on the video's controls and observe the results.
As the video plays, the timing is displayed. Use the controls under the video to find a good spot for the text to appear. You can pause the video, scrub the playhead, and use the Next and Previous Frame buttons to get right to the spot you want. Meanwhile, the currentTime property continues to stream to the Message window.
For this exercise 6900 milliseconds is about right and will have the video looking like so:
 With cue point in hand, you can move on to monitoring for it in the Project 2 section, and making the text appear on cue. Using this technique, you can find as many places in the video as you need cue points. Since you don't actually add a cue point to the video, however, I call this a pseudo cue point. With cue point in hand, you can move on to monitoring for it in the Project 2 section, and making the text appear on cue. Using this technique, you can find as many places in the video as you need cue points. Since you don't actually add a cue point to the video, however, I call this a pseudo cue point.
You can either leave the video in the Score to come back to later, or delete it. It really doesn't matter because the Project 2 section pauses the playback head so the video will never be seen by anyone but you, the developer.
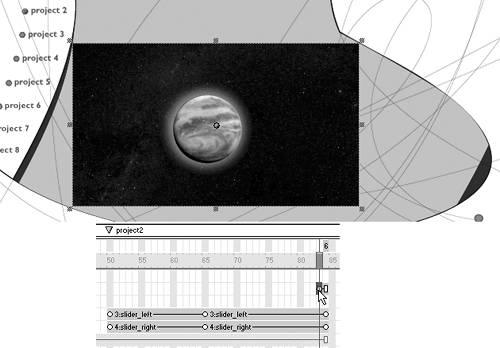
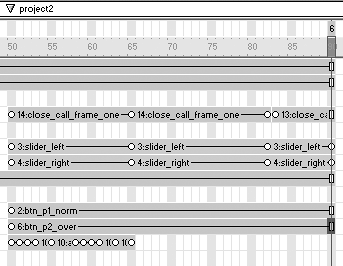
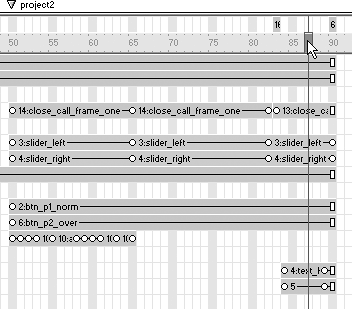
Depending on how many frames the video sprite in Project 2 is taking up, you will want to add a few frames to it to make it easier to work with. You also need to turn the video's controller option off. Because it is a member property, not a sprite property, the controller will be visible anywhere the video member is used.
| 7. | Select the video sprite and, using the Property inspector, turn off the Controls setting. Make sure DTS is enabled. Next, modify the sprite spans in the Project 2 section so that the video sprite in channel 4 has at least five frames.
When modifying the spans for the curtains in channels 6 and 7, remember to Alt/Option-click the last keyframe in order to copy it. You don't want to simply move it, or the curtains won't open fast enough. Be sure to move the behavior in the behavior channel over as well, so that it corresponds to the last frame of the section.
When you're finished, your score should look like the following:
Next, you need to add a behavior that will monitor the currentTime property of the video sprite in channel 4, and display the text when the 6900 millisecond mark has been reached.
| 8. | Double-click in the behavior channel at the frame corresponding to the first frame of the video. In the previous image it would be frame 83, though your Score may be slightly different. In the resulting script window, create the following script:
on exitFrame me if sprite("video").currentTime < 6900 then _movie.go(_movie.frame) end if end
Can you tell what this script will do when it's run? The playhead will loop on the frame as long as the currentTime property of sprite("video") is less than 6900. As soon as the time is greater than 6900 the condition will fail and the playhead will advance.
You might have noticed that you used the syntax sprite("video"). New to Director MX 2004 is the ability to use named sprites. Up until now you've used hard-coded references based on the sprite's channel number. But when you use channel references you'll get an error if the sprite is moved to a new channel. By naming sprites you can move them to any channel you like and the script will still work.
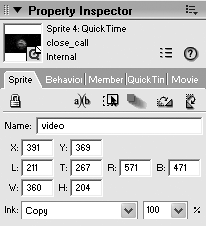
| 9. | Select the video sprite in the Score, and then use the Property inspector to change the sprite's name to video, as shown here:
You're almost done! The last thing you need to do is add the text description that will appear when the playhead advances past the script checking for the pseudo cue point at 6900 ms.
| 10. | Select the text sprite and its background in channels 14 and 15 from Project 1, then copy them by pressing Ctrl/Command+C.
You want to paste these two sprites into the Score at the next frame after the script you created to monitor for the cue point. That way, as soon as the playhead advances past that frame (83 in the example given), the text should appear.
| 11. | In channel 14, select the next frame past the cue point monitoring script, and paste in the two sprites you copied.
The sprites should be pasted into the frame selected in the following image:
 Don't worry that you're using the same text as in the Project 1 section. You'll remedy that in a moment using the cast member exchange option. Don't worry that you're using the same text as in the Project 1 section. You'll remedy that in a moment using the cast member exchange option.
| 12. | With both sprites still selected, click in the frame bar at the last frame in the Project 2 section to move the playhead to that frame without deselecting the sprites. Then press Ctrl/Command+B to trim the sprites to the end of the section.
When you trim the sprites, the keyframes move to keep their relative positions in the span. The background and text will now fade inalthough a bit quicklywhen the cue point is reached.
To make the text fade in slower, you can insert some frames between the first and second keyframes of the new sprites. Although you could do it manually, Director offers a much easier way.
| 13. | Click in the frame bar of the Score to position the playhead between the first and second keyframes of the new sprites as shown here:
It doesn't actually matter where between the keyframes you put the playhead, just so as you're not on a frame containing a keyframe.
| 14. | Press Ctrl/Command+] to insert a new frame.
Everything to the right of the playhead advances a frame when you press the key combination. Adding about 14 more frames will slow the fade to the correct speed. You could press the key combination 14 more times, or you could use another shortcut.
| 15. | Press Ctrl/Command+Shift+] to open the Insert Frames dialog box. Enter 14 into the field and press OK.
The new frames are instantly added, and the text and its background now fade in nice and slow.
Tip You can also press Ctrl/Command+[ or Ctrl/Command+Shift+[ to delete a frame or multiple frames. The final thing to do now is to create the text for the video, and then exchange it with the current text being displayed.
| 16. | In the art cast, single-click to select the text member (it should be member 5) and then copy it. Next, click to select the next empty member and paste in the one you have copied. Double-click the new duplicate member to edit it and change the text as follows:
Title: Close Call
Year: 2004
A 3D animation
created to help me
better understand
3D principles
| 17. | Close the Text window, then click in the Score to select the text of the Project 2 section; it should be the sprite in channel 15. Next, click to select the new text member in the Art cast and then press Ctrl/Command+E to do an exchange.
As soon as you press the key combination you'll see the new text appear on Stage. Director's exchange function can be a real time-saver.
| 18. | Click in the frame bar of the Score at frame 50 and play the movie, and observe the results.
Basically, everything works great except for one problem. As the background of the text fades in, you might notice an undesirable flicker of white in the upper right corner of the video. Even though the video is set to Direct to Stage, the fade is competing with the video for the same screen space and causing the flicker. The only real remedy to this is to have the sprite causing the flicker not fade while the video is playing.
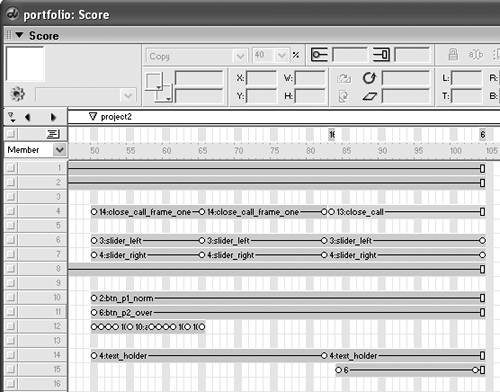
| 19. | Stop the movie and then drag the first frame of the text background sprite in channel 14 to frame 50the beginning of the Project 2 section. Then drag the second keyframe in the sprite so that it matches the keyframe where the curtains finish animating, which should be frame 82.
Your Score for the Project 2 section, with the text and its background in place, should look like this:
 If you play the movie from frame 50 again, you will notice that the flicker is gone. If you play the movie from frame 50 again, you will notice that the flicker is gone.
Before taking a look at the new DVD capabilities you should create some buttons that will allow the user to control the video. Simple play, pause and stop buttons are really all that are needed and will go a long way to making the video feel interactive.
|
Adding Simple Playback Controls In this section you'll add control buttons to the video to enable the end user to interact with it. You'll need some buttons to work with, and they have been provided on the enclosed CD-ROM. 1. | Import the button images into the buttons cast. The images you want to import are all PNG files and named: btn_play, btn_play_hi, btn_pause, btn_pause_hi, btn_stop and btn_stop_hi.
The images all contain alpha channels, so be sure to import them at 32 bits. Otherwise, you'll see little white corners on each one.
| 2. | Click to select frame 83 of channel 17 in the Score. Frame 83 should be the first frame of the video in channel 3. Next drag the Play, Pause, and Stop buttons onto the Stage so they occupy channels 17, 18, and 19 respectively.
You can place the buttons anywhere, but keeping them together and close to the video will reinforce the idea that they go with the video.
I chose to place them underneath and to the right, as shown here:
You'll be creating a more advanced button behavior in the next lesson, so don't worry about the rollover states for these new buttons. Instead, you'll write the Lingo necessary to make them work with the video.
| 3. | Right-click the Play button, and select Script from the context menu. Or select Modify > Sprite > Script from the top menu. In the script window, modify the mouseUp handler to add a new line:
on mouseUp me sprite("video").movieRate = 1 end
The movieRate property for a digital video sprite can be used to play the video at normal speed with a setting of 1. By setting the movieRate to 2, the video will play at twice the normal speed. You can even set the movieRate to -1, or -2, to cause the movie to play backwards at normal or twice normal speed.
| 4. | Right-click the Pause button, select Script from the context menu and modify the mouseUp handler to look like so:
on mouseUp me sprite("video").movieRate = 0 end
By setting the movieRate property to 0, you stop the movie right where it is. Now, you need only finish up with the Stop button.
| 5. | Right-click the Stop button, select Script from the context menu, and modify the mouseUp handler as follows:
on mouseUp me sprite("video").movieRate = 0 sprite("video").currentTime = 0 end
For the Stop button, you must set two properties. If you had only set the currentTime to 0, for instance, the movie would jump to the first frame, but then continue to play. By setting both the movieRate and the currentTime to 0, the movie rewinds to the beginning, and also stops where it is.
Before moving on, you should take note of something. After you imported the button graphics for the video, you probably left the buttons cast active. When you then created the three behaviors for the buttons, the scripts were created in the active cast, which was the buttons cast. You can either move them to the internal cast, or leave them where they are. Just be aware that new members get created in whatever cast is active.
Be sure and save the portfolio movie before continuing.
|
|