| Guaranteeing your video will play back on all systems is a hurdle every developer faces. If your project is intended only for the Windows platform then you're pretty safe using Windows Media formats such as WMV and WMA. Because the playback engine for Windows is built into the operating system, only in rare cases will the video not be viewable. If, on the other hand, you're playing back only on the Macintosh, then using QuickTime will nearly guarantee the video will be viewable. As is the case with Windows, some over-zealous network administrator could uninstall the components necessary to view video. Luckily, there are still a couple of ways to guarantee the video will be seen. Using Flash Video Macromedia Flash, starting with MX and continuing into MX 2004, can import video and compress it into its native FLV format. The compression used by Flash is a special version of Sorenson, named Sorenson Spark, geared to Web playback, which produces high-quality video at fairly high compression rates. What does this mean for you? Because Director can use Flash assets (.swf files), you can play the Flash compressed video inside Director without worrying about the end user needing to do anything. In fact, because the imported Flash asset becomes a sprite, it can be animated on the Stage like any other spriteeven while the video is playing! Another nice thing about using Flash video that differs from using other video formats is that Flash assets can be fully imported into a cast, whereas other supported formats remain linked. Being able to import the video fully means that an end user viewing your project can't go and view the externally linked video files on the CD. Suppose you have created a game that contains a lot of video sequences, and you don't want people to view those sequences out of order, because that would give away key game information. By using Flash, the video can be imported completely, which prevents anyone from seeing your video differently than you intended. As an example, let's take a quick look at using a Flash video sprite. 1. | Within Director select File > New > Movie from the top menu. If prompted to save the portfolio movie, make sure to answer yes. Then, use the Property inspector to select a 640 x 480 Stage size, and a black background.
Because you'll be importing and using a QuickTime video in the portfolio later in this lesson, you can use a new movie for testing now.
| 2. | Import close_call.swf into the internal cast, from the Lesson04\media folder on the included CD.
Note The animation was created in 3ds max and exported to an uncompressed AVI file. The AVI file weighed in at over 85 MB in its uncompressed form. After importing into Flash MX 2004 and being compressed to its FLV format, the video was reduced to a mere 230 K. With the Flash imported, you can click on the cast member to get information about it within the Property inspector. As you can see from the following, the Flash movie is set to play at 15 fps, and is 150 frames long.
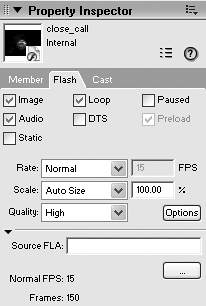
It should be noted that the Options button opens a dialog box allowing you to modify the Flash asset options. The options are nearly identical to what's available in the Property inspector, but the Options dialog lets you play the Flash in a small thumbnail view.
| 3. | Drag the Flash member from the cast to the upper left corner of the Stage.
The sprite appears in the score, spanning frames 1 to 30, even though the Flash movie itself is 150 frames.
| 4. | Make sure that loop playback is on (Control > Loop Playback on the top menu), then play the movie and observe Director's playhead.
As the Flash sprite plays through its 150-frame sequence, Director loops over and over across the 30-frame span. Note that while the Flash sprite is playing at 15 frames per second, Director is likely playing at its default of 30 frames per second. This is because the Rate option within the Flash tab of the Property inspector is set to Normal.
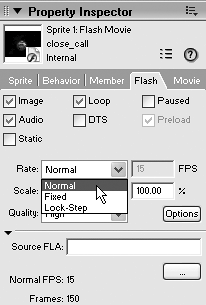
The Normal setting tells the Flash movie to play as close as it can to the speed at which it was authored. The Fixed option forces Flash to play at the specified frame rate, regardless of the frame rate it was authored at. Choosing Lock-Step forces the Flash movie to play at the speed of the Director movie.
| 5. | Choose Lock-Step from the Rate menu, then rewind and play the movie.
Because Director is defaulted to 30 fps, the Flash video now plays at double its intended speed.
| 6. | Stop the movie and set the Flash sprite's rate back to the Normal setting.
Now, let's see how the video performs while the sprite is animated across the Stage.
| 7. | Select just frame 30 of the span, in the Score, and choose Insert > Keyframe from the top menu. Then click and drag the video sprite on the Stage to the lower right corner.
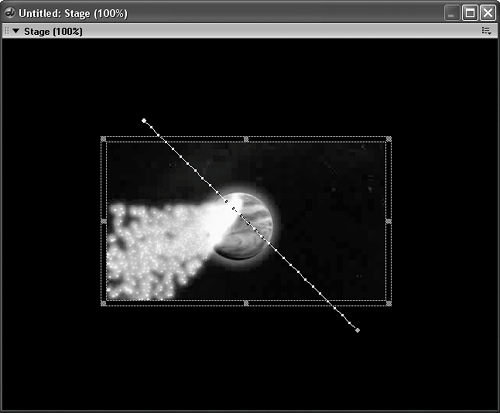
The sprite now moves from upper left to lower right over the course of 30 framesor 1 second at the default tempo of 30 fps. With the sprite selected at frame 15, your Stage should look like this:
 | 8. | Rewind and play the movie and observe the results.
The sprite moves quite quickly from corner to corner and its speed should probably be adjusted. To have the sprite move over the course of one loop of the animation you can set Director's tempo to 15 fps to match that of the video, and then drag the final keyframe of the sprite out to frame 150 from frame 30, where it is now.
| 9. | Stop the movie, then double-click in the Tempo channel at frame 1 to set the tempo to 15 fps. Next, drag the final keyframe of the video sprite out to frame 150. Rewind and play the movie.
As expected, the sprite now moves from corner to corner as the video plays one loop. Stop the movie before continuing.
Tip Because the length of the sprite span is longer than the number of frames displayed in the Score, you can use the Center Current Frame button at the lower left of the Score panel to center the playhead in the Score, regardless of where it is. This works while the movie is playing. 
Before moving on to the next section, let's look at one more cool thing about Flash video sprites that other types of video have a tough time with: transparency.
| 10. | Click the video sprite to select it and then, using the Property inspector, change the sprite's ink type to Background Transparent and its Blend setting to 50 percent.
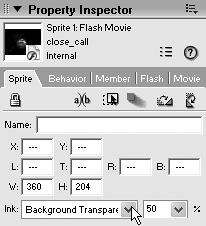
The video becomes noticeably darker, as it is now 50 percent transparent and the black background behind it is showing through. Experiment with changing the movie's background to other colors besides black to see how it affects the video. Note that changing the background color won't have any effect here.
Let's look now at another nearly foolproof method of displaying video: MPEG.
|
Using MPEG MPEG stands for Moving Picture Experts Group. A standard created in 1988, it has become the most ubiquitous video and audio format in use today. Currently there are three popular MPEG video formats, and one MPEG audio format. The video formats are MPEG-1, MPEG-2, and MPEG-4. MPEG-1 Layer 3 is the current rage in personal audio; you know it as MP3. MPEG-1 is the standard on which the video CD (VCD) is based, and is also the most popular MPEG format for computer-based audio and video playback. MPEG-2 is the standard on which DVD as well as digital set-top boxes like Tivo are based. MPEG-2 isn't commonly used on computers because of its high quality and large sizes. MPEG-4 is a standard created for the Web and made to produce very small files with minimal loss in quality. Currently, the very popular DivX codec produces files in the MPEG-4 format. The popular MPEG-1 format can be played in Director using QuickTime or using Windows Media, though you will still run into the aforementioned problems. A better solution is the Mpeg Advance Xtra developed by Tabuleiro software. This is a third-party plug-in that needs to be purchased separately, but it works so well for playing back MPEG-1 video that it really deserves mention. Since the Xtra is cross platform and works with pre-installed system components, it can be relied on to provide video playback on virtually any machine that Director movies will play on. Another great feature of the Xtra is that it allows you to add cue points to your video. Cue points are like markers in the score and allow easy synchronization of the video to external events. For example, you might use a cue point to show an image of Mars as a talking head video describes the solar system. You'll learn more about using cue points later in the lesson. Included on the CD for this book is a demo version of the Mpeg Advance Xtra for Windows, Mac OSX, and Mac Classic, as well as a sample MPEG-1 file that you'll use to test the Xtra. The first thing you'll need to do is install the Xtra for your platform. 1. | Shut down Director, then launch the appropriate Xtra installer for your platform from the Lesson04\xtras folder on the included CD. Install the Xtra and its files to the Director MX 2004\Configuration\Xtras folder in Windows and to Macintosh HD:Applications:Macromedia Director MX 2004:Configuration:Xtras on the Mac.
Xtra extensions are loaded from the XTRas folder on launch, which is why you needed to first shut Director down before installing. Once the Xtra is installed you should copy the close_call.mpg file from the Lesson04\media folder on the CD into the dmx2004_source folder you created on your hard drive in Lesson 2. You don't necessarily have to copy the file from the CD but it's a 5 MB file, so it will perform better if it's played from the hard drive.
| 2. | Launch Director and select Insert > Tabuleiro Xtras > Mpeg Advance Xtra from the top menu.
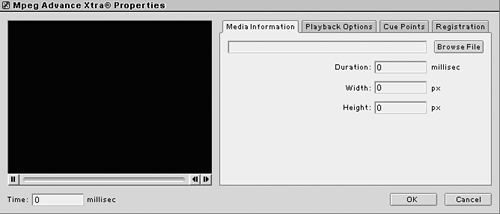 The Xtra's dialog box appears allowing you to configure the path to the video, along with adding cue points and other options. The Xtra's dialog box appears allowing you to configure the path to the video, along with adding cue points and other options.
| 3. | Click the Browse File button, then choose the close_call.mpg file from the dmx2004_source folder on your hard drive.
Once selected, the video appears in the preview window and can be played and stepped through frame by frame, with the controls underneath it.
| 4. | Click the Cue Points tab and then drag the preview slider to a time of approximately 6600 milliseconds.
Although you're just testing out the Xtra and adding one cue point, you could add as many as necessary to facilitate synchronizing your elements.
| 5. | Click the Add button and in the Add Cuepoint dialog that appears give the new cue point the name close call.

Once you click OK the new cue point appears in the list of cue points. If you play the video or scrub it to a new location you can click the Go To button to jump to any selected cue point in the list.
| 6. | Click the OK button at the bottom the Mpeg Advance dialog to close the dialog.
If you get an alert regarding using the demo version of the Xtra, simply dismiss it to continue.
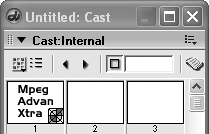
In the cast, the new media type appears:

If you double-click the new cast member, the Mpeg Advance Xtra's dialog will open, allowing you to do more configuration, including editing cue points.
| 7. | Drag the new member from the cast to the Stage and drop it. Press Play to preview the video.
As expected, the video plays, but stops at the end instead of looping.
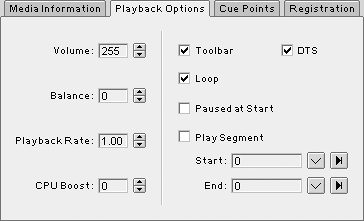
| 8. | Stop the movie, then double-click the sprite, on the Stage, to open the Xtra's dialog box. Click the Playback Options tab, turn Loop and Toolbar on, then close the dialog.

Now when the movie is played, the video sprite features a toolbar allowing the video to be scrubbed, paused, and stepped through frame by frame. You can't change the look of this toolbar, but it can still be quite useful. It should be mentioned that you could create your own custom toolbar using Lingo to control the video. The Xtra comes with a complete Help system detailing the Lingo it supports.
Now, let's look at using a bit of Lingo to take advantage of the cue point that you added.
| 9. | Stop the movie if it's playing, select the video sprite, and choose Modify > Sprite > Script from the top menu. Alternatively, right-click the sprite and select Script from the contextual menu.
As it did previouslyand as it will do every time you add a behavior to a spriteDirector defaults to placing the on mouseUp handler in the script. But what you want to do is replace the mouseUp handler with what's known as a callback handler. This is a handler that is called by the Xtra when a particular event occursin this case whenever a cue point in the video is passed.
| 10. | Delete the default mouseUp handler and add the following script:
on cuePassed me, whichChannel, cuePointNumber, cuePointName trace(whichChannel, cuePointNumber, cuePointName) end
Whenever a cue point is encountered and passed, the Xtra calls the cuePassed handler, if it exists, and sends it information about the cue point. For testing, you can output the information to the Message window using Lingo's trace() method, to see what's being passed in.
Note Many Xtra extensions make use of callback functions as a standard means of returning information to the application when events occur. This is in contrast to having to monitor for the event to occur yourself, as you would have to do without using a callback. | 11. | Open the Message window, then rewind and play the movie.
After a little bit of time, about 6.6 seconds if you're paying attention, you'll see:
--1 1 "close call"
This is the information received from the Xtra about the cue point that was passed. The video in channel 1 passed the first cue point, which was named "close call."
Using a little bit of Lingo logic, you can test to see which of your cue points has been passed, and react appropriately.
| 12. | Stop the movie, then adjust the video sprite's span so that it spans frames 1 through 25.Double-click the behavior channel at frame 10 and create a standard hold on the current frame behavior, which will pause the playhead by continuously sending it to the frame it's on:
on exitFrame me _movie.go(_movie.frame) end
To test the cue point we'll hold at frame 10, and then continue once it's passed.
| 13. | Copy the frame behavior at frame 10 and paste it into frame 25. Next, create a marker named "test" at frame 15.
Your score should now look like so:

You want to modify the behavior on the sprite now, so that it reacts when the particular "close call" cue point is reached.
| 14. | Open the sprite's behavior and modify the on cuePassed handler so that it appears like so:
on cuePassed me, whichChannel, cuePointNumber, cuePointName if cuePointName = "close call" then go "test" end
Now, if the cue point's name is close call the playhead will jump to the test marker. If not, nothing will happen.
| 15. | Click to select frame 15 of channel 2, in the Score, then select the Text tool from the Tool Palette. Draw out a text area on Stage and then enter some text such as "Whoa, was that close!"
It doesn't matter what text you enter as this is just for testing purposes. You could even place a shape or two on the screen to serve the same purpose. This exercise is just to see how to react to cue points using Lingo.
| 16. | Rewind and play the movie and observe the results.
The movie plays and sits at frame 10 until the cue point is passed, at which point it jumps to the test marker and displays the text. In this manner you can synchronize your video with additional elements very easily.
One thing you should note is the placement of your text. If you tried to place the text over the video you probably noticed that it didn't work too well. This is due to the DTS setting within the Playback Options for the video. DTS means Direct To Stage and is a property that all video sprites share. When DTS is enabledand it is by defaultthe video will appear above all other sprites, regardless of what channel it's in. This can improve playback performance, but it also removes the sprite from Director's compositing buffer, thereby disabling any ink or transparency effects you could otherwise use. By turning off DTS you can force the video to be composited along with other sprites, but the video's performance may suffer. It's really a matter of the machine you're running on, the codec used, and other factors. You'll just have to see how it works for your particular project.
If you'd like to learn more about the Mpeg Advance Xtra, I suggest using the excellent Help system installed with the demo version. You may also want to visit www.xtras.tabuleiro.com for more information.
It's time now to get back to the portfolio, where you will import and use a QuickTime video.
|
|


 The Xtra's dialog box appears allowing you to configure the path to the video, along with adding cue points and other options.
