Tracking Actual and Remaining Values for Tasks and Assignments
If you completed Chapter 6, “Tracking Progress on Tasks,” you entered actual start, finish, and duration values for individual tasks. For tasks that have resources assigned to them, you can enter actual and remaining work values for the task as a whole or for specific assignments to that task. To help you understand how Project handles the actual values you enter, consider the following:
-
If a task has a single resource assigned to it, the actual work values you enter for the task or the assignment apply equally to both the task and the resource. For example, if you record that the assignment started on March 21 and has five hours of actual work, those values apply to the task as well.
-
If a task has multiple resources assigned to it, the actual work values you enter for the task are distributed among or rolled down to the assignments according to their assignment units. This level of detail is appropriate if you aren’t concerned about the details at the individual assignment level.
-
If a task has multiple resources assigned to it, the actual work values you enter for one assignment are rolled up to the task, but don’t affect the other assignments to the task. This level of detail is appropriate if details at the individual assignment level are important to you.
In this exercise, you record task-level and assignment-level actuals and see how the information is rolled up or down between tasks and assignments.
OPEN: Short Film Project 14b from the \My Documents\Microsoft Press\Project 2003 Step by Step\ Chapter 14 Advanced Tracking folder. You can also access the practice files for this book by clicking Start, All Programs, Microsoft Press, Project 2003 Step by Step, and then selecting the chapter folder of the file you want to open.
-
On the File menu, click Save As.
The Save As dialog box appears.
-
In the File name box, type Short Film Project 14 Actuals, and then click the Save button.
This version of the project plan includes the updated baseline values you previously saved, as well as the first actuals reported against the first pre-production task.
-
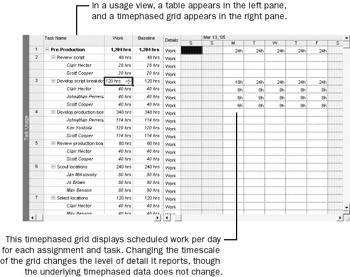
On the View menu, click Task Usage.
The Task Usage view appears. This usage view lists resources under the tasks to which they’re assigned in a table on the left side of the view. On the right side of the view, you see rows organized under a timescale. The rows next to each task name show you the scheduled work values for the task. The rows next to the resource names show you the scheduled work values for each resource—in other words, the scheduled work per assignment. These are the timephased values of the assignments. The two sides of the view are split by a vertical divider bar.
-
In the Task Name column, click the name of task 3, Develop script breakdown and schedule.
-
On the Standard toolbar, click the Go To Selected Task button.
The timephased grid on the right side of the view scrolls to display the first scheduled work for the task.
Next you’ll switch the table and details shown in the view.
-
On the View menu, point to Table: Usage, and then click Work.
The Work table appears. Your screen should look similar to the following illustration:
This table includes the Actual Work and Remaining Work columns you will work with shortly, though they might not yet be visible. The values in the Work column are the task and assignment totals for scheduled work. Note that each task’s work value is the sum of its assignment work values. For example, the work total for task 2, 48 hours, is the sum of Clair Hector’s 28 hours of work on the task and Scott Cooper’s 20 hours.
Next you’ll change the details shown on the timephased grid on the right side of the view.
-
On the Format menu, point to Details, and then click Actual Work.
For each task and assignment, Project displays the Work and Actual Work rows on the timephased grid on the right side of the view. Your screen should look similar to the following illustration:
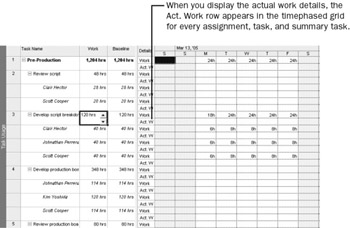
In the timephased grid, you see the scheduled work values per day. If you were to add up the daily work values for a specific task or assignment, the total would equal the value in the Work column for that task or assignment. In a usage view, you see work values at two different levels of detail: the total value for a task or assignment and the more detailed timephased level. These two sets of values are directly related.
Next you’ll enter task-level and assignment-level actual work values and see how they are reflected in the timephased details.
-
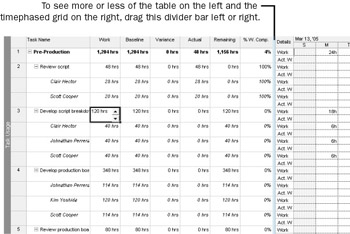
Using the mouse, drag the vertical divider bar to the right until you can see all the columns in the Work table.
Tip When the mouse pointer is in the right position to drag the vertical divider bar, it changes to a two-headed arrow that points left and right.
Your screen should look similar to this illustration:
-
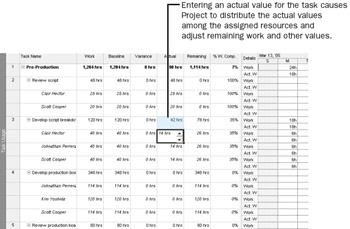
In the Actual column for task 3, Develop script breakdown and schedule, type or click 42h, and then press [Enter].
Your screen should look similar to the following illustration:
Several important things happened when you pressed [Enter].
-
The amount of actual work you entered was subtracted from the Remaining column.
-
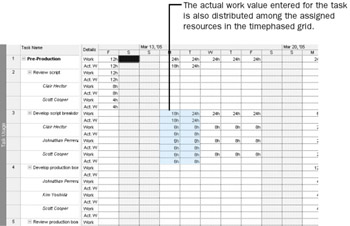
The actual work was distributed to the three assignments on the task, resulting in 14 hours of actual work being recorded for each resource. Likewise, the updated remaining work value was recalculated for each assignment.
-
The updated actual and remaining work values were rolled up to the pre- production summary task.
-
The actual work values were also redistributed to the task and assignment timephased values.
Next you’ll take a closer look at the actual work values.
-
-
Drag the vertical divider bar to the left until you see just the Task Name column in the Work table.
Your screen should look similar to the following illustration:
In the timephased grid side of the view, you can see the daily scheduled work and actual work values for the three resources on Monday and Tuesday, March 14 and 15. Because you entered an actual work value for the entire task, Project assumes that the work was done as scheduled (six hours of scheduled work per resource on Monday and eight hours on Tuesday) and records these timephased values for the resources.
To conclude this exercise, you will enter assignment work values and see the effect on the task.
-
Drag the vertical divider bar back to the right until you see all the columns in the Work table.
-
In the Actual column for Clair Hector’s assignment to task 3, type or click 30h, and then press [Enter].
Your screen should look similar to this illustration:
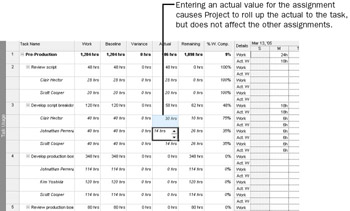
Clair Hector’s actual and remaining work values are updated, and those updates also roll up to the task and its summary task. However, the actual and remaining work values for the other two resources assigned to the task are not affected.
-
Drag the vertical divider bar back to the left to see the updated timephased values for the task.
Your screen should look similar to the following illustration:
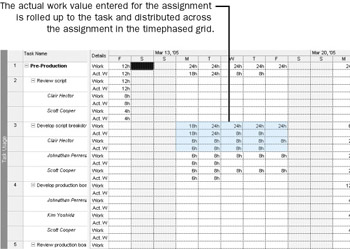
Again Project assumes that the actual work value you entered for Clair was completed as scheduled, so her work and actual work timephased values match through Thursday, March 17.
-
On the Standard toolbar, click the Save button.
-
On the File menu, click Close to close the project plan.
| Note | In this exercise, you’re entering actual work values but you can also enter remaining work values or percentage of work complete. All these values are related to each other—a change to one affects the others. You can update these values in the Work table or on the Tracking tab of the Assignment Information dialog box (when an assignment is selected). |
Tracking a task’s actual work complete value is more detailed than entering a simple percentage complete on a task. However, neither method is as detailed as entering timephased actual work for tasks or assignments (as you will see in the next section). There’s nothing wrong with tracking actual work at the task or assignment level (or just entering a percentage complete, for that matter) if that level of detail meets your needs. In fact, whether you see the timephased details or not, Project always distributes any percentage complete or task-level or assignment-level actual work value you enter into corresponding timephased values, as you saw earlier. This is one reason why new Project users sometimes are surprised to encounter extremely detailed timephased values, such as 1.67 hours of work, scheduled for a day. If you generally understand the math Project is following, however, you can figure out where such numbers come from. On the other hand, you might not care about this level of scheduling detail—and that’s OK too.
Whenever you’ve entered actual work values in this chapter, Project has calculated actual cost values for the affected task, its summary task, the resources assigned to the task, and the entire project. By default, Project calculates actual costs and doesn’t allow you to enter them directly. In most cases this is what we recommend, and what the practice files used in this book do. However if you want to enter actual cost values yourself in your own project plans, follow these steps:
-
On the Tools menu, click the Options command.
The Options dialog box appears.
-
Click the Calculation tab.
-
Under the Calculation options for ‘Short Film Project 14 Actuals’ label, clear the Actual costs are always calculated by Microsoft Office Project check box.
-
Click OK.
After automatic cost calculation is turned off, you can enter or import task-level or assignment-level actual costs in the Actual field. This field is available in several locations, such as the Cost table. You can also enter actual cost values daily or at another interval in any timescale view, such as the Task Usage or the Resource Usage view. On the Format menu, point to the Details command, and then click Actual Cost.
EAN: 2147483647
Pages: 199