Entering a Task s Completion Percentage
Entering a Task’s Completion Percentage
After work has begun on a task, you can quickly record progress on it as a percentage. When you enter a completion percentage other than 0, Project changes the task’s actual start date to match its scheduled start date. It then calculates actual duration, remaining duration, actual costs, and other values, based on the percentage you enter. For example, if you specify that a four-day task is 50 percent complete, Project calculates that it has had two days of actual duration and has two days of remaining duration.
Here are some ways of entering completion percentages:
-
Use the Tracking toolbar (on the View menu, point to Toolbars, and then click Tracking). This toolbar contains buttons for quickly recording that a task is 0, 25, 50, 75, or 100 percent complete.
-
Enter any percentage value you want in the Update Tasks dialog box (on the Tools menu, point to Tracking, and then click Update Tasks).
-
Use the Project Guide (as you will do in this exercise).
In this exercise, you record completion percentages of tasks via the Project Guide.
-
On the Project Guide toolbar, click the Track button.
The Track pane appears.
-
In the Track pane, click the Prepare to track the progress of your project link.
-
If you have Project Professional, you’ll see an additional pane that relates to using Project Server to collect actuals from resources. In the step 1 pane, click No, and then click Save and go to Step 2. If you have Project Standard, you won’t see this pane.
-
In the Setup Tracking pane, select the Always track by entering the Percent of Work Complete option, and then click the Done link (in Project Standard) or the Save and Finish link (in Project Professional) at the bottom of the Setup Tracking pane.
Project updates the Project Guide: Custom Tracking view to the right. In the % Work Complete column in the Custom Tracking view, you will enter the completion percentage of the next few tasks.
-
In the Track pane, click the Incorporate progress information into the project link.
The Incorporate Progress pane appears. Here you can set the status date. In this chapter, you won’t change the status date directly. The status date and other calculation options can help you control how Project schedules actual and remaining work. You will work with the status date in Part 2.
-
In the % Work Complete field for task 4, type or select 100, and then press [Enter]
Project records the actual work for the task as scheduled and extends a progress bar through the length of the Gantt bar. Next you’ll get a better look at the task’s Gantt bar.
-
On the Standard toolbar, click the Go To Selected Task button.
Your screen should look similar to the following illustration:
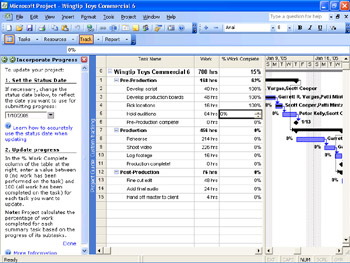
Next you will enter a completion percentage value for a different task.
-
In the % Work Complete field for task 5, type or select 50, and then press [Enter].
Project records the actual work for the task as scheduled, and then it draws a progress bar through 50 percent of the Gantt bar.
-
In the chart portion (on the right) in the Gantt Chart view, hold the mouse pointer over the progress bar in task 5’s Gantt bar.
Your screen should look similar to the following illustration:
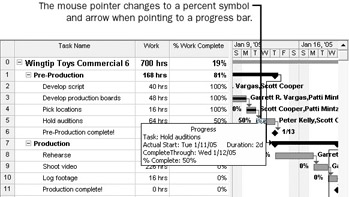
The ScreenTip tells you the task’s completion percentage and other tracking values.
-
At the bottom of the Incorporate Progress pane, click the Done link.
So far, you have recorded actual work that started and finished on schedule. While this might prove true for some tasks, often you need to record actuals for tasks that lasted longer or shorter than planned. This is the subject of the next topic.
EAN: 2147483647
Pages: 199