Flylib.com

Books Software


Tracking a Project as Scheduled


Tracking a Project as Scheduled

The simplest approach to tracking progress is to report that the actual work is proceeding exactly as planned. For example, if the first month of a five-month project has elapsed and all of its tasks have started and finished as scheduled, you can quickly record this in the Update Project dialog box.

In the TV commercial project, suppose that some time has now passed since saving the baseline. Work has started, and so far, so good. In this exercise, you record project actuals by updating work to the current date.

  1. On the View menu, click Gantt Chart .

    The Gantt Chart view appears.

  2. On the Tools menu, point to Tracking , and click Update Project .

    The Update Project dialog box appears.

  3. Make sure the Update work as complete through option is selected. In the adjacent date list, type or select 1/10/05 , and click the OK button, as shown next :

    click to expand

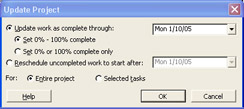
    Tip 

    You can also click the down arrow in the Update work as complete through box, and in the calendar that appears, select January 10, 2005 .

    Project records the completion percentage for the tasks that were scheduled to start before January 10. Then it displays that progress by drawing progress bars in the Gantt bars for those tasks. Your screen should look similar to the following illustration:

    click to expand

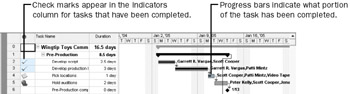
    In the Gantt Chart view, the progress bar shows how much of each task has been completed. Because tasks 2 and 3 have been completed, a check mark appears in the Indicators column for those tasks, and the progress bars extend through the full length of the tasks’ Gantt bars.


Entering a Task’s Completion Percentage

After work has begun on a task, you can quickly record progress on it as a percentage. When you enter a completion percentage other than 0, Project changes the task’s actual start date to match its scheduled start date. It then calculates actual duration, remaining duration, actual costs, and other values, based on the percentage you enter. For example, if you specify that a four-day task is 50 percent complete, Project calculates that it has had two days of actual duration and has two days of remaining duration.

Here are some ways of entering completion percentages:

  • Use the Tracking toolbar (on the View menu, point to Toolbars , and then click Tracking ). This toolbar contains buttons for quickly recording that a task is 0, 25, 50, 75, or 100 percent complete.

  • Enter any percentage value you want in the Update Tasks dialog box (on the Tools menu, point to Tracking , and then click Update Tasks ).

  • Use the Project Guide (as you will do in this exercise).

In this exercise, you record completion percentages of tasks via the Project Guide.

  1. On the Project Guide toolbar, click the Track button.

    The Track pane appears.

  2. In the Track pane, click the Prepare to track the progress of your project link.

  3. If you have Project Professional, you’ll see an additional pane that relates to using Project Server to collect actuals from resources. In the step 1 pane, click No , and then click Save and go to Step 2 . If you have Project Standard, you won’t see this pane.

  4. In the Setup Tracking pane, select the Always track by entering the Percent of Work Complete option, and then click the Done link (in Project Standard) or the Save and Finish link (in Project Professional) at the bottom of the Setup Tracking pane.

    Project updates the Project Guide: Custom Tracking view to the right. In the % Work Complete column in the Custom Tracking view, you will enter the completion percentage of the next few tasks.

  5. In the Track pane, click the Incorporate progress information into the project link.

    {% if main.adsdop %}{% include 'adsenceinline.tpl' %}{% endif %}

    The Incorporate Progress pane appears. Here you can set the status date . In this chapter, you won’t change the status date directly. The status date and other calculation options can help you control how Project schedules actual and remaining work. You will work with the status date in Part 2.

  6. In the % Work Complete field for task 4, type or select 100 , and then press [Enter]

    Project records the actual work for the task as scheduled and extends a progress bar through the length of the Gantt bar. Next you’ll get a better look at the task’s Gantt bar.

  7. On the Standard toolbar, click the Go To Selected Task button.

    Your screen should look similar to the following illustration:

    click to expand

    Next you will enter a completion percentage value for a different task.

  8. In the % Work Complete field for task 5, type or select 50 , and then press [Enter].

    Project records the actual work for the task as scheduled, and then it draws a progress bar through 50 percent of the Gantt bar.

  9. In the chart portion (on the right) in the Gantt Chart view, hold the mouse pointer over the progress bar in task 5’s Gantt bar.

    Your screen should look similar to the following illustration:

    click to expand

    The ScreenTip tells you the task’s completion percentage and other tracking values.

  10. At the bottom of the Incorporate Progress pane, click the Done link.

So far, you have recorded actual work that started and finished on schedule. While this might prove true for some tasks, often you need to record actuals for tasks that lasted longer or shorter than planned. This is the subject of the next topic.