Setting Nonworking Days
This exercise introduces calendars, the primary means by which you control when tasks and resources can be scheduled for work in Project. In later chapters you will work with other types of calendars; in this chapter you will work only with the project calendar.
The project calendar defines the general working and nonworking time for tasks. Think of the project calendar as your organization’s normal working times. This might be, for example, Monday through Friday, 8 A.M. through 5 P.M. with an hour off for lunch. Your organization or specific resources might have exceptions to this normal working time, such as holidays or vacation. In a later chapter you’ll address resource vacations, but here you’ll address a holiday in the project calendar.
-
In the Tasks pane, click the Define general working times link.
The Project Working Times pane appears. Your screen should look similar to the following illustration:
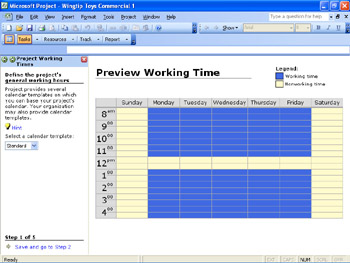
Notice the Preview Working Time portion of the pane. This shows you (in blue) the times at which Project can schedule tasks and resources and (in yellow) when it cannot, based on the settings in the project calendar.
Tip Click the Hint link in the Project Working Times pane. The hint appears in place, without navigating away from the pane. Click it again to collapse it. You will see many such hints throughout the Project Guide.
-
In the Select a calendar template box, click the down arrow.
The list that appears contains the three base calendars included with Project. These are as follows:
-
Standard: the traditional working day, Monday through Friday from 8 A.M. to 5 P.M., with an hour off for lunch.
-
24 Hours: has no nonworking time.
-
Night Shift: covers a “graveyard” shift schedule of Monday night through Saturday morning, 11 P.M. to 8 A.M., with a one-hour break.
Just one of the base calendars serves as the project calendar. For this project you’ll use the Standard base calendar as the project calendar, so leave it selected.
Tip To learn more about calendars, type About calendars into the box labeled Type a question for help.
-
-
At the bottom of the pane, click the Save and go to Step 2 link.
The second pane appears. This pane gives you the option of changing the project calendar’s working time for a specific day of every week. For example, you could choose to end the workday every Wednesday at 3 P.M. instead of 5 P.M. For this project, however, you’ll use the default work week.
-
At the bottom of the pane, click the Save and go to Step 3 link.
The third pane appears. Here you’ll specify some specific nonworking days for the project calendar.
-
Click the Change working time link in the pane.
The Project Guide displays the Change Working Time dialog box. This is the same dialog box you would see if you clicked the Change Working Time command on the Tools menu.
-
In the calendar below the Select Date(s) label, scroll up or down to January 2005 (unfortunately you can’t use the date picking shortcut mentioned previously with this particular calendar). You know that the entire staff will be at a morale event January 28, and no work should be scheduled that day.
-
Select the date January 28.
-
Under Set selected date(s) to, click Nonworking time:
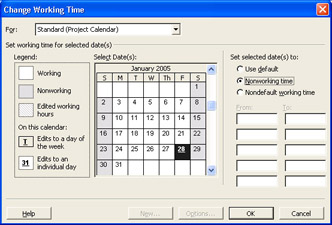
This date is now nonworking time for the project. In the dialog box, the date appears underlined, and it is formatted gray to indicate nonworking time.
-
Click OK to close the Change Working Time dialog box.
-
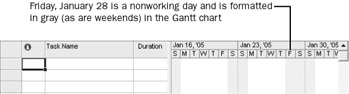
To verify the change to the project calendar, scroll the chart portion of the Gantt Chart view (the portion on the right) to the right until Friday, January 28, is visible. Like the weekends, January 28 is formatted gray to indicate nonworking time:
-
At the bottom of the pane, click the Save and go to Step 4 link.
Take a moment to read the text in the Define Time Units pane, because this is a common source of confusion among Project users. Because you did not change the default working times for the project calendar, you should not change these time units.
-
At the bottom of the pane, click the Save and go to Step 5 link.
The final pane of the Project Working Times activity appears.
-
At the bottom of the pane, click the Save and Finish link.
The Tasks activity list reappears in the Project Guide pane. You’ve completed the Define General Working Times activity.
EAN: 2147483647
Pages: 199