Working with Consolidated Projects
Most projects often involve several people working on tasks at different times, some- times in different locations, and frequently for different supervisors. Although a resource pool can help you manage resource details across projects, it might not give you the level of control that you want over tasks and relationships between projects.
A good way to pull together far-flung project information is to use a consolidated project. This is a project plan that contains other project plans, called inserted projects. The inserted projects do not reside within the consolidated project plan, but they are linked to it in such a way that they can be viewed and edited from it. If an inserted project plan is edited outside of the consolidated project, the updated information appears in the consolidated project plan the next time it is opened.
| Tip | Consolidated project plans are also known as master projects, and inserted project plans are also known as subprojects. This chapter uses the terms consolidated and inserted. To learn more about consolidated project plans, type About master and subprojects into the Search box in the upper right corner of the Project window. The Search box initially contains the text Type a question for help. |
Using consolidated project plans enables you to do the following:
-
See all tasks from your organization’s project plans in a single view.
-
“Roll up” project information to higher levels of management. For example, one team’s project plan might be an inserted project plan for the department’s consolidated project plan, which in turn might be an inserted project plan for the organization’s consolidated project plan.
-
Divide your project data into different project plans to match the nature of your project, for example, by phase, component, or location. Then you can pull the information back together in a consolidated project plan for a comprehensive look at the whole.
-
See all your projects’ information in one location, so you can filter, sort, and group the data.
Consolidated project plans use Project’s outlining features. An inserted project plan appears as a summary task in the consolidated project plan, except that its summary Gantt bar is gray and an inserted project icon appears in the Indicators column. When you save a consolidated project plan, you are also prompted to save any changes you have made to inserted project plans as well.
| Tip | If you have a set of project plans that you normally work on, but you don’t want to combine them into one consolidated project plan, consider saving them as part of a workspace instead. A workspace simply records the names and window sizes of the open project plans into one file that you can later open. On the File menu, click Save Workspace. |
In this exercise, you create a new consolidated project plan and view the two inserted project plans.
-
On the Standard toolbar, click the Open button.
The Open dialog box appears.
-
Navigate to the Chapter 20 Consolidating folder, and double-click the Parnell Aerospace Promo 20 file.
Tip You can also click the file name at the bottom of the File menu.
-
Project asks whether you want to open the resource pool. Click Do not open other files option, and then click OK.
-
On the Standard toolbar, click the Open button.
The Open dialog box appears.
-
Navigate to the Chapter 20 Consolidating folder, and double-click the Wingtip Toys Commercial 20 file.
-
Project asks whether you want to open the resource pool. Select the Do not open other files option, and then click OK.
Next you will use a handy shortcut to insert both open project plans into a new plan, creating a consolidated project plan.
-
On the Window menu, click New Window.
The New Window dialog box appears.
-
Under Projects, hold down the [Ctrl] key while clicking or drag to select the names of both open project plans, and then click OK.
Project creates a new project plan that will become the consolidated project, and then inserts the two projects into the consolidated project as expanded summary tasks.
-
Click the Show/Hide Project Guide button on the Project Guide toolbar.
The Project Guide closes.
-
On the View menu, click Zoom.
-
In the Zoom dialog box, click the Entire Project option, and then click OK.
Project adjusts the timescale in the Gantt chart so that the full duration of the two projects is visible. If necessary, double-click the right edge of any columns that display pound signs (###). Your screen should look similar to the following illustration:
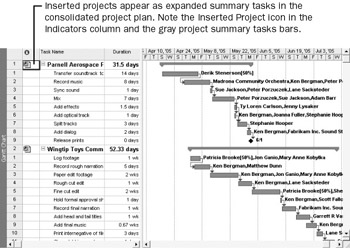
Tip TipIf you point to the Inserted Project icon in the Indicators column, Project displays the full path to the inserted project plan.
To conclude this exercise, you will save the consolidated project plan and display its project summary task.
-
On the File menu, click Save As.
-
In the File name box, type Consolidated Projects 20, and then click the Save button.
-
When prompted to save changes to the inserted projects, click the Yes To All button.
Next you will display the project summary task for the consolidated project.
-
On the Tools menu, click Options.
-
In the Options dialog box, click the View tab.
-
Under Outline options, select the Show project summary task box, and then click OK.
Project displays the Consolidated Projects 20 summary task. Your screen should look similar to the following illustration:
The values of this summary task, such as duration and work, represent the rolled- up values of both inserted projects. As Southridge Video takes on more projects, inserting them into the consolidated project plan in this way gives you a single location in which to view all activities of the organization.
| Tip | To add project plans to a consolidated project, on the Insert menu, click Project. |
EAN: 2147483647
Pages: 199