Customizing a Toolbar
As with other Office applications, you have several choices about how to work with Project. In fact, some of the preferences you set in Project automatically apply in the other Office applications and vice versa. Some of the customization settings include the following:
-
Displaying or hiding the Office Assistant. (It’s hidden by default in Project 2003.) To display the Office Assistant, click Show the Office Assistant on the Help menu. To hide the Office Assistant, click Hide the Office Assistant on the Help Menu.
-
Setting up Project to save the active file or all open files automatically at the time interval you specify. (On the Tools menu click Options, and on the Save tab of the Options dialog box, select Save Every and enter the time interval you want.)
-
Creating customized toolbars that include buttons for any commands you want. (You will do this in the following exercise.)
In this exercise, you create a custom toolbar and assign the macro you recorded earlier to a button on the custom toolbar.
-
Switch back to the Project window that displays the Parnell project plan.
-
On the Tools menu, point to Customize, and then click Toolbars.
The Customize dialog box appears.
-
Click the Toolbars tab.
Your screen should look similar to the following illustration:
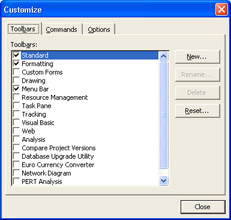
A check mark indicates the toolbars that are currently displayed; what you see might differ.
Tip Toolbars are either docked or floating. When docked, a toolbar appears at one edge of the Project window. Normally this is the top edge, but you can dock a toolbar at any edge of the window. When a toolbar is floating, it has a title bar that tells you the toolbar’s name. To move a docked toolbar, point to the far left edge, and drag the toolbar either into the Project window to make it float or to another edge of the window to redock it.
-
Click New.
The New Toolbar dialog box appears.
-
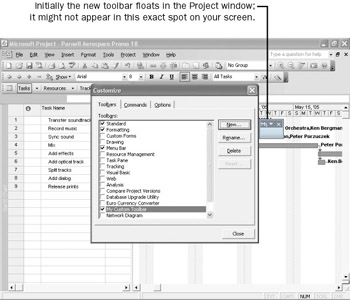
In the Toolbar Name box, type My Custom Toolbar, and then click OK.
The new toolbar appears in the list of toolbars and is displayed by default. (Initially it’s a floating, empty toolbar.) Your screen should look similar to the following illustration:
Next you’ll add a command to the toolbar that runs the previously recorded macro.
-
Click the Commands tab.
In the Categories list, you can see several categories of commands. Many of these, such as File and Edit, correspond to menu names.
-
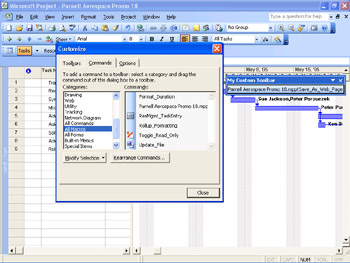
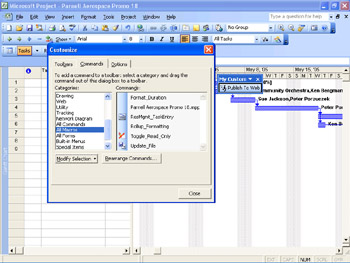
In the Categories list, click All Macros.
The commands in the All Macros category appear in the Commands list on the right. Your screen should look similar to the following illustration:

Most of the commands listed for the All Macros category relate to macros included with Project, and what you see might differ. However you should see the Parnell Aerospace Promo 18.mpp!Save_As_Web_Page macro listed because it is stored in the active project plan.
-
Drag the Parnell Aerospace Promo 18.mpp!Save_As_Web_Page macro from the Customize dialog box onto My Custom Toolbar.
My Custom Toolbar widens to show the full title of the macro. If necessary, drag the toolbar so you can see all of it. Your screen should look similar to the following illustration:
Next you’ll change the text that appears on the button and add a graphic image.
-
In the Customize dialog box, click Modify Selection, and then click Image and Text.
This setting makes room on the button for an image as well as a text label.
-
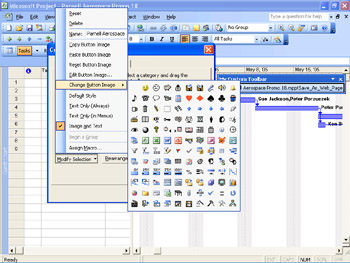
Click Modify Selection, and then point to Change Button Image.
A submenu of button images appears. Your screen should look similar to the following illustration:
-
Click the last item on the fourth row, the running figure.
Project adds the button image to the button. Next you will change the text label of the button.
-
Click Modify Selection, and then position your mouse pointer in the Name box and select the full name of the macro.
-
With the name of the macro selected, type Publish To Web, and then press [Enter]
Project changes the text label on the button. Your screen should look similar to the following illustration:
-
Click Close to close the Customize dialog box.
The custom toolbar remains floating in your Project window.
-
On My Custom Toolbar, click the Publish To Web button.
The Save_As_Web_Page macro runs. If you want, switch back to your browser and refresh it to see the results, and then switch back to Project.
Custom toolbars and any other customizations made to built-in toolbars apply to all project plans you view in Project. This is because toolbar settings must reside in the global template. To conclude this exercise, you’ll delete My Custom Toolbar and the map created by the Export Wizard from your global template so it doesn’t affect your overall Project environment.
-
On the Tools menu click Organizer.
The Organizer dialog box appears.
-
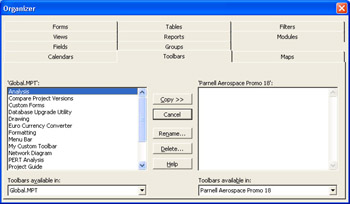
Click the Toolbars tab.
Your screen should look similar to the following illustration:
-
In the Global.MPT box, click My Custom Toolbar, and then click Delete.
-
Project prompts you to confirm that you want to delete the toolbar; click Yes.
-
Click the Maps tab.
-
In the Global.MPT box, click Map 1, and then click Delete.
-
Project prompts you to confirm that you want to delete the map; click Yes.
-
Click Close to close the Organizer dialog box.
| Tip | You can also delete a toolbar on the Toolbars tab of the Customize dialog box (Tools menu). |
CLOSE: the Parnell Aerospace Promo 18 and Wingtip Toys Commercial 18 files.
EAN: 2147483647
Pages: 199