Troubleshooting Scope-of-Work Problems
The project’s scope includes all the work required—and only the work required—to successfully deliver the product of the project to its intended customer. After project work has started, managing its scope usually requires making trade-offs: trading time for money, quality for time, and so on. You might have the goal of never making such trade-offs, but a more realistic goal might be to make the best-informed trade- offs possible.
Recall from the previous exercises that the project finish date extended into 2006. With the actions taken in the previous exercise, the finish date has been pulled into 2005, but you want it to end around mid-December 2005 at the latest. In this exercise, you focus on the project’s finish date and make several trade-offs to ensure that the project will deliver its product within the time frame that you want.
-
On the Project menu, click Project Information.
The Project Information dialog box appears. As the schedule is now, if all the remaining work is completed as scheduled, the project will be completed on December 29, 2005. However, realistically, you expect the holiday season to interfere with concluding the project, so you’ll need to take steps to pull in the finish date.
-
Click Cancel to close the Project Information dialog box.
Because the project finish date is controlled by tasks on the critical path, you’ll begin by viewing only those tasks.
-
On the View menu, click More Views.
-
In the More Views dialog box, click Detail Gantt, and then click the Apply button.
The Detail Gantt view appears.
-
On the Project menu, point to Filtered For: All Tasks, and then click Critical.
Project displays only the critical tasks. The remaining production tasks are already as compressed as they can be, so you’ll focus on compressing the post-production tasks. To begin, you’ll allow overtime work for several tasks, to shorten their durations.
-
On the Edit menu, click Go To.
-
In the ID box, type 74, and then click OK.
Project displays task 74, Log footage.
Your screen should look similar to the following illustration:

-
On the Window menu, click Split.
The Task Form appears below the Detail Gantt view.
-
Click anywhere in the Task Form. Then on the Format menu, point to Details, and click Resource Work.
The Resource Work details appear in the Task Form.
-
To see the effect of the following steps on the duration of task 74 and successor tasks, scroll the Detail Gantt view in the upper pane until task 74 is visible.
-
In the Task Form, in the Ovt. Work column for the resource named Editing Lab, type or click 20h, and press [Enter].
-
In the Ovt. Work column for Florian Voss, type or click 20h, and click OK in the upper right corner of the Task Form.
The overtime work values cause Project to adjust the daily work assignments for these resources and to shorten the overall duration of the task. Your screen should look similar to the following illustration:
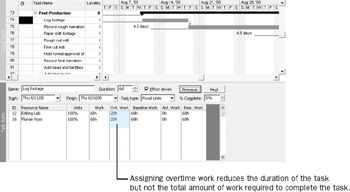
Note that each resource’s total work on this task remains at 68 hours. Now, however, 20 of those 68 hours per resource will be scheduled as overtime. The same amount of work will be performed, but in a shorter time span. Project will apply overtime cost rates, if they have been set up, to the overtime portion of the assignment.
-
In the Gantt Chart view, click the name of task 75, Record rough narration.
-
In the Task Form, enter 30 hours (30h) of overtime work for both of the assigned resources, and then click OK.
Project schedules the overtime work and recalculates the task’s duration.
-
In the Gantt Chart view, click the name of task 76, Paper edit footage.
-
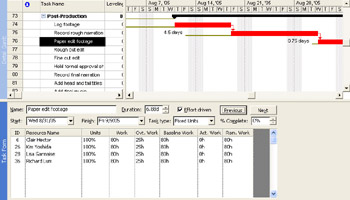
In the Task Form, enter 25 hours (25h) of overtime work for each of the four assigned resources, and then click OK.
Project schedules the overtime work and recalculates the task’s duration.
-
On the Window menu, click Remove Split.
-
On the Project menu, click Project Information.
The Project Information dialog box appears. The adjustments you’ve made to the schedule have pulled in the project’s finish date to 12/16/05. Although that meets the target you had in mind, given the overall performance to date, you can expect some additional variance. In anticipation of this, you’ll make further adjustments to the post-production tasks.
-
Click Cancel to close the Project Information dialog box.
Task 81, Add head and tail titles, is a fairly long task. After talking with the resources assigned to it and its predecessor task, you all agree that given the schedule crunch, work on task 81 can begin at the same time as its predecessor, task 80.
-
In the Task Name column, click the name of task 81, Add head and tail titles.
-
On the Standard toolbar, click the Task Information button.
The Task Information dialog box appears.
-
Click the Predecessors tab.
-
In the Type field for the task’s predecessor, click Start-to-Start (SS) in the drop- down list.
-
Click OK to close the Task Information dialog box.
-
On the Standard toolbar, click the Go To Selected Task button.
Your screen should look similar to the following illustration:
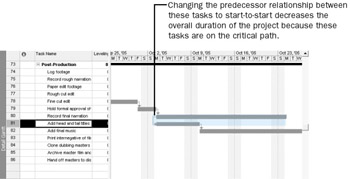
Project reschedules task 81 to start when 80 starts and reschedules all subsequent linked tasks as well. Note that now task 82 as well as task 81 will now start before task 80 is completed.
-
On the Project menu, click Project Information.
The Project Information dialog box appears. The project’s finish date is now pulled back to late November—a workable date at this time.
To conclude this exercise, you’ll see what effects these final adjustments have had on the project’s final cost values as well.
-
Click the Statistics button.
The Project Statistics dialog box appears.

The current cost calculation is now closer to its baseline cost, although you know it’s likely to go up.
-
Click the Close button to close the Project Statistics dialog box.
You confer with the project sponsors, who are pleased that you can wrap up the short film project before the holiday season. Although producing the project deliverable within these constraints will be a challenge, you’re both realistic and optimistic about the project’s future performance and comfortable with your project management skills and your knowledge of Project. Good luck!
CLOSE: the Short Film Project 16 file.
EAN: 2147483647
Pages: 199