User Interface Components
Now that you've put a tap into the private lives of your input devices, you've got to do something with their messages. Games usually have a small set of user interface components and they are almost always custom coded. MFC and straight Win32 GDI calls just don't cut it, as far as I'm concerned. Sure, the number of controls you can attach to dialog boxes and screens is overwhelming, but most games don't need rich text editors, grid controls, OLE containers, property pages, and so on. Rather, the lack of control over position, animation and sounds usually compel game programmers to roll their own simple user interface.
These simple interfaces break the job into two parts: controls and containers for controls. Some user interface designs, such as Windows, don't distinguish between controls and control containers. Everything in the Win32 GDI has an HWND, or if you code in MFC everything derives from CWnd. This might seem a little weird because it would be unlikely that a button in your game would have other little buttons attached to it.
Instead of proposing any specific design, it's best to discuss some of the implementation issues and features any game will need in a user interface. I'll talk about control containers first, and then move to individual control types.
Screens
The highest level component of any user interface is analogous to the window, although I prefer to use my older nomenclature since I was coding screen based user interfaces long before Windows 95 came about. It's also easier for game programmers to see each screen as a self-contained unit, whether you are coding a PC game or a console game.
| Best Practice | If your game has multiple screens, and even simple games have many, it's wise to manage them and the transitions between them in a high level API. This might seem a little strange to Windows programmers but it's a little like programming multiple applications for the same window, and you can freely move from one screen to another by selecting the right controls. If your screens are fairly small "memory-wise" consider preloading them. Any transitions that happen will be blazingly fast, and players like responsive transitions. If your screens have tons of controls, graphics, and sounds, you won't necessarily be able to preload them because of memory constraints but you might consider loading a small transition screen to give your players something to look at while you load your bigger screens. Lots of console games do this, and they usually display a bit of the next mission in the background while a nice animation plays, showing the load progress. |
Games such as Myst use a screen architecture like the one shown in Figure 5.2 throughout the entire game. Lots of kids games and mass market titles have a similar architecture.
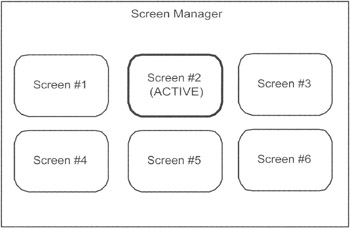
Figure 5.2: A Screen Manager Is a Container for Game Screens.
When the right controls are activated in the right order, the current screen is replaced by a new one with different controls.
Other games use multiple screens to set up the characters or missions. When everything is set up for the player, the game transitions to the game screen where most, if not all, the game is played. Almost every console game uses this model.
How do the device messages get to your game code? Again, it depends on a lot of things. Let's look at a simple example, such as keyboard input. Every time a player presses a keyboard key a WM_KEYDOWN event is sent to the top-level window via a call to your main window procedure. We'll make a reasonable assumption that you've encapsulated the normal WndProc routine into a game application class, and that one member of this class is the active screen:
LRESULT APIENTRY MyGameApp::WndProc(HWND hwndMain, UINT uMsg, WPARAM wParam, LPARAM lParam) switch (uMsg) { case WM_KEYDOWN: // A key is down! Holy crap what do I do now??? // First, translate the raw event into something I like. yourcode::KeyboardEvent event = yourcode::TranslateKeyboardEvent(wParam, lParam); // Send the event into my active screen if (m_activeScreen) m_activeScreen->On Key down (event); break; } } The first thing you'll do is translate the raw device event into something you'll use directly for your game. If you care about nothing more than printable ASCII characters, all you need to do is store an unsigned char in the event. If your game wants to know the current status of the left and right Ctrl keys in addition to the key that triggered the event, you'll have to create a more complicated event structure. You'll also have to put more logic in the yourcode::TranslateKeyboardEvent method to remember the status of previous key presses. Either way, by writing an event translator you've just successfully decoupled the operating system and device details from your game code.
The second task is detecting the active screen, and forwarding your translated event into the screen's implementation of OnKeydown().The screen is a control container and it must iterate through the list of controls and send the message to each one until a control responds and handles the event:
bool CScreen::OnKeyDown(MyKeyboardEvent const &event) { ControlList::reverse_iterator j=m_ControlList.rbegin(); while(j !=m_ControlList.rend()) { if((*j)->OnKeyDown( event )) return true; ++j: } return false; } Did you notice that the STL list was traversed in reverse order? Assuming the list is sorted in the order in which controls are actually drawn—back to front—the user interface code must ask controls about messages in the reverse order. The controls that appear on top of everything will get messages before their brethren (see Figure 5.3).
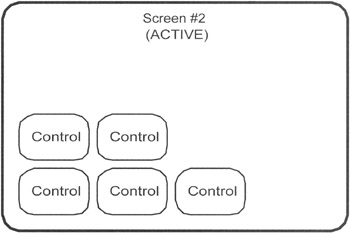
Figure 5.3: A Screen Is a Container for Controls.
The STL reverse iterator works its way through the list of controls from the tail of the list to the head. The first control to accept the message, signifying by returning true from OnKeyDown(), terminates the loop.
The screen class shouldn't care about anything except that the controls exist and that each one attached to the screen is a candidate to receive a particular kind of message. The control class implements code to determine whether it should care about the event:
bool Control::OnKeyDown(MyKeyboardEvent const &event) { if ( IsActive() ) { if ( CareAbout(event) ) { OnChangeState(); // No Meat Here! return true; } } return false; }; In the case of a control that processes keyboard events, it only needs to determine if it is currently active—since controls can be disabled—and whether the events match keys on its dance card.
You might think that the meat of the control code is really inside OnChangeState(). You'd be wrong, but I wouldn't blame you for guessing. OnChangeState() might perform some minor graphical or audio tasks but it doesn't call your game logic. Think about where we are in the overall call stack for your game. We're deep inside the message pump if you're coding in Windows, or you're in some callback function sending you device input.
That is the last place you want to change game logic or do anything drastic, like flip your game to fullscreen from windowed mode. I use that example because it's exactly what you might hook up to a hotkey, and you really don't want the message pump stalled out while your game is flipping graphics modes. Instead, do something simple like add the control a list that tracks activated controls. The list can be processed when your game is outside the callbacks and message pumps, and can safely do whatever madness it must:
void CScreen::ProcessActivatedControls() { while( ! m_activatedControlList.empty() ) { OnControl(* (m_activatedControlList.begin()) ); m_activatedControlList.pop_front(); } } There's much more discussion about what goes on in the main loop of the game in Chapter 7. Until then, you'll have to take my word that ProcessActi vatedControl s() gets called once per game loop.
Every screen in your game implements an OnControl(), which is somewhat analogous to Win32's processing of the WM_COMMAND message. Each control has an identifier, and the OnControl switches on the value of that ID. You can define these IDs in something as simple as an enumeration. Since user interface code can have a relatively slow reaction time—less than 80ms is adequate—you can even use a more complicated scheme that matches controls with text strings. Whatever you choose, make it easy for programmers to change, and try to keep these IDs out of header files; they'll change often.
Here's an imaginary implementation of a screen's OnControl() method:
bool CScreen::OnControl(const CControl* pControl) { switch( pControl->GetID() ) { case CID_PLAY: Play(); return true; case CID_PAUSE: Pause(); return true; case CID_REWIND: Rewind(); return true; case CID_FASTFORWARD: FastForward(); return true; case CID_EXIT: Exit(); break; default: assert(0 && _T("Unknown control!")); break; } return false; } There are five controls on this screen, each distinguishing itself with a control identifier. The controls might be buttons, hidden hot areas sensitive to mouse movement, or hot key detectors. By the time the device input gets to the screen the input is translated into a command.
Dialog Boxes: Modal vs. Modeless
Dialog boxes usually present the player with a question, such as "Do you really want to quit?" In most cases, the game stops while the dialog box is displayed so the player can answer the question (see Figure 5.4). The answer is usually immediately accepted by the game.
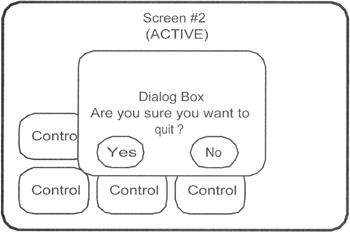
Figure 5.4: A Modal Dialog Box.
This might seem easy to code, but it's actually fraught with pain and suffering. Why? Let's look at the anatomy of the "quit" dialog. The code to bring up a message box in Win32 looks like this:
int answer = MessageBox(_T("Do you really want to quit?"), _T("Question"), MB_YESNO | MB_ICONEXCLAMATION); When this code is executed, a message box appears over the active window and stays there until one of the buttons is pressed. The window disappears and the button ID is sent back to the calling code. If you haven't thought about this before, you should realize that the regular message pump can't be working, but clearly some message pump is active. How else could mouse and keyboard messages activate the dialog box? How does that work?
The code to MessageBox has its own version of the message pump inside it, and similar to the main loop of your game, it doesn't exit until the dialog box destroys itself. The function that solves this problem is shown here:
int MyApp::PumpUntilMessage (UINT msgEnd, LPARAM* pLParam, WPARAM* pWParam) { MSG msg; for ( ;; ) { if ( PeekMessage( &msg, NULL, 0, 0, PM_NOREMOVE ) ) { // If the WM_CLOSE comes through, we've got to close // no matter what - your game should begin its shut down // code even if the dialog is up. if (msg.message == WM_CLOSE) { // a member variable of MyApp m_CloseReceived = true; GetMessage(& msg, NULL, 0, 0); break; } else { // Default processing if ( !PumpMessage() ) return ExitInstance(); // Are we done? if ( msg.message == msgEnd) break; } } else { // Process MyGameIdle(1); // this is your idle function } } if (pLParam) *pLParam = msg.lParam; if (pWParam) *pWParam = msg.wParam; return 0; } The PumpUntilMessage function works similar to the message pump in your main loop, but it is a special one meant for modal dialog boxes. One message, WM_CLOSE, gets special treatment since they must terminate the dialog and begin the game close process. Other than close, the loop continues until the target message is seen in the message queue—although it could look for anything it will usually look for MSG_END_MODAL, something you'll need to define yourself:
#define MSG_END_MODAL WM_USER + 100
Your application will need more than an internal message pump. It needs something to handle the logistics of preparing the screen for a model dialog. If the game is processing a drag command, weird things will happen if a dialog interrupts the drag. You'll want to abort the drag before the dialog appears:
int MyApp::DoModal(MyScreen* modalScreen) { //Abort all drag operations - you write these yourself if (IsSomeoneDraggingSomething()) { AbortTheDragToAvertStrangeness(); } PushActiveScreen(modalScreen); LPARAM lParam = 0; int result = PumpUntilMessage(MSG_END_MODAL, &lParam); if (lParam != 0) result = (int)lParam; PopActiveScreen(); if (mCloseReceived) { QuitMyGame(); // Call your quit code here! } return result; } There's special code in here to handle the case of WM_CLOSE coming through while your game is asking a question like, "Would you like fries with that?" The message terminates the modal dialog and begins the process of the quit code. This implies that each dialog must have a default answer, which is true. The code that calls DoModal with your dialog screen needs a rational way to interpret the answer.
Notice the calls to PushActiveScreen() and PopActiveScreen(). You'll write those to make your modal screen the top level screen. This allows a smaller dialog box to appear over another screen. It wouldn't do to have your game screen completely disappear just because a message box pops up.
Your dialog code can work exactly like one of your normal screens, with one exception. Instead of using the root screen manager to transition from one screen to another, it sends MSG_END_MODAL to the internal message pump:
PostMessage( m_myGameWindow, MSG_END_MODAL, 0, result );
The value in result is sent back to the code that called the modal dialog.
Modeless dialog boxes are usually status screens, object palettes, or anything else that needs to overlay the main game screen. Attach these screens to the root screen and make them active, so they'll be drawn and accept events. Just like controls, screens have a Z-order, and they draw from back to front but accept events from front to back. Other than that, they don't need any special treatment. Don't you wish we could say that about game programmers!
Controls
Controls have lots of permutations, but most of them share similar properties. I've seen push buttons, radio buttons, checkboxes, combo boxes, edit boxes, expandable menus, and all sorts of stuff. I've also coded quite a few of them, I'm sad to say.
The tough thing about implementing a new kind of control in your game isn't how to draw a little 'x' in the checkbox; good grief if you can't do that you should give up programming and become an attorney or a truck driver. Rather, the tough thing is knowing what features your controls will need beyond simple push button animations. You also need to be aware of the important gotchas you'll need to avoid. Let's start with the easy stuff first:
-
Message sensitivity: Which device messages do the controls care about?
-
Identification: How is the control distinguished from others on the same screen?
-
Hit Testing/Focus Order: Which control gets messages, especially if they overlap graphically?
-
State: What states should controls support?
I suggest you approach the first problem from a device-centric point of view. Each device is going to send input to a game, some of which will be mapped to the same game functions. In other words, you might be able to select a button with the mouse to perform some game action, like firing a missile. You might also use a hot key to do the same thing.
First, model the devices and their physical design: buttons, one-axis, and two-axis controls. Then, create some helper interface classes for each device, that take as input the translated events that you received from messages, callbacks, or even polling. You can write these any way you want, but here are some examples:
class IKeyboardSensitive { virtual bool OnKeyDown(unsigned int const kcode)=0; virtual bool OnKeyUp(unsigned int const kcode)=0; }; class IMouseSensitive { virtual bool OnLMouseDown(int const x, int const y)=0; virtual bool OnLMouseUp (int const x, int const y)=0; virtual bool OnRMouseDown(int const x, int const y)=0; virtual bool OnRMouseUp (int const x, int const y)=0; virtual bool OnMouseMove (int const x, int const y)=0; }; class IJoystickSensitive { virtual bool OnButtonDown(int const button, int const pressure)=0; virtual bool OnButtonUp(int const button)=0; virtual bool OnJoystick(float const x, float const y)=0; }; class IGamepadSensitive { virtual bool OnTrigger(bool const left, float const pressure)=0; virtual bool OnButtonDown(int const button, int const pressure)=0; virtual bool OnButtonUp(int const button)=0; virtual bool OnDirectionalPad(int directionFlags)=0; virtual bool OnThumbstick(int const stickNum, float const x, float const y)=0; }; Each function represents an action taken by a control when something happens to an input device. Here's how the return values work: If the message is handled, the functions return true; otherwise they return false.
Your control classes, such as a push button class or a menu class, will implement the interfaces for the devices they care about. Control objects in your game are guaranteed to receive device input in a standard and predictable way. Thus, it should be a simple matter to modify and change the interface of your game by attaching new control objects that care about any device you've installed.
The interface classes described previously are simple examples and they should be coded as to fit the unique needs of your game. You can easily remove or add functions at will. Clearly, not every game will use input exactly the same way.
| Best Practice | Don't add parameters to distinguish between multiple joysticks or gamepads. A better solution is to create controls that map directly to the object they are controlling. For example, if multiple gamepads control multiple human drivers, the control code shouldn't need to be aware of any other driver but the one it is controlling. Set all this up in a factory that creates the driver, the controller, and informs the input device code where to send the input from each gamepad. |
If you follow a modular design, your game objects can be controlled via the same interface whether the source of that control is a gamepad or an AI character. The AI character sends commands like "brake 75%" or "steer 45%" into a car controller, where the human player touches a few gamepad keys, generating translated events that eventually result in exactly the same calls, but to a different car.
This design should always exist in any game where AI characters and humans are essentially interchangeable. If humans and AI characters use completely different interfaces to game objects it becomes difficult to port a single player game to multiplayer. You'll soon discover that none of the "plugs" fit.
Control Identification
Every control needs an identifier—something the game uses to distinguish it from the other controls on the screen. The easiest way to do this is define an enum, and when the controls are created they retain the unique identifier they were assigned in their construction:
enum MAINSCREEN_CONTROL_IDS { CID_EXIT, CID_EXIT_DESKTOP, CID_PREVIOUS_SCREEN, CID_MAIN_MENU, CID_OPTIONS }; bool MyMainScreen::OnControl(const MyControl* pControl) { switch(pControl->GetID()) { case CID_EXIT: // exit this screen break; case CID_EXIT_DESKTOP: // exit to the desktop break; // etc. etc. } } Each screen should define a method that accepts messages from controls. A control will send the message to the screen when it is selected. This is very similar to the way Win32 sends messages from controls to windows via the WM_COMMAND message, but simplified. The only problem with defining control IDs in this manner is keeping them straight, especially if you create screen classes that inherit from other screen classes, each with their own set of controls.
| Gotcha | There's almost no end to the religious arguments about creating new screens by inheriting from existing screen classes. Object oriented coding techniques make it easy to extend one class into another but there is a risk of confusion and error when the new class is so different from the original that it might as well be a completely new class. This is why it's better to define functionality in terms of interfaces and helper functions, and flatten your class hierarchy into functional nuggets. A deep inheritance tree complicates the problems of changing something in a base class without adversely affecting many classes that inherit from it |
Some games define controls in terms of text strings, assigning each control a unique string. The downside is the more expensive string compare every time you want to figure out what control is talking to the screen. It does make things easy to debug, but there's nothing stopping you from including a string member in the debug build of the class. You can solve this problem by writing a bit of debug code that detects multiple controls with the same ID. Your code should simply assert so you can go find the problem and redefine the offending identifier.
Hit Testing and Focus Order
There are two ways controls know they are the center of your attention. The first way is via a hit test. This is where you use a pointer or cursor and position it over the control by an analog device such as a mouse. This method is prevalent in PC games, and especially games that have a large number of controls on the screen.
The second method uses a focus order. Only one control has the focus at any one time, and each control can get the focus by an appropriate movement of the input device. If the right key or button is pressed, the control with focus sends a message to the parent screen. This is how most console games are designed, and it clearly limits the number and density of controls on each screen.
Hit testing usually falls into three categories: rectangular hit testing, polygonal hit testing, and bitmap collision testing. The rectangle hit test is brain dead simple. You just make sure your hit test includes the entire rectangle, not just the inside. If a rectangle's coordinates were (15,4) and (30,35), then a hit should be registered both at (15,4) and (30,35).
The hit test for a 2D polygon is not too complicated. The following algorithm was adapted from Graphics Gems, and assumes the polygon is closed. This adaptation uses a Point structure and STL to clarify the original algorithm. It will work on any arbitrary polygons, convex or concave:
#include <vector> struct Point { int x, y; Point() { x = y = 0; } Point(int _x, int _y) { x = _x; y = _y; } }; typedef std::vector<Point> Polygon; bool PointInPoly( Point const &test, const Polygon & polygon) { Point newPoint, oldPoint; Point left, right; bool inside=false; size_t points = polygon.size(); // The polygon must at least be a triangle if (points < 3) return false; oldPoint = polygon[points-1]; for (unsigned int i=0 ; i < points; i++) { newPoint = polygon[i]; if (newPoint.x > oldPoint.x) { left = oldPoint; right = newPoint; } else { left = newPoint; right = oldPoint; } // A point exactly on the left side of the polygon // will not intersect - as if it were "open" if ((newPoint.x < test.x) == (test.x <= oldPoint.x) && (test.y-left.y) * (right.x-left.x) < (right.y-left.y) * (test.x-left.x) { inside=!inside; } oldPoint = newPoint; } return(inside); } Bitmap collision is easy. You simply compare the pixel value at the (x,y) coordinate with your definition of the transparent color.
Control State
Controls have four states: active, highlighted, pressed, and disabled. These states are shown in Figure 5.5. An active control is able to receive events but isn't the center of attention. When the control gets the focus or passes a hit test from the pointing device, its state changes to highlighted. Its common for highlighted controls to have separate art or even a looping animation that plays as long as it has focus.
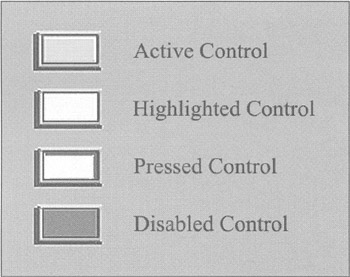
Figure 5.5: The Four States Used with Controls.
When the player presses an activation button on their mouse or controller the button changes state again to pressed. The art for this state usually depicts the control in a visually pressed state so that the player can tell what's going on. If the cursor moves away from the control it will change state to active again, giving the player a clue that if the activation button is released, nothing will happen.
Disabled controls are usually drawn darkened, giving the impression that no one is home. I know that Windows does this all over the place, but there is one thing about it that really bothers me: I can never tell why the control is disabled. It's fine to have a disabled state, but make sure that the player can figure out why it's disabled or you'll just cause a lot of frustration.
| Best Practice | If your interface uses a mouse, change the mouse cursor to a hand when you are over an active control. This approach will give the player another clue that something will happen when he or she clicks the button. Use the Win32 LoadCursor() API to grab a handle to the right mouse cursor, and call SetCursor() with the cursor handle. If you want a good package to create animated mouse pointers try Microangelo by Impact Software, www.impactsoftware.com. |
Don't get confused about the control states mentioned here and control activation. Control activation results in a command message that propagates though to the screen's OnControl() function. For a standard push button control, this only happens if the mouse button is pressed and released over the button's hit area.