Using the DataSet Component The Data tab of the Visual Studio toolbox contains a DataSet component that allows you to set property values by means of the Properties window, rather than doing everything in code. This approach is analogous to that in Chapter 4 for the Connection and Command objects. Let's run through the steps to configure a DataSet and its associated objects with the same definitions used in the code samples in the previous sections. First, we define the DataSet and the table schemas. -
Add another form, frmDataSetComponent, to the DataSetCode project. -
In the Properties window for frmDataSetComponent, set its Text property to DataSet component. -
Enlarge the size of frmDataSetComponent. -
From the Windows Forms tab of the Toolbox, add a listbox to Form1 and place it on the right side of the form. -
In the Properties window, set the name property of the listbox to lstOutput. -
Enlarge the listbox so that it covers about 80 percent of the area of the form. -
From the Data tab of the toolbox, drag a DataSet component onto the design surface of frmDataSetComponent. In the dialog box that appears, select the Untyped dataset radio button and click on the OK button. This component isn't visible at run-time, so it will appear in the component tray beneath the form's design surface. -
In the Properties window for this new DataSet component, named DataSet1, set the Name property to dsEmployeeInfo. -
Select the Tables property in the Properties window and then click on the ellipsis ("… ") button to display the Tables Collection Editor. -
Click on the Add button to display the properties for the first table in the DataSet. -
In the Table1 Properties panel set the TableName property to Employees. The results so far are shown in Figure 5.5. Figure 5.5. Tables Collection Editor after adding the Employees table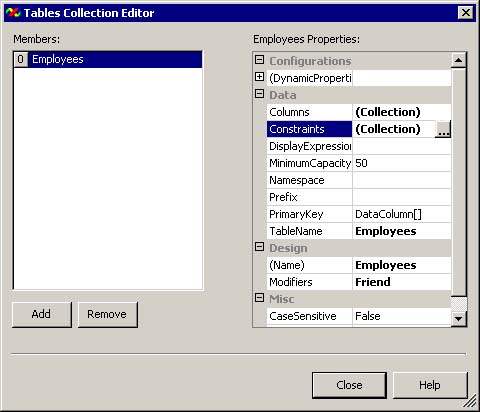
-
Select the Columns property in the Employees Properties panel and then click on the ellipses ("… ") button to display the Columns Collection Editor. -
Click on the Add button to display the properties for the first column in the Employees table. -
In the Column1 Properties panel set the ColumnName property to FirstName. -
Click on the Add button to display the properties for the second column in the Employees table. -
In the Column1 Properties panel set the ColumnName property to LastName. -
Click on the Add button to display the properties for the third column in the Employees table. -
In the Column1 Properties panel set the ColumnName property to DepartmentID and also set the DataType property to System.Int32. The Columns Collection Editor for the Employees table is shown in Figure 5.6. Figure 5.6. Column Collection Editor for the Employees table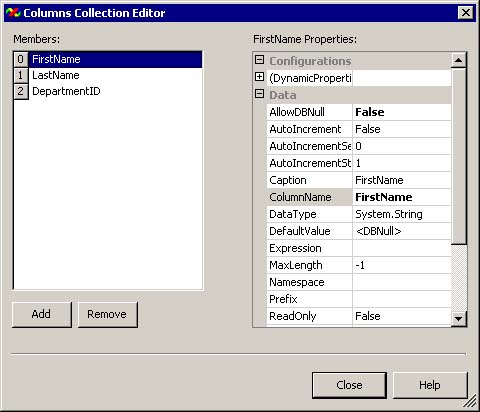
-
Click on the Close button in the Columns Collection Editor to return to the Tables Collection Editor for the dsEmployeesInfo DataSet to add the Departments table. -
Click on the Add button to display the properties for the second table in the DataSet. -
In the Table1 Properties panel set the TableName property to Departments. -
Select the MinimumCapacity property in the Departments Properties panel and set it to 5. -
Select the Columns property in the Departments Properties panel and then click on the ellipses button to display the Columns Collection Editor. -
Click on the Add button to display the properties for the first column in the Departments table. -
In the Column1 Properties panel set the ColumnName property to ID and also set the DataType property to System.Int32. -
In the ID Properties panel set the ReadOnly property to True, the Unique property to True, and the AutoIncrement property to True. -
Click on the Add button to display the properties for the second column in the Departments table. -
In the Column1 Properties panel set the ColumnName property to DepartmentName. -
In the DepartmentName Properties panel set the Unique property to True and the AllowDBNull property to False. -
Click on the Close button on the Columns Collection Editor to return to the Tables Collection Editor and then click on its Close button to close the Tables Collection Editor. You have now implemented the dsEmployeesInfo DataSet and its Employees and Department tables by setting properties of design-time components to the same values that you set in the (run-time) code shown in Listing 5.1. Now continue setting the design-time components and defining the relations between the tables in the DataSet. -
In the Properties window for the dsEmployeesInfo DataSet component, select the Relations property and then click on the ellipsis button to display the Relations Collection Editor. -
Click on the Add button to display the properties for the first relation in the DataSet. -
Set the Name property to relDepartmentEmployees. -
Set the ParentTable property to Departments by selecting Departments from the first drop-down listbox. -
Set the ChildTable property to Employees by selecting Employees from the second drop-down listbox. -
In the Columns section, set the first entry in the Key Columns column to ID by selecting ID from the drop-down listbox. Doing so sets the value of the DataRelation's ParentColumns property. -
In the Columns section, set the first entry in the Foreign Key Columns column to Department ID by selecting DepartmentID from the drop-down listbox. Doing so sets the value of the DataRelation's ChildColumns property. -
Accept the default values for the Update, Delete, and AcceptReject rule properties by not changing them. -
Click on the OK button to close the Relations Collection Editor. The only setting missing now is the PrimaryKey property for each table. To set it, do the following. -
Select the Tables property in the Properties window of the dsEmployeeInfo component and then click on the ellipses button to display the Tables Collection Editor. -
In the Members pane, select the Employees table. -
In the Employees Properties pane, select the PrimaryKey property and then the click on the arrow button for the drop-down listbox. -
Select the column or columns that comprise the primary key, from the list of available columns displayed. If the primary key comprises multiple columns, be sure to select them in the desired order. In this case, select the FirstName column and then the LastName column, as shown in Figure 5.7. Figure 5.7. Selecting multiple columns to define the value of PrimaryKey property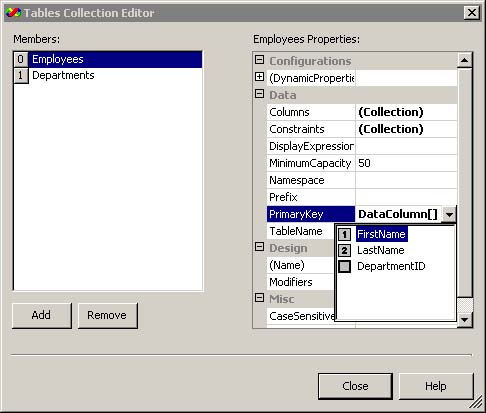
-
Press the Enter key to accept the settings for the PrimaryKey Property. -
In the Members pane, select the Departments table. -
In the Departments Properties pane, select the PrimaryKey property and then the click on the arrow button for the drop-down listbox. -
Select the DepartmentName column from the list of available columns displayed and then press the Enter key to accept the settings for the PrimaryKey Property. -
Click on the Close button to close the Tables Collection Editor. To show that you get the same results by using the design-time components as you did previously by using pure code, copy and paste some routines from frmDataSets into frmDataSetComponent and then execute frmDataSetComponent. -
Select and copy the AddData routine (including all the code of the routine) from frmDataSets and paste it into frmDataSetComponent. -
Repeat step 1 for the DisplayDataSet and DisplayChildRows routines. -
Add the following code for the frmDataSetComponent_Load event handler in frmDataSetComponent: Private Sub frmDataSetComponent_Load(ByVal sender As _ System.Object, ByVal e As System.EventArgs) _ Handles MyBase.Load AddData() DisplayDataSet() DisplayChildRows(dsEmployeeInfo.Tables("Departments")) End Sub -
Right-click on the DataSetCode project in the Solution Explorer and select Properties from the pop-up menu displayed. -
Select the General item in the Common Properties folder and then set the Startup object property to frmDataSetComponent. If you now run the DataSetCode project, the listbox on frmDataSetComponent will display all of the data from the DataSet as well as the related child rows of the Departments table, as shown in Figure 5.8. Figure 5.8. Using the DataSet design-time component to display DataSet data and related child rows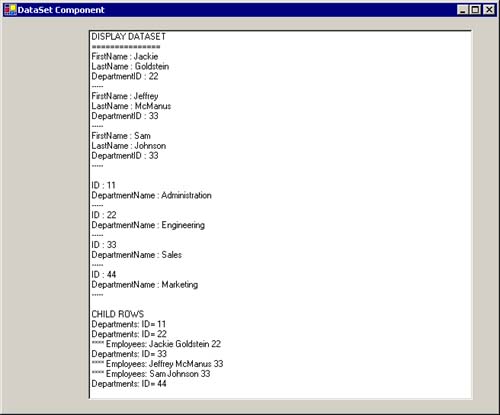
Note You may find it interesting to review the code generated by the design-time components it will be very similar to what you coded manually in the earlier sections of this chapter. You can see the generated code by opening the code view for Form1 in the Visual Studio code editor and then expanding the region named Windows Form Designer generated code.
|