Lesson 2: Configuring Exchange Server 2003 to Coexist with Other Messaging Systems
In addition to being able to coexist with previous versions of Exchange Server, Exchange Server 2003 can be configured to coexist with other non-Microsoft mail systems. This is very useful, for instance, if you have a UNIX environment that is being migrated to Windows and Active Directory, but you need to support the existing mail system until it can be fully migrated to Exchange Server 2003. You can use various connectors to connect Exchange Server 2003 to other mail systems to provide coexistence until you are ready to migrate.
After this lesson, you will be able to
-
Configure Exchange Server 2003 to coexist with Lotus Notes
-
Configure Exchange Server 2003 to coexist with X.400-compliant message systems
Estimated lesson time: 60 minutes
Configuring Exchange Server 2003 to Coexist with Lotus Notes
One of the more common non-Microsoft messaging systems in use is Lotus Notes. Exchange Server 2003 includes a Connector for Lotus Notes that allows synchronization between the two messaging systems. Conceptually, the connector is similar to the ADC, which is used to synchronize Active Directory with an Exchange Server 2003 directory. In this case, though, the Connector for Lotus Notes is used to synchronize Active Directory with the Lotus Notes directory.
Before you can use the Connector for Lotus Notes, you must first install it from the Exchange Server 2003 installation CD by performing the following steps:
-
On Server03, re-run Setup to start the Microsoft Exchange Installation Wizard.
-
Select Change on the Component Selection page for the Microsoft Exchange Messaging And Collaboration component.
-
Select Install for both the Connector For Lotus Notes and the Microsoft Exchange Calendar Connector.
-
Complete the wizard to install the components.
Once the Connector for Lotus Notes is installed, you can configure it using Exchange System Manager by performing the following steps:
-
On Server03, open Exchange System Manager. Navigating to the Connectors container will depend on whether you have Routing Groups displayed. If you do not have Routing Groups displayed, the Connectors container is off of the root of the organization name. If you do have Routing Groups displayed, navigate to the Routing Groups container, and then expand the First Routing Group and click the Connectors container.
-
Right-click the Connector For Lotus Notes and click Properties.
-
To configure the Connector for Lotus Notes, you use a series of property tabs. The first is the General tab, shown in Figure 5-14. On this tab, you supply the Notes Server name, and you can configure the location of the Notes.ini file, the connector mailbox name, and how to handle Notes DocLinks. Once you enter the required server name, click the Address Space tab.
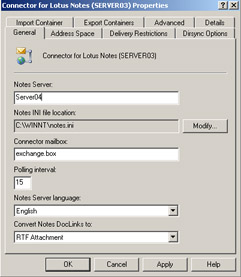
Figure 5-14: Configuring general settings -
On the Address Space tab, you configure the common e-mail address space that will be used between Exchange Server 2003 and Lotus Notes. You can also configure whether the connector scope will apply to the entire organization or only to the specific routing group. This is only an issue if you have more than one routing group configured; otherwise, the scope is the same either way. Create an SMTP address space that applies to * (meaning everything), as shown in Figure 5-15.
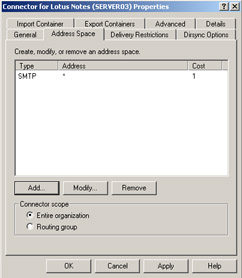
Figure 5-15: Configuring the address space -
Next, click the Import Container tab, shown in Figure 5-16. Select the Users container for importing Notes accounts. The default behavior when importing a mailbox that doesn't have a Windows account is to create a contact in Active Directory. You can also select to create a new user account, which can be either enabled or disabled.
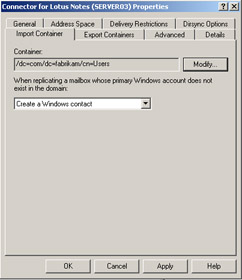
Figure 5-16: Configuring the import container -
Next, click the Export Containers tab. You can configure Active Directory to export groups or contacts from any OU to the Notes directory, and you can export multiple containers. Add the Users container, as shown in Figure 5-17, and then click the Advanced tab.
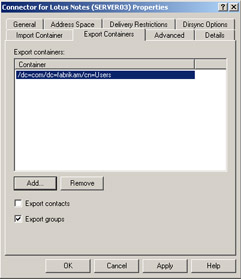
Figure 5-17: Configuring the export containers -
On the Advanced tab, shown in Figure 5-18, you configure how mail is handled. You can configure message routing, which controls what domains are routable through the connector, as well as the router mailbox and the appearance of messages. You can also configure a message size limit here. Add fabrikam.com to the list of routable domains, and then click the Dirsync Options tab.
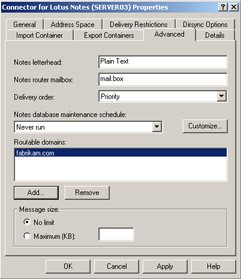
Figure 5-18: Configuring advanced options -
On the Dirsync Options tab, shown in Figure 5-19, you configure a number of synchronization options, such as the schedule for synchronization, Address Book settings, and whether to initiate Exchange to Notes or Notes to Exchange synchronization immediately. You can immediately synchronize either a full reload of all data or an immediate update, which just overrides the schedule and immediately synchronizes any changes that have been made since the last synchronization.
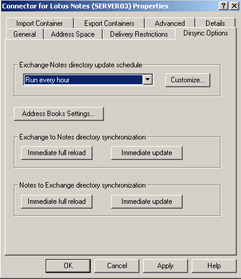
Figure 5-19: Configuring directory synchronization options -
The last settings to configure are on the Delivery Restrictions tab, shown in Figure 5-20. Here, you can configure permissions for the connector, whether you want to allow everyone to send through it or to restrict access to certain users and groups. Click OK when you are done.
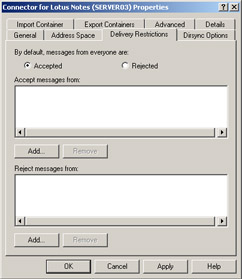
Figure 5-20: Configuring delivery restrictions
The Connector for Lotus Notes sets up directory synchronization of mail and account information, but it does not synchronize calendar information between Exchange Server and Notes. To do this, you must also configure the Microsoft Calendar Connector by performing the following steps:
-
Right-click the Calendar Connector in the Connectors container, and click Properties. The first tab is the General tab, shown in Figure 5-21. Select the connector used to import users into Active Directory. Click Modify and select the Connector For Lotus Notes. On this tab, you can also change the default settings for the maximum number of days to maintain free and busy information, the maximum age in minutes of foreign free and busy information that can be used without querying the Notes calendar, and the maximum time in seconds to wait for queries to be answered. After configuring these settings, click the Calendar Connections tab.
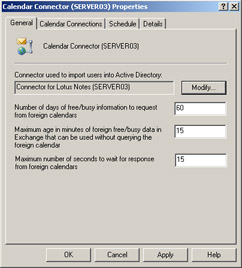
Figure 5-21: Configuring the general settings for the Calendar Connector -
To create a new Calendar Connection, click Add, then click Lotus Notes, and then click OK.
-
As shown in Figure 5-22, you are required to identify the Notes server and the location of the Notes.ini configuration file. After supplying this information, click OK.
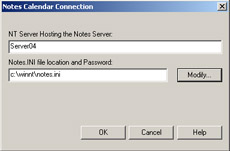
Figure 5-22: Configuring a Calendar Connection type -
Click the Schedule tab. This is where you configure the schedule for synchronizing calendar information. This is a standard calendar like the one you configured for the ADC.
The Connector for Novell GroupWise is the other type of connector that comes with Exchange Server 2003, and the procedures to set it up are essentially the same as those for setting up the Connector for Lotus Notes. As with Notes, you do have to configure the Calendar Connector separately from synchronizing mail and account information.
Configuring Exchange Server 2003 to Coexist with X.400-Compliant Messaging Systems
There are two primary messaging standards in use for transporting e-mail between foreign messaging systems. The most popular is SMTP, which most people are familiar with. The other is X.400, which is less used in the United States but is prevalent in Europe and Canada. X.400 is a standards-based system that provides a hierarchical addressing structure. Whereas an SMTP address is in the format host@domain, an X.400 address is in the format "c=country;a=administrative management domain;p=private management domain;o=organization;s=surname;g=given (first) name". An SMTP address of ChrisMeyer@Litwareinc.com in X.400 formatting would look like this:
c=USA;a=;p=LITWAREINC;o=LITWAREINC;s=Meyer;g=Chris
All versions of Exchange Server support the X.400 standard, and Exchange Server 5.5 used X.400 for all internal processing and message delivery. You didn't even need SMTP addresses with Exchange Server 5.5 unless you were communicating with SMTP-based messaging systems, such as over the Internet.
In Exchange Server 2003, you can configure an X.400 connector to connect any X.400-compliant messaging system. There are two primary uses for the X.400 connector. One is to connect X.400 messaging systems that do not support any other common protocol to Exchange Server 2003. The other is to connect Exchange Server sites that are connected by unreliable bandwidth. Typically, you would use a Site Connector to connect Exchange Server 2003 routing groups, but if the bandwidth is unreliable, you can use the messaging-based X.400 connector, which doesn't rely on a consistent or permanent link for the connection.
Configuring an X.400 connector is done through Exchange System Manager. There is nothing additional to install, unlike with the Connector for Lotus Notes or the Connector for Novell GroupWise. Before you can configure an X.400 connector, you must first create an X.400 transport stack in the Protocols container on the desired server. This provides the transport that the X.400 connector will use. There are three different types of X.400 transports available in Exchange Server 2003:
-
TCP/IP X.400 Service Transport Stack Provides an interface for connecting X.400 messaging systems over the standard Transmission Control Protocol/Internet Protocol (TCP/IP) protocol.
-
X.25 X.400 Service Transport Stack Provides an interface for using X.25-compliant devices to connect X.400 systems.
-
RAS Provides an interface for using Remote Access Service (RAS) over a dial-up connection. This option will appear only if RAS is installed on the server.
After you configure the type of transport stack you want the X.400 connector to use, you can then configure the X.400 connector to use the transport stack. This is also done through Exchange System Manager, by right-clicking the Connectors container, pointing to New, and clicking the type of X.400 connector to create. To configure the X.400 connector, you use a series of property tabs, similar to configuring other connectors. If you are connecting to a non-Exchange Server X.400 system, you will need to obtain the necessary information about the destination end of the connector, and the administrator of the other system will need your information. You have to configure both ends of the connector for synchronization to work, so configuring an X.400 connector is usually a cooperative effort between mail system administrators.
Practice: Configuring Exchange Server 2003 to Coexist with Other Messaging Systems
In this practice, you will configure the local side of an X.400 connector that will be used to connect Exchange Server 2003 to a non-Exchange Server X.400 messaging system. Perform these tasks on Server03. Enable the display of Administrative Groups and Routing Groups, if they are not already enabled.
Exercise 1: Create an X.400 Transport Stack
-
Open Exchange System Manager, and navigate to Server03 in the console.
-
Expand Server03, and click the Protocols container.
-
Right-click X.400, point to New, and click TCP/IP X.400 Service Transport Stack.
-
The Properties dialog box, shown in Figure 5-23, appears and a default name is given. You do not need to configure the OSI Address Information, so click OK.
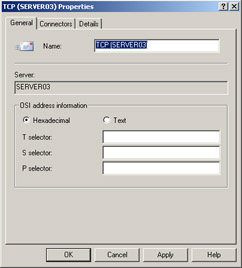
Figure 5-23: Configuring a new TCP/IP X.400 transport stack -
Expand the Routing Groups container, and then expand First Routing Group. Right-click the Connectors container, point to New, and click TCP/IP X.400 Connector.
-
On the General tab, shown in Figure 5-24, provide a descriptive name for the connector. You also have to select the remote X.400 name. This information is provided by the administrator of the other X.400 system. When you click Modify, the Remote Connection Credentials screen, shown in Figure 5-25, appears, which prompts you to enter the name and password for the remote X.400 system. The password is used to prevent an unauthorized user from creating a connection to a system.
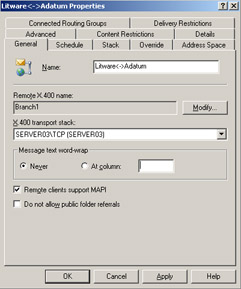
Figure 5-24: Configuring general settings for the X.400 connector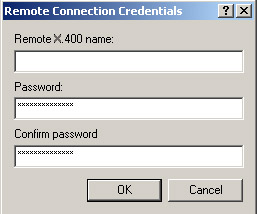
Figure 5-25: Configuring the remote X.400 name and entering its password -
When you click the Schedule tab, you see a standard schedule screen. The default setting is Always Update, though you can schedule updating for different times if unreliable bandwidth, toll charges, or other reasons deem it necessary.
-
Next, click the Stack tab. You have the option of specifying either the DNS name of the remote X.400 host or the Internet Protocol (IP) address. This information is based on the X.400 transport stack configuration on the remote end and must match for the connection to work. Enter an IP address, and then click the Override tab.
-
The Override tab allows you to configure settings specific to the X.400 connector in a situation where you had multiple connections using the same X.400 transport stack. With only a single X.400 connector, there is nothing you need to configure, so continue by clicking the Address Space tab.
-
The Address Space tab is identical to the one used to configure the Connector for Lotus Notes. You add address spaces to define the type and format of addresses used through the connector. Create an address space that matches the remote end.
-
Click the Advanced tab. This tab, shown in Figure 5-26, allows you to configure link options and message settings. If the X.400 system on the other end is an Exchange Server system, use Allow Exchange Contents to send messages using the Exchange Server 2003 internal Message Database Encapsulated Format (MDBEF). If you are connecting to a non–Exchange Server X.400 system, clear the check box to send in the standard X.400 format.
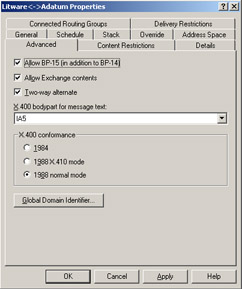
Figure 5-26: Configuring advanced message settings -
Click the Content Restrictions tab. On this tab, shown in Figure 5-27, you can restrict the types of messages and the allowed size of messages that can pass through the connector. By default, there are no restrictions, but you can define restrictions, if necessary.
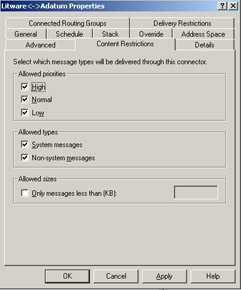
Figure 5-27: Configuring content restrictions
You are finished configuring this side of the X.400 connector. If you were connecting to another Exchange Server routing group, you would click the Connected Routing Groups tab and enter the information for the destination routing group or Exchange Server 5.5 site. Once the remote side of the X.400 connection is configured, you are able to transmit messages across the connector.
Lesson Review
The following questions are intended to reinforce key information presented in this lesson. If you are unable to answer a question, review the lesson materials and then try the question again. You can find answers to the questions in the "Questions and Answers" section at the end of this chapter.
-
You are trying to configure an X.400 connection between your Exchange Server 2003 organization and a remote X.400 messaging system running on a UNIX platform. After working with the administrator of the remote system to configure the connector, you test and find that your side of the connection receives messages fine, but on the remote end, the messages come out garbled. What do you need to do to fix the problem on your end?
-
You have set up directory synchronization between your Exchange Server 2003 organization and the Lotus Notes organization of a company that has recently merged with your company. E-mail is working fine and you are able to verify synchronization between Active Directory and Notes, but Outlook users are complaining that when they view the schedules of Notes users, the information is generally out of date. What can you do to correct the problem?
-
You are the administrator of two Exchange Server 2003 routing groups that have been connected by a T-1 line. Lately, the circuit has been very inconsistent, sometimes very slow, and sometimes dropping connection altogether. Message traffic is suffering as a result. What can you do to improve the reliability of the message transfer over the unreliable connection?
Lesson Summary
-
Three connectors can be installed from the Exchange Server 2003 installation CD: Connector for Lotus Notes, Connector for Novell GroupWise, and the Microsoft Calendar Connector.
-
The X.400 connector requires that an X.400 transport stack be configured beforehand.
-
There are three types of X.400 transport stacks: TCP/IP, X.25, and RAS. You have only the option of RAS if the Remote Access Service is installed on the server.
-
X.400 connectors can be used to connect Exchange Server routing groups when the bandwidth is too unreliable to use Site Connectors.
-
The connectors for Lotus Notes and Novell GroupWise only synchronize mailbox and user account data. You must use the Calendar Connector in conjunction with the other connectors to synchronize calendar data.
EAN: 2147483647
Pages: 221