Step 3 - Delete Unnecessary Files
Step 3—Delete Unnecessary Files
If you find that a hard-disk partition is getting low on free space, you should delete any unneeded files and programs. Windows XP comes with a Disk Cleanup utility that enables you to remove certain types of files quickly and easily. Before discussing this utility, let’s look at a few methods you can use to perform a spring cleaning on your hard disk by hand:
-
Uninstall programs you don’t use. If you have an Internet connection, you know it’s easier than ever to download new software for a trial run. Unfortunately, that also means it’s easier than ever to clutter your hard disk with unused programs. Use Control Panel’s Add Or Remove Programs icon to uninstall these and other rejected applications.
-
Delete downloaded program archives. Speaking of program downloads, your hard disk is probably also littered with ZIP files or other downloaded archives. For those programs you use, you should consider moving the archive files to a removable medium for storage. For programs you don’t use, consider deleting the archive files.
-
Remove Windows XP components that you don’t use. If you don’t use some Windows XP components (such as MSN Explorer, Paint, and some or all of the Windows XP games), in Control Panel, select Add Or Remove Programs, Add/Remove Windows Components to remove those components from your system.
-
Delete application backup files. Applications often create backup copies of existing files and name the backups using either the .bak or .old extension. Use Windows Explorer’s Search utility to locate these files and delete them.
Once you’ve completed these tasks, you next should run the Disk Cleanup utility, which can automatically remove several other types of files. Here’s how it works:
-
Select Start, All Programs, Accessories, System Tools, Disk Cleanup. The Select Drive dialog box appears.
-
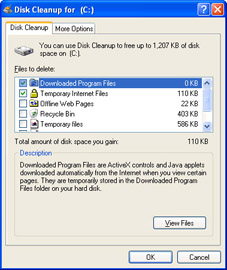
Choose the disk drive you want to work with and then click OK. Disk Cleanup scans the drive to see which files can be deleted and then displays a window similar to the one shown in Figure 12-4.

Figure 12-4: : Disk Cleanup can automatically and safely remove certain types of files from a disk drive.Tip Windows XP offers two methods for bypassing the Select Drive dialog box. One is to right-click the disk drive in Windows Explorer and then click the Disk Cleanup button on the General tab of the drive’s property sheet. The other is to select Start, Run, and enter cleanmgr /ddrive, where drive is the letter of the drive you want to work with (for example, cleanmgr /dc).
-
In the Files To Delete list, select the check box beside each category of file you want to remove. If you’re not sure what an item represents, select it and read the text in the Description box. Note, too, that for most of these items you can click View Files to see what you’ll be deleting.
-
Click OK. Disk Cleanup asks if you’re sure you want to delete the files.
-
Click Yes. Disk Cleanup deletes the selected files.
Insider Secret It’s possible to save your Disk Cleanup settings and run them again at any time. This is handy if you want to, say, delete all your downloaded program files and temporary Internet files at shutdown. Launch the command prompt and then enter the following command:
cleanmgr /sageset:1
Note that the number 1 in the command is arbitrary: you can enter any number between 0 and 65535. This launches Disk Cleanup with an expanded set of file types to delete. Make your choices and click OK. What this does is save your settings to the registry; it doesn’t delete the files. To delete the files, open the command prompt and run the following command:
cleanmgr /sagerun:1
Note that you can also create a shortcut for this command, add it to a batch file, or schedule it with the Task Scheduler.
EAN: 2147483647
Pages: 126