| I've never liked the term mail merge because the "mail" part makes everyone think about form letters and mass mailings (read: junk mail). A better term might have been data merge, because that's really what mail merge is all about: It takes data from a source filean Access table or query, an Excel list, or the Outlook Contacts folderand merges it with a special Word document populated with fields that specify where each piece of data goes. There are no restrictions on how you lay out the Word document, so the merged result can be not only customized form letters and envelopes, but just about anything you want: customized broadcast email messages, labels, name tags, phone directories, catalogs, parts lists, invoices, and much more. This section introduces you to Word's mail-merge capabilities and shows you a few tricks for getting the most out of this powerful feature. To use mail merge successfully, you need to understand only a few basic concepts: Data sourceThis is the object that contains the data you want to use. For our purposes in this section, the data sources can be an Access table or query, an Excel list, or the Outlook Contacts folder. However, Word also supports a number of other data source types, including SQL Server, Oracle, ODBC, Microsoft Works, Lotus 1-2-3, Paradox, and dBase. In this section, I assume you've already created the data source you want to use. Main documentThis is the Word document that acts as a kind of boilerplate for the merge operation. The main document (also called the starting document) includes the text that you want to appear in the merge, as well as the data source fields that serve to customize the merge. RecipientThis is Word's term for the merge result when you apply a single data source record to the starting document. The recipient can be a separate document (such as a customized form letter), an email message, or an item in a directory.
After you have these concepts down, running a mail merge couldn't be simpler because Word has a Mail Merge task pane (Tools, Letters and Mailings, Mail Merge) that takes you through the steps that are required. However, as an Office guru, you should know how to build a mail merge from scratch using the powerful Mail Merge toolbar, so that's what we'll do here. The next few sections discuss the steps you have to follow. For now, display the Mail Merge toolbar by selecting Tools, Letters and Mailings, Show Mail Merge Toolbar. Step 1: Opening the Main Document You begin the mail-merge process by opening or creating the main document that Word uses to hold the mail-merge fields and boilerplate text. You have three choices: Use the existing document. Create a new document using either the Normal template or some other template. Open a document that you used with a previous mail-merge operation.
Step 2: Selecting the Mail-Merge Document Type  | You continue the mail merge by specifying the type of document you want Word to create as the main document. Click the Main Document Setup button to display the Main Document Type dialog box, shown in Figure 6.15. |
Figure 6.15. Use the Main Document Type dialog box to specify the type of mail-merge document you want to create. 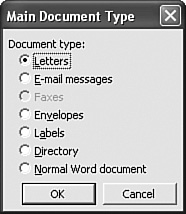
You have six document types to choose from (click OK when you've made your choice): The Faxes Document Type The Faxes document type is disabled unless you have a fax program installed that supports the Merge to Fax feature. Early versions of Microsoft Fax supported Merge to Fax, but Outlook 2003 does not work with Microsoft Fax, so the Faxes document is disabled in most Office 2003 installations. |
LettersPersonalized letters, memos, or other correspondence meant to be printed. The address, salutation, and specified fields within the text are personalized based on the information in the data source. Word creates a single document where the letter for each recipient is in its own section, separated by a page break. Email messagesPersonalized messages sent via Outlook email. Word creates separate email messages for each recipient. Email Addresses Must Be in the Data Source If you plan to merge email messages, your data source must include a field that holds the recipients' email addresses. |
EnvelopesPersonalized envelopes meant to be printed. The recipient's name and address on the envelope are personalized using the data source fields. Usually (but not always), each envelope has a corresponding letter. If you choose this type, Word displays the Envelope Options dialog box, which you use to select your envelope size, address fonts, and printing options.
Cross Reference If you're creating form letters and corresponding envelopes for printing, there's a trick you can use to avoid running separate mail merges for the letters and envelopes. See "Creating Letters and Envelopes at the Same Time," later in this chapter. |
LabelsPersonalized labels meant to be printed. The recipient's name and address on the label are personalized using the data source fields. If you choose this type, Word displays the Label Options dialog box, which you use to specify the label and printer information. If more than one label fits on a page, the document then shows several <<Next Record>> fields, which serve to separate the labels on each page. See "Inserting Word Fields" later in this chapter for more information on the <<Next Record>> field. DirectoryA list of the source data, such as a phone directory, catalog, parts list, and so on. Each item in the list (which Word stills calls a "recipient") is personalized from the source data. Word creates a single document that contains the entire list. Normal Word documentA regular Word document that you personalize by adding fields from the data source.
Step 3: Opening the Data Source  | The next mail-merge step is to open the data source that you want to use to personalize the main document. Click the Open Data Source button in the Mail Merge toolbar. The Select Data Source dialog box appears, as shown in Figure 6.16. |
Figure 6.16. Use the Select Data Source dialog box to choose the data source you want to use with your mail merge. 
If you have already defined the data source you want to use (see "Defining a New Data Source," later in this chapter), select it and click Open. Otherwise, use the Files of Type list to select the source type, such as Access Databases or Excel Files and then click Open. Word displays the Select Table dialog box, from which you select the query or table (for an Access data source) or named range (for an Excel data source) that you want to use, and then click OK. Selecting the Outlook Contacts Folder as the Data Source If you use the Mail Merge task pane to set up your mail merge, the Select Recipients pane has a Select from Outlook Contacts option that enables you to use Outlook's Contacts folder as the data source. It's frustrating, but Word offers no way to choose the Contacts folder as the data source using the Select Data Source button or any other Mail Merge toolbar button. There are two ways you can work around this bizarre limitation. Here's the first workaround: 1. | In Outlook, select the Contacts folder.
| 2. | If you want to limit the number of contacts included in the data source, either select the contacts you want or customize the view with a filter to display only the contacts you want.
| 3. | If you want to limit the number of fields included in the data source, customize the view to display only the fields you want.
| 4. | Select Tools, Mail Merge to display the Mail Merge Contacts dialog box.
| 5. | Specify the contacts by activating either All Contacts in Current View or Only Selected Contacts.
| 6. | Specify the fields by activating either All Contact Fields or Contact Fields in Current View.
| 7. | Specify the main document by activating either New Document or Existing Document. If you choose the latter, type the document path or click Browse.
| 8. | Use the Document Type list to select the merge document type.
| 9. | Click OK.
|
The second workaround uses a short VBA macro: Sub SelectContactsAsDataSource () With ActiveDocument .MailMerge.OpenDataSource _ Name:="", _ SubType:=wdMergeSubTypeOutlook End With End Sub
When you run this macro, Word displays the Select Contact List Folder dialog box. Select the Contacts folder you want to use and then click OK. (If the Select the Contact List Folder dialog box appears again, select the folder again and click OK.) Defining a New Data Source If you have an Access or Excel data source that you use often, you should define it as a data source file that appears in the My Data Sources folder for easy access. Here are the steps to follow: 1. |  Click the Open Data Source button in the Mail Merge toolbar. The Select Data Source dialog box appears. Click the Open Data Source button in the Mail Merge toolbar. The Select Data Source dialog box appears.
| 2. | Click New Source to start the Data Connection Wizard.
| 3. | Select ODBC DSN and then click Next.
| 4. | Select MS Access Database or Excel Files and then click Next.
| 5. | Select the Access or Excel file that contains the data source and click OK.
| 6. | Select the Access query or table or Excel named range that you want to use as the data source and then click Next.
| 7. | (Optional) Type a Description of the data source.
| 8. | Click Finish.
|
Step 4: Selecting, Sorting, and Filtering the Recipients With your data source set, you can use it to select which recipients (records) you want to include in the mail merge. If you've already done this in advance using an Access query or an Excel named range, you can skip this step. Selecting Recipients  | Click the Mail Merge Recipients button in the Mail Merge toolbar to display the Mail Merge Recipients dialog box, shown in Figure 6.17. |
Figure 6.17. Use the Mail Merge Recipients dialog box to select, sort, and filter the mail-merge recipients. 
To select the mail-merge recipients, use the following techniques: To remove a recipient, deactivate its check box. To select a recipient, activate its check box. To remove all recipients, click Clear All. (This is handy if you want to select only a few recipients from a large list. Remove all the recipients and then select the ones you want.) To select all recipients, click Select All.
Finding a Recipient If you have a large data source and you're having trouble locating a recipient, click Find to open the Find Entry dialog box. Type your search string into the Find text box. To search only a specific field, activate the This Field option and select the field from the list. |
Filtering Recipients Rather than activating and deactivating recipient check boxes, you might prefer to filter the recipients based on the data in one or more fields. To filter the recipients, first notice that each column header has a drop-down arrow. Clicking that arrow in the column you want to work with displays a list with four values: (All)Displays all the recipients. (Blanks)Displays only those recipients for which the current field is blank. (Nonblanks)Displays only those recipients for which the current field is not blank. (Advanced)Displays the Filter and Sort dialog box. In the Filter Records tab, shown in Figure 6.18, use the Field list to select the field you want to use for the filter; use the Comparison list to select an operator such as Equal To or Contains; use the Compare To text box to enter the comparison value. To create compound filter criteria, fill in as many rows as you need, choosing And or Or for each. Figure 6.18. Select (Advanced) in any column's drop-down list to display the Filter and Sort dialog box. 
Sorting Recipients In mail-merge operations, the sort of the recipients is often crucial. For example, if you're sending out a mass mailing, putting the recipients in postal code order can help you get a reduced rate. Also, if you'll be creating both letters and corresponding envelopes or labels, you must ensure that both merge operations use the same sort order. In the Mail Merge Recipients dialog box, you can use two methods to sort the entries: Click a column header. This sorts the recipients based on the data in that column. Clicking the same column header toggles between an ascending and descending sort. To sort on multiple fields, click the column headers in reverse order of priority. For example, suppose you want to sort customers by the City field, and then within each city you want to sort by the CompanyName field. To do this, first click the CompanyName header and then click the City header. Use the Filter and Sort dialog box. Click any column's drop-down arrow and then click (Advanced). In the Sort Records tab (see Figure 6.19), use the Sort By list to choose the main sort field, and then activate either Ascending or Descending. To sort on multiple fields, use the Then By lists. Figure 6.19. Use the Sort Records tab to sort the recipients on up to three fields. 
Step 5: Adding Text and Merge Fields You're now ready to start building the main document, which requires the bulk of your mail-merge efforts. You add two things to the document: Boilerplate text (and perhaps other elements such as lines and clip art)This is the text that remains constant in each letter, email message, envelope, and so on. Merge fieldsThese are the items that personalize the mail merge for each recipient. The next few sections show you how to add the various types of merge fields.
Inserting an Address Block Recipient addresses are a common mail-merge feature. They appear on envelopes and labels, of course, but they're also found at the top of form letters, as well as in directory listings, invoices, purchase orders, and many other applications. Unfortunately, addresses can also be time-consuming to work with because they require you to add separate fields for name, company name, street address, city, region, and so on. Having to do this repeatedly in different mail merges is a recipe for tedium and frustration. Fortunately, the Word programmers took pity on poor mail mergers and came up with an efficient solution: the address block. This is a single field that includes the standard address items and is customizable to suit your address style. To add an address block, follow these steps: 1. | Position the cursor where you want the address block field to appear.
| 2. |  Click the Insert Address Block button on the Mail Merge toolbar. Word displays the Insert Address Block dialog box, shown in Figure 6.20. Click the Insert Address Block button on the Mail Merge toolbar. Word displays the Insert Address Block dialog box, shown in Figure 6.20.
Figure 6.20. Use the Insert Address Block dialog box to configure the address block for your mail merge. 
| 3. | Use the following check boxes to configure the address fields (watch the Preview box to see the effect on the resulting address block):
Insert Recipient's Name in This FormatToggles the recipient's name on and off. If you include the name, use the list to select the name format you prefer.
Insert Company NameToggles the company name on and off.
Insert Postal AddressToggles the postal address on and off. If you include the postal address, use the option buttons to determine whether the country/region field is included.
Format Address According to the Destination Country/RegionConfigures the address according to the address standards used in the recipient's country.
| 4. | Click OK.
|
Word inserts the address block, which appears in the document as follows: <<AddressBlock>>
The AddressBlock Field The <<AddressBlock>> code is a front end for Word's {ADDRESSBLOCK} mail-merge field. To see the full field syntax, click <<AddressBlock>> and then press Shift+F9. (For more about Word's fields, see Chapter 1, "Building Dynamic Documents in Word.") |
Working with Labels  | If you're creating a label mail merge, you need to insert an address block for each label. If you have multiple labels per page, place the first address block in the first label. For the other labels, you can insert the address blocks by hand between the <<Next Record>> fields. However, Word offers an easier method: Click the Propagate Labels button in the Mail Merge toolbar. This copies the layout of the first label to all the other labels. |
|
Matching Fields If when you preview the mail merge (see "Step 6: Previewing the Results," later in this chapter) the address block doesn't include one or more of your address items, that's probably because Word didn't recognize those fields as part of the address. For example, to include a person's name in an address block, Word looks for a separate first name and last name with the names FirstName and LastName. If your data source has the entire name in a field named ContactName, Word won't recognize it. To solve this problem, you need to tell Word which fields in your data source correspond with the fields that Word expects. This is called matching fields and it works like this: 1. |  Click the Match Fields button in the Mail Merge toolbar. (You can also click Match Fields in the Insert Address Block dialog box.) The Match Fields dialog box appears, as shown in Figure 6.21. Click the Match Fields button in the Mail Merge toolbar. (You can also click Match Fields in the Insert Address Block dialog box.) The Match Fields dialog box appears, as shown in Figure 6.21.
Figure 6.21. Use the Match Fields dialog box to match your data source address fields with the fields expected by Word. 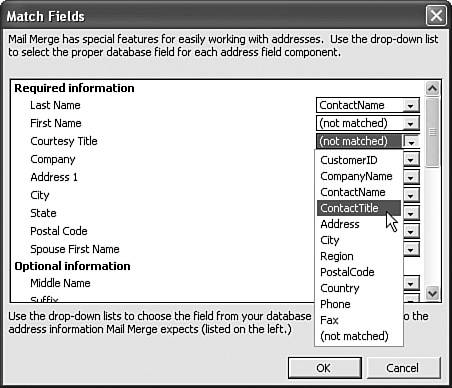
| 2. | The list on the left contains the items that Word expects. Find the item that corresponds to one of your missing address fields.
| 3. | On the right, use the associated list to select the corresponding field from your data source.
| 4. | Repeat steps 2 and 3 for all your nonstandard address fields.
| 5. | Click OK.
|
Creating Letters and Envelopes at the Same Time If you're creating a form letter for printing, you almost certainly want to also create envelopes in which to mail those letters. Normally, this means running a form letter mail merge, then a separate envelope mail merge, and then collating the two jobs. If that sounds like a lot of work, you're right, it is. You can simplify your life by creating the form letters and envelopes within a single mail merge. Follow these steps: 1. | Select Tools, Letters and Mailings, Envelopes and Labels.
| 2. | Display the Envelopes tab.
| 3. | Enter the Return Address you want to use on the envelopes, as well as any other envelope options you require. Be sure to leave the Delivery Address blank.
| 4. | Click Add to Document. Your merge document now has two pages: page 1 is the envelope you just created and page 2 is the form letter.
| 5. | In the envelope page (page 1), double-click at the point where you want the recipient address to appear, and then insert an Address Block field.
| 6. | Build the rest of your form letter and complete the mail merge as discussed later in this chapter.
|
When you print the mail merge, for each recipient the envelope prints first, followed by the form letter. Inserting a Greeting Line If you merge a lot of form letters, you know the greeting is another common merge item, and it can be problematic not only because you have to insert multiple fields (usually the courtesy title and last name), but you also have to deal with invalid names (such as using a generic greeting such as "Dear Sir or Madam"). Happily, you can avoid all of this by inserting a greeting line, a single field that displays the salutation and name the way you want and also handles invalid names automatically. Follow these steps to insert a greeting line: 1. | Position the cursor where you want the greeting line to appear.
| 2. |  Click the Insert Greeting Line button on the Mail Merge toolbar. Word displays the Greeting Line dialog box, shown in Figure 6.22. Click the Insert Greeting Line button on the Mail Merge toolbar. Word displays the Greeting Line dialog box, shown in Figure 6.22.
Figure 6.22. Use the Greeting Line dialog box to configure the greeting line for your mail merge. 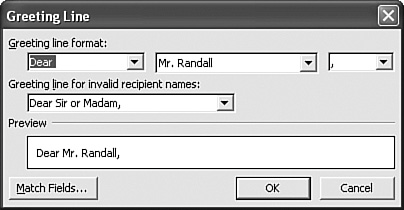
| 3. | In the Greeting Line Format section, use the lists to select the salutation, the name format, and the punctuation mark.
| 4. | Use the Greeting Line for Invalid Recipient Names list to select the greeting to use for invalid names in the data source.
| 5. | Click OK.
|
Word inserts the greeting line, which appears in the document as the following merge field: <<GreetingLine>>
The GreetingLine Field The <<GreetingLine>> code is a front end for Word's {GREETINGLINE} mail-merge field. To see the full field syntax, click <<GreetingLine>> and then press Shift+F9. |
Inserting Data Source Fields If you're creating an envelope or label mail merge, the address block may be all you need. For letters, email messages, and directories, however, you probably also need to insert nonaddress fields from the data source, as well as individual address fields. Here's how it's done: 1. | Position the cursor where you want the field to appear.
| 2. |  Click the Insert Merge Fields button in the Mail Merge toolbar. The Insert Merge Field dialog box appears, as shown in Figure 6.23. Click the Insert Merge Fields button in the Mail Merge toolbar. The Insert Merge Field dialog box appears, as shown in Figure 6.23.
Figure 6.23. Use the Insert Merge Field dialog box to insert any field from your data source. 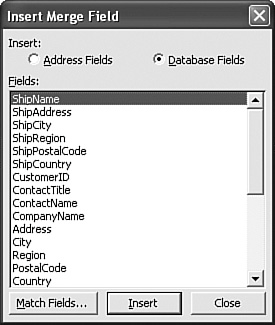
| 3. | Activate the Database Fields option. (You use the Address Fields to insert individual fields from the address block.)
| 4. | Select the field you want to insert.
| 5. | Click Insert.
| 6. | Repeat steps 4 and 5 to insert any other fields you need.
| 7. | Click Close.
|
 | Figure 6.24 shows a Word document with some text and various fields added, including an address block, a greeting line, and several data source fields. To view the fields highlighted, click the Highlight Merge Fields button in the Mail Merge toolbar. |
Figure 6.24. A Word mail-merge document with text and merge fields. 
Using MergeField If you prefer to enter your fields manually (by pressing Ctrl+F9), you can insert a data source field by using MergeField, which is one of Word's mail-merge fields: {MERGEFIELD FieldName}
Here, replace FieldName with the name of the data source field. |
Adding Formatting Switches If you want to format text, dates, times, or numbers, you need to add Word's field formatting switches (see "Understanding Field Code Syntax" in Chapter 1). To add a switch to a field, click the field and then press Shift+F9 to see the underlying Word field. Add your switch at the end of the field, before the closing brace (}). |
Inserting Word Fields Besides the AddressBlock and GreetingLine fields you've seen so far, Word has a number of other merge fields that you can use to control the merge. You can insert one of these fields by clicking Insert Word Field in the Mail Merge toolbar and then clicking the field you want. There are nine fields available: AskPrompts the user for input and stores the result in a bookmark. The field equivalent is {ASK}. Fill-inPrompts the user for input and stores the result in the merge document. See "Personalizing Mail Merges with Fill-In Fields," later in this chapter. If...Then...ElseInserts text into the document based on the result of a conditional expression. See "Intelligent Merging I: The If Field," later in this chapter. Merge Record #Displays the record number for each record in the mail merge. The field equivalent is {MERGEREC}. For example, you could use this field to generate automatic invoice numbers (in this case, 101, 102, and so on): Invoice Number: {=Sum(100,{MERGEREC})}
Merge Sequence #Displays the record number from the original data source for each record in the mail merge. This will be different from the Merge Record # value if the mail-merge records are a subset of the original data source. For example, suppose the original data source has 100 records and the mail merge is filtered to include only records 50 through 100. The Merge Record # field assigns 1 to the first mail-merge record; the Merge Sequence # field assigns 50 to the first record. The field equivalent is {MERGESEQ}. Next RecordMoves to the next record in the data source. This is most often used in directory-type merges where you have multiple records in a single document. The field equivalent is {NEXT}. For example, suppose you're creating a simple phone list that consists of a person's first name, last name, and phone number. If you want only five records to appear per page, you'd set up the main document like so: <<FirstName>> <<LastName>> <<PhoneNumber>> <<Next Record>> <<FirstName>> <<LastName>> <<PhoneNumber>> <<Next Record>> <<FirstName>> <<LastName>> <<PhoneNumber>> <<Next Record>> <<FirstName>> <<LastName>> <<PhoneNumber>> <<Next Record>> <<FirstName>> <<LastName>> <<PhoneNumber>>
Next Record IfMoves to the next record in the data source, but applies a conditional expression to determine whether the record appears in the current document. This is the same as filtering out the record based on the condition, so it's always easier to use the Filter and Sort dialog box. See "Filtering Recipients," earlier in this chapter. Set BookmarkSets the value of a bookmark. The field equivalent is {SET}. Skip Record IfSkips the current merge record if the record satisfies a conditional expression. Again, this is the same as filtering the records, so see "Filtering Recipients," earlier in this chapter.
Personalizing Mail Merges with Fill-In Fields By definition, the mail-merge results are personalized documents, because the information in each one is at least partly based on whatever information is in its data source record. However, a document may require personalized data that doesn't come from the data source. For example, you might want to put the current date at the top of each letter, which is easily done with the Date field. For personalized items that have no field equivalent, you can still insert them into your mail merge by prompting the user for the appropriate value, either once for the entire merge or for each recipient. In a letter, for example, you might want to personalize the complimentary close based on whether you know the person. You can prompt for personalized information by using a Fill-in field: 1. | In the Mail Merge toolbar, pull down the Insert Word Field list and select Fill-in. The Insert Word Field: Fill-in dialog box appears, as shown in Figure 6.25.
Figure 6.25. Use a Fill-in field to prompt the user for data to insert into the mail-merge documents. 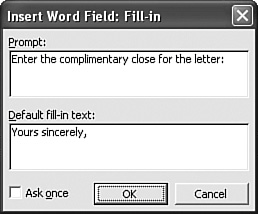
| 2. | Use the Prompt box to enter the text that appears in the dialog box that prompts the user to enter the data.
| 3. | Use the Default Fill-in Text box to enter a default value for the field.
| 4. | If you want the prompt to appear only once at the beginning of the mail merge (so the field value applies to every document), activate the Ask Once check box.
Prompt with Care on Large Data Sources One of the most commonand most frustratingFill-in field errors is to leave the Ask Once check box deactivated in a merge that uses a data source with hundreds or even thousands of records. This means, of course, that Word will dutifully prompt you hundreds or thousands of times. If your data source is a big one, either activate the Ask Once check box or forget about using a Fill-in field. |
| 5. | Click OK. Word displays the prompt (for the main document), as shown in Figure 6.26.
Figure 6.26. An example of a Fill-in field prompt dialog box. 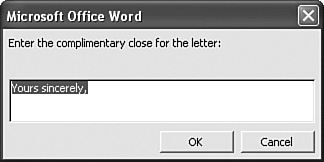
| 6. | Enter the value and click OK.
|
Intelligent Merging I: The If Field In some merge operations, you might want to customize a portion of the text based on some aspect of the data in the current record. For example, in a letter thanking people for donations, you might want to check the size of the donation: if it's over a certain amount, insert the word "generous" before each instance of the word "donation." Similarly, if your data source has a courtesy title field that contains "Mr.," "Miss," "Mrs.," or "Ms.," you could customize the greeting to display "Dear Sir" for recipients with "Mr." as the courtesy title, and "Dear Madam" for all the others. You can do this by inserting an If...Then...Else field, which is the same as an If Word field (in Chapter 1, see the section titled "Creating Decision-Making Fields"). This field evaluates a conditional expression and then, depending on the result, inserts into the document one of two text values. Follow these steps to set up such a field: 1. | In the Mail Merge toolbar, pull down the Insert Word Field list and select If...Then...Else. The Insert Word Field: IF dialog box appears, as shown in Figure 6.27.
Figure 6.27. Use an If field to insert one of two text values based on the result of a conditional expression. 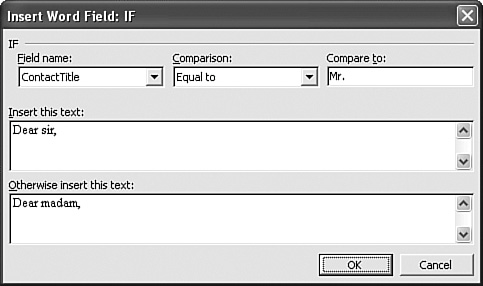
| 2. | Use the Field Name list to choose the field you want to use in the conditional expression.
| 3. | Use the Comparison list to choose a conditional operator (such as Equal To or Is Blank).
| 4. | Use the Compare To text box to enter the value to which you want the field compared. (You don't need to enter a value if you chose either Is Blank or Is Not Blank as the comparison operator.)
| 5. | Use Insert This Text box to enter the text you want to insert into the document if the comparison returns a True result.
| 6. | Use Otherwise Insert This Text box to enter the text you want to insert into the document if the comparison returns a False result.
| 7. | Click OK.
|
Step 6: Previewing the Results  | When you've completed your main documentor even if the document is only partially completeyou can preview the merge to make sure things look the way you want. You switch to preview mode by clicking the View Merged Data button in the Mail Merge toolbar. Figure 6.28 displays a preview of the merge document shown earlier in Figure 6.24. |
Figure 6.28. A preview of the merge document from Figure 6.24. 
When the preview mode is active, use the following Mail Merge toolbar techniques to navigate the records:  Click First Record to display the first record in the data source. Click First Record to display the first record in the data source.
 Click Previous Record to display the previous record in the data source. Click Previous Record to display the previous record in the data source.
To go to a specific record number, type the number into the Go to Record text box (see Figure 6.28) and press Enter.  Click Next Record to display the next record in the data source. Click Next Record to display the next record in the data source.
 Click Last Record to display the last record in the data source. Click Last Record to display the last record in the data source.
 To locate a record, click Find Entry and use the Find Entry dialog box to enter your search criteria. To locate a record, click Find Entry and use the Find Entry dialog box to enter your search criteria.
 | This is also a good time to check the mail merge for errors. Click the Check for Errors button in the Mail Merge toolbar to display the Checking and Reporting Errors dialog box shown in Figure 6.29. Activate the Simulate the Merge and Report Errors in a New Document option and then click OK. Word runs through a simulated version of the merge. If it finds any errors, it displays them in a new document. |
Figure 6.29. Use the Checking and Reporting Errors dialog box to run a simulated merge that checks for errors. 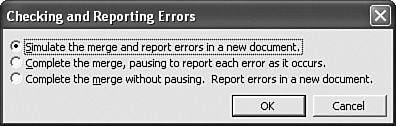
Step 7: Completing the Mail Merge You're now ready to complete the merge. Word gives you three choices:  Merge to New DocumentClick to display the merge results in a new document. In the Merge to New Document dialog box that appears (see Figure 6.30), specify the records you want to include in the merge: All, Current Record only, or the range of record numbers that you enter in the From and To text boxes. Merge to New DocumentClick to display the merge results in a new document. In the Merge to New Document dialog box that appears (see Figure 6.30), specify the records you want to include in the merge: All, Current Record only, or the range of record numbers that you enter in the From and To text boxes.
Figure 6.30. Use the Merge to New Document dialog box to specify the range of records to include in the merge. 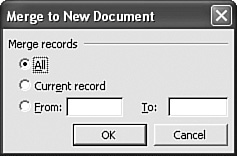
 Merge to PrinterClick to send the merge results directly to your printer. Use the Merge to Printer dialog box (it has the same layout as the Merge to New Document dialog box) to specify the range of records you want to include in the merge. Click OK to display the Print dialog box and choose your print options. Merge to PrinterClick to send the merge results directly to your printer. Use the Merge to Printer dialog box (it has the same layout as the Merge to New Document dialog box) to specify the range of records you want to include in the merge. Click OK to display the Print dialog box and choose your print options.
 Merge to E-mailClick to send the merge results as email messages. The Merge to E-mail dialog box not only lets you choose the records to include in the merge, it also lets you select the data source field that includes the recipient email addresses, the Subject line, and the message format (Attachment, Plain Text, or HTML). When you click OK, Word sends the results to Outlook. Merge to E-mailClick to send the merge results as email messages. The Merge to E-mail dialog box not only lets you choose the records to include in the merge, it also lets you select the data source field that includes the recipient email addresses, the Subject line, and the message format (Attachment, Plain Text, or HTML). When you click OK, Word sends the results to Outlook.
From Here To get the details on using fields in Word, see the section in Chapter 1 titled "Using Fields to Insert Dynamic Data." For more information on using lists in Excel, see the section in Chapter 2 titled "Analyzing Data with Lists." You'll find information on creating Access queries in Chapter 4, "Taming Access Data."
|