Preventing Form Errors by Validating Data
| If, as the cooks say, a recipe is only as good as its ingredients, a database is only as good as its data. Viewing, summarizing, and analyzing the data are meaningless if the table you're working with contains erroneous or improper data. For basic data errors (for example, entering the wrong date or transposing a number's digits), there's not a lot you can do other than exhorting yourself or the people who use your forms to enter data carefully. Fortunately, you have a bit more control when it comes to preventing improper data entry. By "improper," I mean data that falls into either of the following categories:
The next few sections show you several techniques that can help you reduce these types of errors. Helping Users with Text PromptsYou can prevent improper entries to a certain extent by adding text that provides details on what is allowable inside a particular cell. You have two choices:
For instance, Figure 4.25 shows a form used as a Mortgage Calculator. Notice the labels added beside the Interest Rate and Term text boxes that specify to the users that they must enter the interest rate per annum and the term in years. Note, too, the status bar text that appears when the users enter the Interest Rate field. Figure 4.25. Use form labels and status bar text to give the users text prompts about the data they must enter.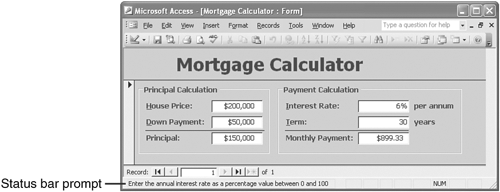 Preventing Errors with Data Validation ExpressionsThe problem with text prompts is they require other people to both read and act on the text. The better solution for preventing data-entry errors is the Access data validation feature. With data validation, you create rules that specify exactly what kind of data can be entered and in what range that data can fall. You can also specify pop-up input messages that appear when a cell is selected, as well as error messages that appear when data is entered improperly. Follow these steps to define the settings for a data validation rule:
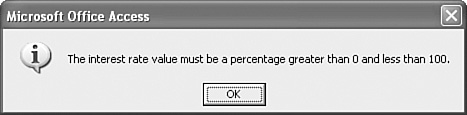
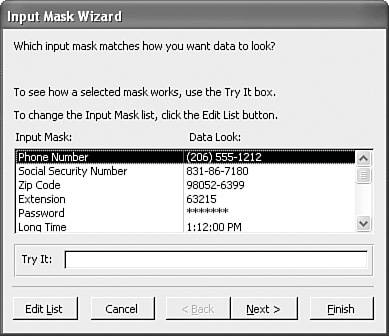
For example, suppose you want the users to enter an interest rate. This should be a positive quantity, of course, but it should also be less than 1. (That is, you want to users to enter 6% as 0.06 instead of 6.) Figure 4.26 shows the property sheet for a field named InterestRate that meets these criteria by defining the following expression in the Validation Rule property: >0 And <1 Figure 4.26. Use the Validation Rule property to enter a data validation expression for a field.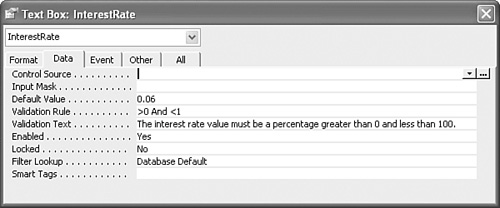 Figure 4.26 also shows a string in the Validation Text property. If the users enter invalid data (that is, any value for which the Validation Rule expression returns False), the Validation Text appears in a dialog box, as shown in Figure 4.27. Figure 4.27. If the users enter invalid data in the field, Access displays a dialog box such as this one, which uses the string entered into the Validation Text property. Using Input Masks for Consistent and Accurate Data EntryOne of the major headaches that database administrators have to deal with is data entered in an inconsistent way. For example, consider the following phone numbers: (123)555-6789 (123) 555-6789 (123)5556789 123555-6789 1235556789 These kinds of inconsistencies might appear trivial, but they can cause all kinds of problems, from other users misreading the data, to improper sorting, to difficulties analyzing or querying the data. And it isn't just phone numbers that cause problems. You also see them with social security numbers, ZIP Codes, dates, times, account numbers, and more. One way to avoid such inconsistencies is to add a label or status bar message that specifies the correct format to use. As with data validation, however, these prompts are not guaranteed to work every time (or even most of the time). A better solution is to apply an input mask to the field. An input mask is a kind of template that shows users how to enter the data and prevents them from entering incorrect characters (such as a letter where a number is required). For example, here's an input mask for a phone number: (___)___-____ Each underscore (_) acts as a placeholder for (in this case) a digit, and the parentheses and dash appear automatically as the user enters the number. Using the Input Mask WizardThe easiest way to create an input mask is to use the Input Mask Wizard. Here are the steps to follow:
Creating a Custom Input Mask ExpressionIf your data doesn't fit any of the predefined input masks, you need to create a custom mask that suits your needs. You do this by creating an expression that consists of three kinds of characters:
Table 4.3 lists the data placeholders you can use to build your input mask expressions.
Table 4.4 lists the modifiers and literals you can use to build your input mask expressions.
You can enter your input mask expressions directly into the Input Mask property, or you can modify a predefined input mask using the Input Mask Wizard. For example, suppose your company uses account numbers that consist of four uppercase letters and four digits, with a dash () in between. Here's an input mask suitable for entering such numbers: >aaaa\-0000 Note, too, that input masks can contain up to three sections separated by semicolons (;): first;second;third
For example, following is an input mask for a ZIP Code that stores the dash separator and displays dots (.) as placeholders: 00000\-9999;0;. |
EAN: 2147483647
Pages: 129