| We tend to take it for granted now, but one of Windows's biggest advantages is what technical types call its "consistent user interface." This just means that most Windows programs operate in more or less the same way. For example, pull-down menus are now such a common feature of the PC landscape that we hardly notice them; we just assume that anybody with even a modicum of Windows experience knows how to work with them. That's a huge plus for your own VBA interface design chores because it means you have a built-in mechanism for delivering access to your proceduresa mechanism, moreover, that requires no support or training on your part. In other words, you can add your macros as commands on the application's existing menu system, and therefore put your VBA procedures within easy reach. You can even create your own menus so as not to clutter the application's built-in menus. This section shows you how to create custom menus and commands and associate macros with them. First, a Game Plan Before you dive into the menu customization techniques outlined in the next few sections, you need to take a step back and plan what you want to do. For starters, bear in mind that these techniques require access to the user's computer, so they only apply to the following situations: -
You're a corporate developer and your VBA code is designed for a limited number of employees . (After all, you wouldn't want to tweak the menu systems of a thousand machines!) -
You're a consultant putting together a system for a client. -
You want easier access to the macros and procedures you've developed for your own use. In each case, I'm assuming you can sit down in front of the computer, load the underlying application, and make the appropriate menu customizations. On the other hand, there will be plenty of situations where you can't access the user's computer directly; for example, if you distribute your VBA code electronically or via some other means where you have no direct contact with the user. Similarly, you might be building VBA procedures for use on hundreds or thousands of computers, and it's impractical to customize each system by hand. For these and similar cases, you need to use code to customize your menus. I'll tell you how to do this later in this chapter (see "Menus, Toolbars, and VBA"). The next thing you have to consider is the layout of your custom menus. You can use three levels of customization: -
Menus This level involves creating an entirely new menu that appears in the application's menu bar. Use this level when you have many different procedures and you don't want to cram them all into the application's built-in menus. -
Submenus This level involves adding one or more submenus to the application's built-in menu system. (A submenu is a menu that appears when you select a menu command.) Use this level if you have several related procedures that you want to group together. -
Menu commands This level involves tacking a new command or two onto one or more of the application's built-in menus. Use this level when you have just a few procedures. Creating a New Menu If you'll be adding a lot of new commands to the application's menu system, you might not want to bog down the existing menus with too many items. To keep things clean, you can create a custom menu just for your procedures. Here are the steps to follow: -
Either select Tools, Customize or right-click the menu bar and select Customize from the shortcut menu. The application displays the Customize dialog box. -
Activate the Commands tab. -
In the Categories list, highlight New Menu, as shown in Figure 14.1. Figure 14.1. Use the Commands tab in the Customize dialog box to create new menus in the application. 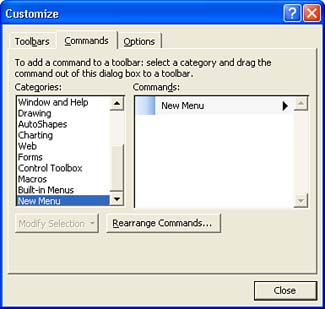 -
In the Commands list, drag the New Menu item up to the menu bar. You'll see a vertical bar that marks the spot where the new menu will appear. When the bar is positioned where you want your menu, drop the New Menu item. -
Either click Modify Selection or right-click the new menu, and then use the Name box in the shortcut menu to name your new menu, as shown in Figure 14.2. Place an ampersand (&) before whichever letter you want to use as an accelerator key. (Remember: the accelerator key enables the user to drop down the menu by holding down Alt and pressing the key. Make sure the key you choose doesn't conflict with an accelerator key used by any other menu.) Figure 14.2. Use this shortcut menu to rename the new menu bar item. 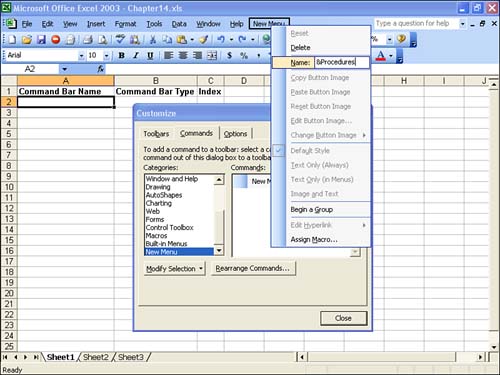 -
Press Enter. Creating a New Submenu To work with submenus, you have two choices: Either way, you follow the steps outlined in the preceding section. However, instead of dragging the New Menu item to the menu bar, drag it to an existing menu. When the menu pulls down, drag the mouse pointer down into the menu to the position where you want the submenu to appear. When you drop the item, a new submenu is created. To rename the submenu item, either right-click the item or highlight the item and click Modify Selection. Then use the Name text box to enter the new name (including an accelerator key). Adding Menu Commands and Assigning Macros You're now ready to create the custom menu commands for your macros. Remember that you can create these commands in any of the following locations: -
On a custom menu that you've created -
On a custom submenu that you've created -
On one of the application's built-in menus Here are the steps you need to work through: -
Follow the steps outlined earlier to display the Commands tab in the Customize dialog box. -
In the Categories list, highlight the Macros item. -
In the Commands list, drag the Custom Menu Item to a custom menu, a custom submenu, or a built-in menu. -
When the menu opens, drag the item down into the menu and then drop the item at the position where you want the command to appear. -
Right-click the new command, or click Modify Selection, and then use the Name box in the shortcut menu to name your new menu. As before, place an ampersand (&) prior to whichever letter you want to use as an accelerator key. (To ensure that the Modify Selection menu remains onscreen, don't press Enter when you're done.) -
In the Modify Selection menu, click Assign Macro. The Assign Macro dialog box appears, as shown in Figure 14.3. Figure 14.3. Use this dialog box to choose the macro you want to assign to the new menu item. 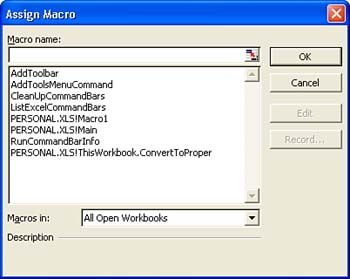 -
Use the Macro name list to highlight the macro you want to assign to the new menu command, and then click OK.  | Although my focus in this chapter is only on creating menu items to run macros and procedures, you can use the Customize dialog box to remake any of the application's menus in your own image. Just follow the basic instructions in the last couple of sections to create submenus and menu commands. Instead of macros, however, you use the other items in the Categories list to create commands for application features that don't have existing commands. |
Deleting Menus and Menu Commands If you don't need a custom menu, submenu, or command any longer, you can use a couple of methods to delete these items. First, display the Customize dialog box and then try either of the following techniques: |