| After you've created your form, the next step is to incorporate your handiwork into some VBA code. This involves three separate techniques: Displaying the Form Each UserForm object has a Show method that you use to display the form to the user . For example, to display a form named UserForm1, you would use the following statement: UserForm1.Show Alternatively, you may want to load the form into memory but keep it hidden from the user. For example, you may need to perform some behind-the-scenes manipulation of the form before showing it to the user. You can do this by executing the Load statement: Load Form | Form | The name of the form you want to load. | tip  | Before getting to the code stage, you might want to try out your form to make sure it looks okay. To do this, activate the form and then either select Tools, Run Sub/UserForm, press F5, or click the Run Sub/UserForm button on the toolbar. |
This statement brings the form object into memory and fires the form's Initialize event. From there, you can display the form to the user at any time by running the form's Show method as discussed above. Unloading the Form Once the user has filled out the form, you'll probably want her to click a command button to put whatever values she entered into effect. Alternatively, she could click some sort of Cancel button to dismiss the form without affecting anything. However, just clicking a command button doesn't get rid of the form ”even if you've set up a command button with the Default or Cancel property set to True. Instead, you have to add the following statement to the event handler for the command button: Unload Me The Unload command tells VBA to dismiss the form. Note that the Me keyword refers to the form in which the event handler resides. For example, the following event handler processes a click on a command button named cmdCancel : Private Sub cmdCancel_Click() Dim result as Integer result = MsgBox("Are you sure you want to Cancel?", _ vbYesNo + vbQuestion) If result = vbYes Then Unload Me End Sub You should note, however, that simply unloading a form doesn't remove the form object from memory. To ensure proper cleanup (technically, to ensure that the form object class fires its internal Terminate event), Set the form object to Nothing . For example, the following two lines Show the TabStripTest form and then Set it to Nothing to ensure termination: TabStripTest.Show Set TabStripTest = Nothing Processing the Form Results When the user clicks OK or Cancel (or any other control that includes the Unload Me statement in its Click event handler), you usually need to examine the form results and process them in some way. Obviously, how you proceed depends on whether the user has clicked OK or Cancel because this almost always determines whether the other form selections should be accepted or ignored. -
If OK is clicked, the Click event handler for that button can process the results. In other words, it can read the Value property for each control (for example, by storing them in variables for later use in the program). -
If Cancel is clicked, the code can move on without processing the results. (As shown earlier, you can include code to ask the user if he's sure he wants to cancel.) Table 13.1 lists all the controls that have a Value property and provides a description of what kind of data gets returned. Table 13.1. Value Properties for Some Form Controls | Object | What It Returns | | CheckBox | True if the check box is activated; False if it's deactivated; Null otherwise . | | ComboBox | The position of the selected item in the list (where 1 is the first item). | | ListBox | The position of the selected item in the list (where 1 is the first item). | | MultiPage | An integer that represents the active page (where 0 is the first page). | | OptionButton | True if the option is activated; False if it's deactivated; Null otherwise. | | ScrollBar | A number between the scrollbar's minimum and maximum values. | | SpinButton | A number between the spinner's minimum and maximum values. | | TabStrip | An integer that represents the active tab (where 0 is the first tab). | | TextBox | The value entered in the box. | | ToggleButton | True if the button is pressed; False otherwise. | For example, Figure 13.7 shows the Convert Case form created in the Visual Basic Editor. The idea behind this form is to convert the selected cells to proper case, uppercase, or lowercase, depending on the option chosen . Figure 13.7. A custom form that lets the user change the case of the selected worksheet cells. 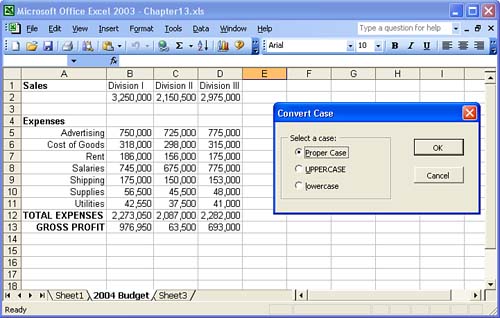 To load this form, I created a macro named ConvertCase that contains the two statements shown earlier: ConvertCase.Show Set ConvertCase = Nothing Here, ConvertCase is the name of the form shown in Figure 13.7. The three option buttons are named optProper , optUpper , and optLower ; the OK button is named cmdOK . Listing 13.4 shows the event handler that runs when the user clicks OK. Listing 13.4. A Procedure that Processes the Convert Case Custom Form Private Sub cmdOK_Click() Dim c As Range For Each c In Selection If optProper.Value = True Then c.Value = StrConv(c, vbProperCase) ElseIf optUpper.Value = True Then c.Value = StrConv(c, vbUpperCase) ElseIf optLower.Value = True Then c.Value = StrConv(c, vbLowerCase) End If Next 'c Unload Me End Sub The procedure runs through the selected cells, checking to see which option button was chosen, and then converts the text by using VBA's StrConv function: StrConv( String , Conversion ) | String | The string you want to convert. | | Conversion | A constant that specifies the case you want: | | | Conversion | Resulting Case | | | vbProperCase | Proper Case | | | vbUpperCase | UPPERCASE | | | vbLowerCase | lowercase | The Absolute Minimum This chapter showed you how to work with VBA's Microsoft Forms feature to create custom dialog boxes. After a brief introduction to user forms, you learned you how to add a form to your project and how to set a number of form design-time properties. From there, you turned your attention to controls, and you learned numerous techniques for working with the various Toolbox objects, including inserting, selecting, sizing, moving, copying, and deleting controls. After a brief discussion of form event handlers, I took you on a tour of the various control types that are available in the Toolbox. You finished by learning how to handle forms inside your VBA procedures. Here are some places to go for related material: -
Handling form results often means using loops and control structures (such as If...Then...Else and Select Case ). I explain these VBA statements in Chapter 6, "Controlling Your VBA Code." -
The MsgBox and InputBox functions provide simple form capabilities in a single statement. I show you how to use these functions in Chapter 12, "Interacting with the User." This chapter also shows you how to access the built-in dialog boxes available in VBA applications. -
You complete your look at VBA user-interface design in Chapter 14, "Creating Custom Menus and Toolbars." |
|