24.5. Advanced XSLT Tricks XSLT is a complex language with lots of bell and whistlesand just as many pitfalls. It's all too easy to head ambitiously into Code view and, with just a few keystrokes, completely break your XSLT style sheet. But since Dreamweaver's XSLT tools take you only so far, you'll undoubtedly find yourself wanting to dip into the code. Here are a couple of examples to help your explorations go a little more smoothly. 24.5.1. Sorting Data in a Repeat Region The Repeat Region feature normally works by spitting out data that it retrieves from an XML document in the order it appears in the XML file. But what if you want that information sorted in a particular wayemployees listed in alphabetical order, for example. Dreamweaver doesn't have a visual tool to let you accomplish this common goal. Fortunately, adding the code yourself is pretty easy: -
Click inside a repeat region and then click the "Code" or "Split" buttons in the document window's toolbar . Alternatively you can choose View  Code or View Code and Design. Doing so drops you into the scary world of XSLT code; dont look too hardyou might go blind. Code or View Code and Design. Doing so drops you into the scary world of XSLT code; dont look too hardyou might go blind. -
Locate the beginning of the repeat region . What you're looking for is something like this: <xsl:for-each select="company- Info /employeeList/employee">, where the stuff in quotes after "select" is the XPath expression pointing to the repeating tag. You need to add your new code directly after this tag. -
Click immediately after the closing bracket (>), hit Enter, and then type <xsl: sort select="xml_tag_to_sort_on" data-type="text" order=" ascending " /> . Replace xml_tag_to_sort_on with the XML tag inside the repeat region that you wish to use as the basis for sorting. For example, pick a tag used for a name or a tag used for a price.
Note: Don't forget the forward slash at the end of the sort tag: />. The tag you're adding is an empty tag (meaning there's no accompanying closing tag). In XML, these types of tags must be "self closed" using the forward slash (see Section 24.1.1 for details).
The value for data-type can be either "text" or "number." Use the one that matches the type of data contained in the XML tag you're using as a sorting key. For example, use "text" if you're sorting names and "number" if you're sorting prices. Depending on how you want to sort the datasmallest number to largest or largest number to smallest, type either ascending or descending , respectively, for the order property. "Ascending" gets you smallest number to largest, or AZ; "descending" results in largest number to smallest, or ZA. 24.5.2. Using XSLT Parameters The Repeat Region's filter feature is very useful. With it, you can winnow down a mass of XML data to a smaller collection of useful facts. But what if you wanted the data retrieved from the XML file to change based on information from a database or information submitted by a visitor? For example, say you've already created an employee-list page, and now you want to create separate pages for each employee (kind of like the master-detail pages described on Section 21.6). You could create an XSLT style sheet for each employee, thereby filtering the XML file based on the employee's ID number. But that's a lot of work. A better approach is to use an XSLT parameter .
Note: This solution applies only to server-side XSL Transformations, not the client-side approach described on Section 24.2.
XSLT parameters provide a way of passing information from an outside source to the XSLT style sheet; the parameters can affect how the XSLT style sheet processes and displays the XML file. You've already encountered one way to pass a parameter to an XSLT style sheetthe XSL Transformation server behavior (see Figure 24-3). You can use the server behavior to pass either a value you manually enter, a dynamic value pulled from a database, or any of the other sources of data accessible in dynamic Web pages (see Section 23.2.1). In this way, you could present a separate page for each employee simply by passing the employee's ID number to the XSLT style sheet (instead of manually creating separate XSLT files for each employee). For this maneuver to work, you need to string together several different concepts involving both dynamic pages and XSLT files that you've already learned in this book. Here's an example of how to use XSLT parameters to dynamically filter XML data: -
Create an XSLT fragment as described on Section 24.3 . You'll eventually include this fragment on a dynamic page (ASP, PHP, or whichever server method you're using) to display the final, filtered data. -
Follow steps 15 on Section 24.4.1 to insert a repeat region and create a filter . With this technique, all the steps in creating a filter are the same as those on Section 24.4.1.1, except for entering the value in the "value" box, as explained in the next step. -
In the filter's Value box type $your_param (see Figure 24-11) . Change "your_param" to a name you'd like to use for the parameter. For example, if you want to filter for an ID that matches a particular value, you might type $id . You must include the $ sign, but you can come up with whatever name you like. It helps if it's descriptive, like $id, $name, or $price. It also must follow a few rules: use only numbers and letters , always start the name with a letter (not a number), don't use spaces, and stay away from punctuation marks, except for hyphens and underlines. Figure 24-11. You can use an XSLT parameter as a filter value. The parameter always begins with the $ sign and can let you dynamically filter the contents of an XML file. 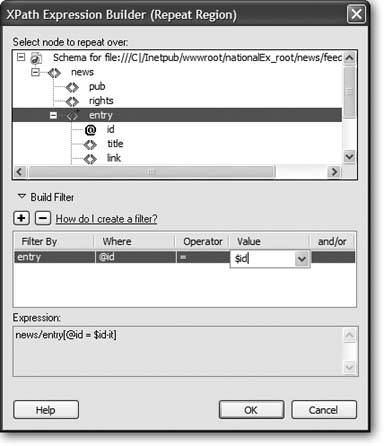 Unlike a static value that you type into the Value box, like "38," "Dave," or "marketing," a parameter can be different each time the XSLT style sheet does its magic. But to get it to work, you do need to dip (just a bit) into Code view. -
Click the "Code" or "Split" button to view the XSLT code. Locate the line <xsl: template match="/">, and then click just before the opening bracket (<) . In XSLT, you first need to tell the style sheet that you'll be using a parameter. -
Type <xsl:param name="your_param"/> . Replace "your_param" with the text you typed in step 3. Note that you leave off the $ sign. Also make sure you include the forward slash before the final bracket, like this: /> You're done with the XSLT style sheet. It's all primed to have dynamic data sent to it. The next steps involve adding the XSLT fragment to a dynamic page. -
Repeat steps 810 on Section 24.3 . This step is the same process as adding any XSLT fragment to a dynamic pagethat is, using the XSL Transformation server behavior. In the next step, you add the XSLT parameter. -
In the XSL Transformation window, click the + button next to the label XSLT Parameters (see Figure 24-3) . The Add Parameter window opens (Figure 24-12). Figure 24-12. While inserting the XSLT server behavior, you can add one or more parameters that let you pass information to the XSLT fragmentthat way, you can control which data from the XML file is displayed on the Web page. 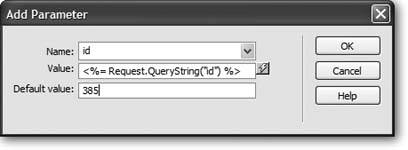 -
In the Name box, type the name you used in steps 3 and 5 above (don't include the $ sign) . The value you enter here defines the name of the parameter that the dynamic page will pass off to the XSLT style sheet. Next (and this is the magic part), you'll add the value. -
Click the lightning-bolt icon to the right of the Value box to open the Dynamic Data window . This is the same Dynamic Data window you've encountered with dynamic pages (see Figure 22-7). Don't get it confused with the XSLT Dynamic Text box (Figure 24-7). Here, "dynamic" refers to any of the many sources of dynamic information you've used when creating database-driven pagesrecordsets, URL variables, form variables, cookies, session variables , and so on. (For a recap on creating recordsets, see Section 21.1.2; the other types of dynamic data can be added to the Dynamic Data window as described on Section 23.2.1.) -
Select a source from the Field list and then click OK . What you select here is the crucial part of the puzzle. You're telling the dynamic page where to get the information that will be passed off to the XSLT style sheet. To use the employee-list example again, you would need to identify where the "id" number used to select just a single employee comes from. Here are a few examples: -
Recordsets . You could use the value from a field in a recordset. For this to work, you'll need to add a recordset (Section 21.1.2) to the dynamic page first. -
Form fields . One way to pass a value to a page is via a form. For example, you could add a form to a separate Web page. The form submits to this dynamic page (the one with the XSL Transformation) and includes a form menu that lists every employee's name (and includes the employee ID in the menu's value columnsee Section 10.3.5 for more on form menus ). When a visitor selects a name from the menu, the employee ID is submitted to the dynamic page, which turns it into an XLST parameter and hands it off to the XSLT style sheet for use in the repeat region filter. ( Turn to Section 23.2.4 to see how to add a form field name to the dynamic data window.) -
URL variables . You can apply the same idea to URL variables, but instead of getting the employee id from a menu, you'd attach it to a link to the dynamic page. For example, you might use a URL variable that looks something like this: employee.php?id=15 . (Turn to Section 23.2.4 to see how to add a URL variable to the Dynamic Data window.) These are just a few examples. You can use dynamic data from any dynamic source: cookies, session variables, and so on. -
Type a value in the "Default value" box . This is the value the dynamic page will use if the source you picked in step 10 doesn't come throughfor example, if the dynamic page is accessed without adding a URL variable (in which case you'd be passing just employee.php , instead of employee.php?id=15 ). Entering a default value will ensure that the XSLT style sheet has some value to work with. If, as in this example, you're using this technique to dynamically control XML filtering, the default value should match at least one record in the XML file. -
Click OK to close the Add Parameter box, and then click OK once again to close the XSL Transformation window . Dreamweaver adds the new server behavior and the new parameter to your page.
Note: If you want to remove or change the XSLT parameter, just re-open the XSL Transformation window by double-clicking its name in the Server Behaviors panel.
-
Provide a way to pass the dynamic data to the page . For example, if you selected a URL variable as the data source for step 10, you would add links to other pages on your site that would point to the page with the XSL Transformation products.php?sku=10294 or employee.asp?id=15 , for example. Hopefully, by this point, your brain hasn't completely melted. As you can see, XML, XSLT, and all of the other x's can be pretty "X"-hausting. Take a breath , go have a cup of tea (or a bottle of Jolt cola), and when you're ready for some hands-on experience with Dreamweaver's exciting new XML tools, move on to the tutorial. |