Section 17.3. Defining Editable Regions
Your next task is to specify which parts of your template are locked and which are editable. By default, everything on a page is locked. After all, the main reason to use templates is to maintain a consistent, unchanging design and structure among pages. To make a template usable, you must define the area or areas you can change.
17.3.1. Adding a Basic Editable Region
To add an editable region to a template, start by selecting the part of the page you want to make changeable . You can designate as editable anything in the document window (that is, any HTML between the <body> tags).
Note: You can always add Cascading Style Sheets, JavaScript code, and meta tag information to the <head> of a template-based page. Any <head> content in the original template files stays put, however. For example, you can't remove an external style sheet applied to the template file from a page based on that template.
| FREQUENTLY ASKED QUESTION The Broken-Link Blues |
| Why aren't the links in my templates working ? When you created the link, you probably typed a path into the Property inspector's Link fielda recipe for heartbreak. Instead, always select the target Web page for a link by clicking the folder icon in the Property inspector, or by pressing Ctrl+L ( Dreamweaver saves templates in the Templates folder inside the local root folder; all relative links need to be relative to this location. (Absolute links, like those to other Web sites, aren't a problem; see Section 4.1.2 to learn the difference.) The reason you should browse to, rather than type in, your links is so that Dreamweaver can create a proper relative link. Imagine this situation: You create a template for your classified ads. You store all classified ads for April 2001 inside a series of folders like this: classifieds A link from a page in the april folder to the home page would follow the path marked 1 here. So when you create a link in your template, you can create a link to the home page by typing the path ../../../index.html . That choice is logical if you're thinking about the page (in the april folder) you'll create from the templatebut it won't work. Dreamweaver stores templates in the Templates folder, so the correct path would be path 2, or ../index.html . When you create a new page based on the template and save it in the april folder, Dreamweaver, in its wisdom, automatically rewrites all paths in the page so that the links function correctly. The beauty of Dreamweaver is that you don't have to understand how all this works. Just remember to use relative links in your templates and create them by clicking the folder icon in the Property inspector. 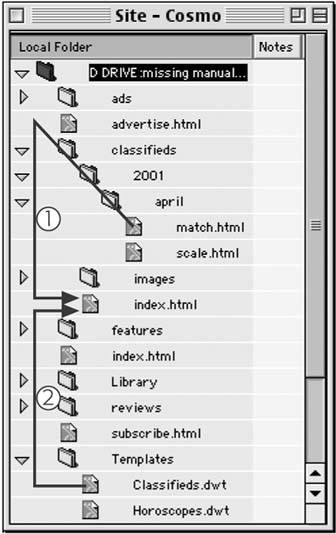 |
Drag across your page to select the elements you wish to make editable, or, for greater precision, use the tag selector (see Section 1.2.1) to make sure you select the exact HTML you want.
Now tell Dreamweaver that the selected elements are to be editable. You can use any of these techniques:
-
In the Common tab of the Insert bar (Figure 17-2), select Editable Region from the Template menu.
-
Choose Insert
 Template Objects
  Editable Region.
 -
Press Ctrl+Alt+V (
 -Option-V).
 -
Right-click (Control-click) the selection and then choose Templates
 New Editable Region from the shortcut menu.
| FREQUENTLY ASKED QUESTION When Save Won't Behave |
| I keep getting an error message when I save my template. What's going on ? If you add an editable region inside certain block-level elements like a paragraph, or a heading, Dreamweaver pops up a warning message when you save the template, explaining that you can't create additional paragraphs or headings inside this region on any pages you build from this template. This just means that you didn't select the <p> or heading tag when you made the region editable. Dreamweaver considers anything outside of the editable region locked, so you can't change those tags. Since it's improper HTML to have a paragraph, heading, or other block-level elements inside another paragraph, or heading, Dreamweaver doesn't let you add other block-level elements to the selection. This characteristic may not be such a bad thing, however. Imagine you're creating a template that's to be used by other people building a Web site. You have a heading 1, maybe the title of the page you applied a style to, and you want to make sure it looks the same on every page. You wouldn't want anyone changing the heading tag, and possibly erasing the style. In addition, you don't want them to be able to change the heading 1 to a heading 2, or a heading 3; nor do you want them to completely erase the h1 tag and type paragraph after paragraph of their random thoughts. You just want them to type in new text for the page title. Selecting just the text inside the heading and turning it into an editable region does just that. Viva micromanagement! If this is in fact what you want to do, you can save yourself the bother of having to constantly see the warning box shown here each time you save the template by simply turning on the "Don't show me this message again" checkbox. However, if you made a mistake and do want to allow people to change the heading, or add more headings and paragraphs in this region, you need to do two things: First, unlock the editable region you created (see Section 17.3.2); then, select the text and tag (the tag selector [Section 1.2.1] is the best way to make sure you've selected a tag) and turn that into an editable region. 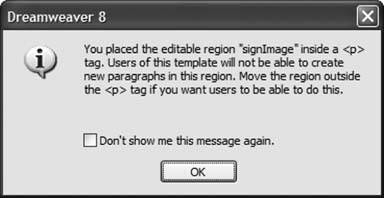 |
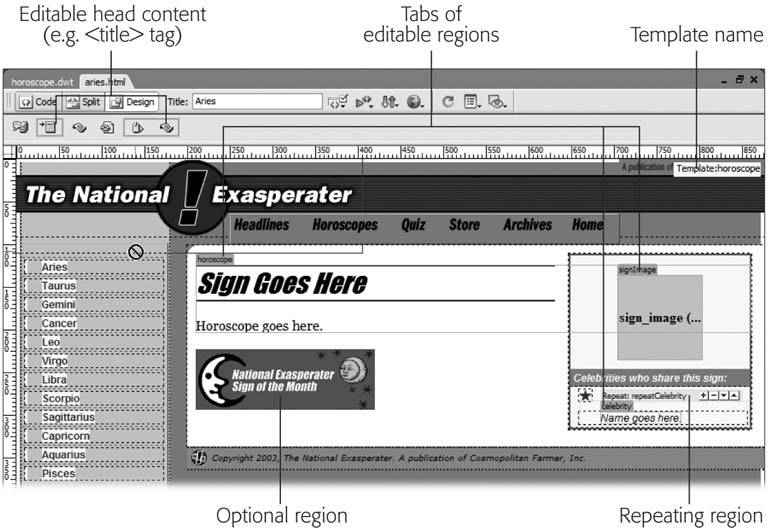
When the New Editable Region dialog box appears, type a name for the region (you can't use the same name twice) and then click OKavoid hyphens in the name (see the Note on Section 16.7.1). You return to your template, where the name you gave the region appears in a small blue tab above the editable region (see Figure 17-5).
Tip: If you use tables to lay out your pages (see Chapter 7), you'll often assign one table cell as the main area to hold the primary content of the page. For example, in the pages shown in Figure 17-1, the Frequently Asked Question and its answer appear in a single cell on the page. This cell makes a perfect editable region for a template. In the tag selector, just click the <td> tag associated with that cell and use any of the techniques discussed here to convert the contents of that cell into an editable region.If you use CSS, on the other hand, you can create a separate <div> tag (see Section 8.4) for the main content area. In this case, select just the contents of the <div> tag, not the tag itself. Here's one instance where you want to avoid the tag selector (Section 1.2.1), which selects the entire <div>, tags and all. If you turn the <div> tag into an editable region, it's possible for someone modifying the page later to delete the tag entirely, which could wreak untold havoc on your CSS-based layout.Fortunately, Dreamweaver 8 has introduced a handy shortcut for selecting just the contents of a <div> tag. Click anywhere inside the <div> tag, and press Ctrl-A (
 Select All. Next, turn this selection into an editable region, and the <div> tags will remain outside of the editable region, so no one can inadvertently delete a <div> tag that helps define the basic structure of a page.
 | POWER USERS' CLINIC Under the Hood of Templates |
| Dreamweaver saves templates as HTML files in the Templates folder inside your current local site folder (see Chapter 14 for information on local sites). Each template bears the file name extension .dwt to distinguish it from regular Web pages. The program treats files in the Templates folder differently from normal Web pages, so don't save anything but .dwt files there. In addition, since Dreamweaver expects the Templates folder to be in the local root folder of your site, don't move the Templates folder or change its name in any way (don't even change the capital T in Templates, even if you're a low-key type of person). If you do, your templates won't work. As with Library items, Dreamweaver uses HTML comment tags to indicate the name of the template. If you inspect the HTML code of a template-based document (see Chapter 9), you'll see that, immediately following the opening <html> tag, Dreamweaver inserts a comment tag with the text "InstanceBegin" followed by the location and name of the template. Additional comment tags indicate areas of the page that you can modify, plus special template features like template parameters used for optional regions. For instance, the title of a page based on a template is always editable; its comment tag might look like this: <!-- InstanceBeginEditable name="doctitle" --> <title>My New Page</title> <!-- InstanceEndEditable --> The first comment indicates the editable region's beginning and also includes the editable region's name. When editing pages based on the template, you can change only the HTML between these comment tags. Everything else on the page is locked, even when you're working in Code view. |
You may find that a single editable region is all you needfor example, a single area of the page (a table cell, or section of a page enclosed by a <div> tag, for example) containing the text for a product review. However, if you need to edit multiple areas of a Web page, just add more editable regions to the template. For instance, when you create a template for an employee page, you can create editable regions for the employee's name, telephone number, and photo. If you change your mind and want to lock a region again, select the editable region and then choose Modify  Templates
  Remove Template Markup. Dreamweaver removes the code that makes the region editable. You can do the same thing with other types of template regions, like repeating and optional regions.
Warning: You can rename an editable region by clicking the blue tab on the template page and typing a new name into the Property inspector. However, if you've already built pages based on this template, it's not a good idea. Because template-based pages use the name to identify editable regions, Dreamweaver can lose track of where content should go when you rename a region. See Figure 17-18 for a workaround.
Figure 17-5. This page is based on a template called Horoscope, as you can tell from the little tab in the document window's upper-right corner. You can modify editable regions, which are labeled with small tabs. In this example, two editable regions are called horoscope and signImage. An additional editable regionnamed celebrityappears within a repeating regionlabeled repeatCelebritywhich lets you duplicate editable regions to form a list of items. Optional regions don't have any clear identifier on the page; you can identify them only in the Template properties window, as described on Section 17.6.2. The title of any page created from a template is also editable. All other parts of the page are locked; you can only make changes to the original template file.
17.3.2. Adding a Repeating Region
Some Web pages contain lists of items. A catalog page may display row after row of product informationpicture, name, price, and description. An index of Frequently Asked Questions may provide a list of questions and the dates they were posted.
If you were to make a template for either of these pages, you would add an editable region to the area of the page where these lists appear. Just creating an editable region, however, wouldn't give you any ability to enforce (or easily update) the design of these lists, because everything within an editable region can be changed.
Fortunately, Dreamweaver provides a pair of template tools to overcome this problem: repeating regions and repeating tables . Both let you create areas of a page that include editable (and uneditable) regions that can be repeated any number of times (see Figure 17-6).
| FREQUENTLY ASKED QUESTION Hindered by Highlighting |
| I'm distracted by the tabs and background colors that Dreamweaver uses to indicate Library items and Templates. How do I get rid of them ? When you use Library items or Templates, you see blue tabs and yellow backgrounds to indicate editable regions and Library items. Although these visual cues don't appear in a Web browser, they can still make your page harder to read while you work in Dreamweaver. Fortunately, you can alter the background color of these items and even turn highlighting off altogether. Choose Edit Oftentimes, it's useful to keep highlighting on to help you keep track of Library items and editable regions. If you want to turn off highlighting temporarily, simply choose View 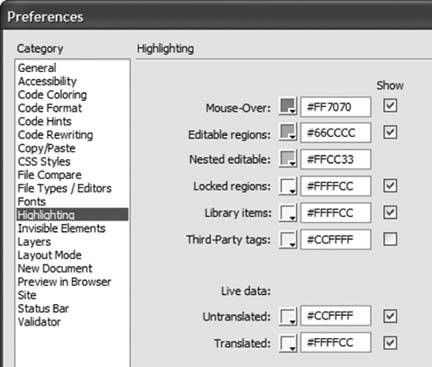 |
Adding a repeating region is similar to adding an editable region. Select the area of the template page you wish to make repeatable, which usually contains at least one editable region. Most often, this area's a table row, so you could select the row (<tr> tag) with the information to be repeated. You could also just as easily select a paragraph or a list item (<li> tag).
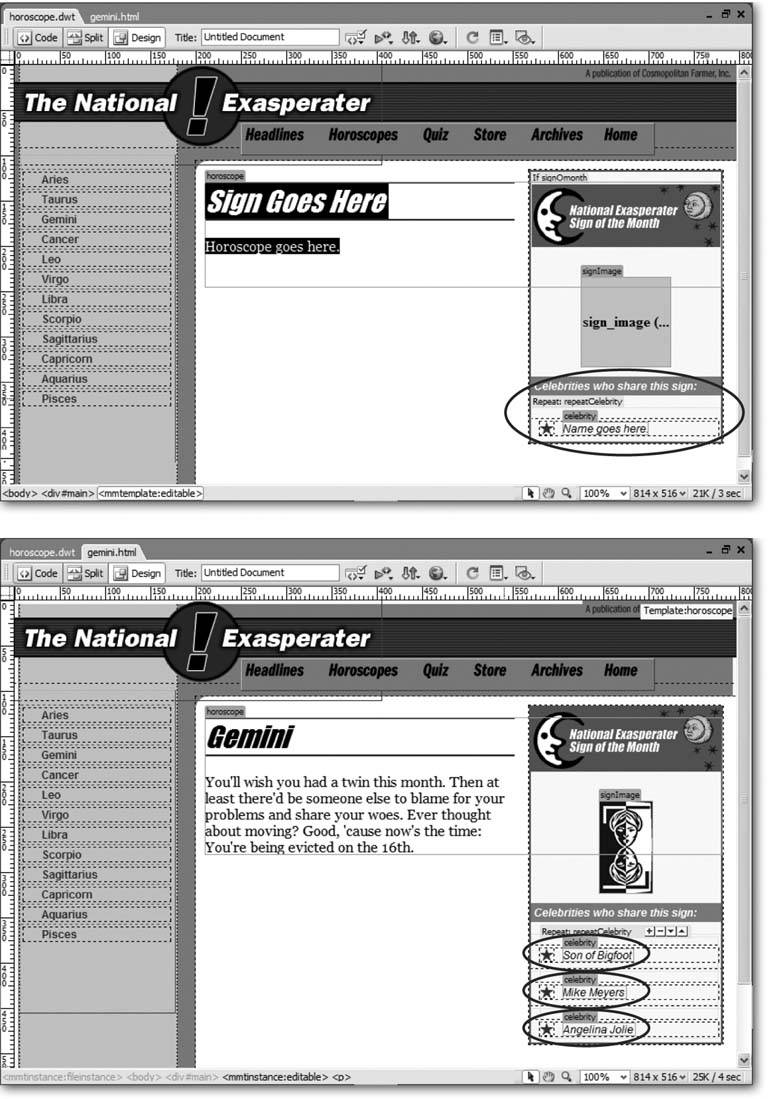
Figure 17-6. A repeating region lets page authors add multiple selections of repeating information.
Top: In this example, the template has one repeating region, labeled repeatCelebrity (circled).
Bottom: A complete page based on this template includes three repeated editable regions (circled in the lower-right corner of the page). If another page requires more celebrity listings, you could easily add additional rows to each list. However, the template still controls the basic design. Changing the star graphic of the repeating region (an uneditable part of the region) in the template page automatically changes the same elements in all pages created from the template. From a design perspective, this strategy also means that page authors can't tamper with the design of a repeating regionjust the content marked as editable.
Tip: You can make a repeating region that doesn't include an editable region. For example, a template for a movie review Web page could include a repeating region that's simply a graphic of a star. A page author adding a new movie review could repeat the star graphic to match the movie's ratingfour stars, for example. (There's just one caveatsee the Warning on Section 17.6.1.)
Next, tell Dreamweaver that the selected elements are part of a repeating region. You can use any of these techniques:
-
On the Common tab of the Insert bar (Figure 17-2), select the Repeating Region option from the Templates menu.
-
Choose Insert
 Template Objects
  Repeating Region.
 -
Right-click (Control-click) the selection and choose Templates
 New Repeating Region from the shortcut menu.
When the New Repeating Region dialog box appears, type a name for the region and then click OK. You return to your template, where the name you gave the region appears in a small blue tab above the editable region (see Figure 17-6). (See Section 17.6.1 for a discussion of using a repeating region when building a new template-based page.)
Warning: Dreamweaver lets you name a repeating region with a name already in use by an editable region. But don'tmultiple template areas with the same name make Dreamweaver act unpredictably.
17.3.3. Repeating Tables
The repeating table tool is essentially a shortcut to creating a table with one or more repeating rows. If you had a lot of time on your hands, you could achieve the same effect by adding a table to a page, selecting one or more rows, and applying a repeating region to the selection. To use the repeating table tool:
-
Click the template page where you wish to insert the table .
You can't insert a repeating table into an already defined editable, repeating, or optional region, as explained in the box on Section 17.3.4. You must be in an empty, locked area of the template.
-
On the Common tab of the Insert bar (Figure 17-2), select the Repeating Table option from the Templates menu .
Alternatively, you can choose Insert
 Template Objects
  Repeating Table. Either way, the Insert Repeating Table window appears (Figure 17-7).
 -
In the "Starting row" box, type the number of the row where the repeating region should begin .
Often you'll have just one repeating row: one row of product information, for example. You may want to use the top row for labels indicating the information contained in the rows below. If that's the case, enter 2 at this step, leaving the first row as an uneditable part of the template.
It's conceivable, however, that you may want each entry to take up two rows. The first would list Name and Description; the second would contain a cell for a photo and a cell for the price. You set up this effect in this step and the next.
-
In the "Ending row" box, type the number of the last repeating row .
If you wish to repeat only a single row, enter the same number you provided for step 4. If you're creating a double repeating row, add 1 to the number you provided in step 4. For example, if you need three rows for each repeating entry, add 2 to the number from step 4.
-
Type a name for this repeating region .
Don't use the same name as another template region. You'll run the risk of unpredictable results on template-based pages.
-
Click OK .
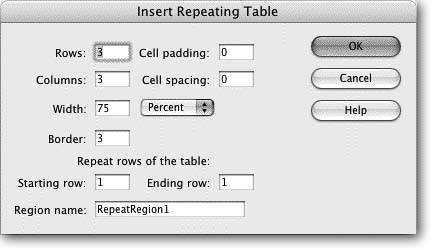
Dreamweaver inserts a table into the page. A blue tab with the name of the repeating region appears (see Figure 17-6), as do blue tabs in each cell of each repeated row. These tabs indicate new editable regionsone per cell.
Since these new editable regions have uninformative names like EditRegion4, you may want to rename them. Click the blue tab and type a new name in the Property inspector. (But do so before you create any pages based on the tem-platesee the Warning on Section 17.3.3.)
Figure 17-7. The Insert Repeating Table dialog box lets you kill three birds with one stone: it adds a table to a page, turns one or more rows into a repeating region, and adds editable regions into each table cell inside the repeating region.
To remove a repeating region, select it by clicking the blue Repeat tab, and then choose Modify  Templates
  Remove Template Markup. A more accurate way to select a repeating region is to click anywhere inside the region and then click <mmtemplate: repeat> in the tag selector (see Section 1.2.1 for more on the tag selector). Note that removing a repeating region doesnt remove any editable regions you added inside the repeating region. If you want to rename a repeating region, heed the Warning on Section 17.3.3.
17.3.4. Making a Tag Attribute Editable
An editable region lets you change areas of HTMLlike a paragraph, image, or entire tableon new pages you create from a template. However, when you're creating a template for others to make pages from down the line, you may want to limit these page authors' editing abilities . You may want to allow budding Web designers to change the color of a table cell without changing other properties like cell width or paragraph alignment . You can use Dreamweaver's Editable Tag Attribute to specify which tag properties your successors can change.
Note: Before making a tag attribute editable, first set that property to a default value in the template. Doing so inserts a default value and makes the attribute appear in the Editable Tag Attribute window (see steps 3 and 7 in the following instructions).
| FREQUENTLY ASKED QUESTION Editable Regions, Repeating Regions, and Errors |
| When I try to insert an editable region inside a repeating region, I get the following error: "The selection is already in an editable, repeating, or optional region." What's that about ? This error message essentially means you're trying to add a template region where it doesn't belong. It most commonly appears when you attempt to put a repeating or optional region inside an editable region. That kind of nesting is a no-no; anything inside an editable region can be changed on template-based pages, and as such, Dreamweaver can't touch it. However, you may get this error message seemingly in error. For instance, it's perfectly OK to add an editable region inside a repeating region, and it's even OK to add a repeating region inside an optional region, and vice versa. But one day you select text inside a repeating region and try to turn it into an editable region, and boomerror message. What probably happened was, when you selected the text, Dreamweaver actually selected part of the hidden code used to define a template region (see the box "Under the Hood of Templates" on Section 17.3.1) and thought you were trying to put an editable region inside it. To avoid confusion, use the tag selector to select the tag you wish to turn into an editable region. For example, click <p> in the tag selector to select the paragraph inside the repeating region. Alternatively, go into Code view (see Section 9.2) and select whatever part of the code inside the repeating region you wish to make editable. |
To make a tag attribute editable:
-
Select the tag whose property you wish to make editable .
Using the tag selector (see Section 1.2.1) is the most accurate way.
-
Choose Modify
 Templates
  Make Attribute Editable .
 The Editable Tag Attributes window opens (Figure 17-8).
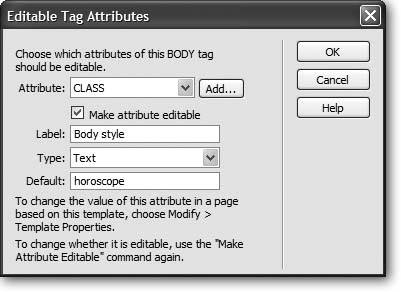
Figure 17-8. Dreamweaver provides detailed control for template pages. To make just a single property of a single tag editable when pages are later based on your template, turn on the "Make attribute editable" checkbox. In this case, the "class" attribute of the body tag is editable, allowing page designers the freedom to apply different CSS styles to the body of each template-based page.
-
Select an attribute from the menu or add a new attribute with the Add button .
Only properties you've already set for the selected tag appear in the Attribute menu. In other words, if you've selected an image, you probably see the Src , Width , and Height properties listed. But unless you've set the image's border, the Border property doesn't appear.
To add a property, click the Add button. In the window that appears, type the appropriate property name. For example, to make the path to a graphics file editable, you'd set the <img> tag's Src attribute by typing src here. (If you're not sure of the property's name, check out Dreamweaver's built-in HTML reference, described on Section 9.6.)
Note: If you want page editors to be able to change a CSS class applied to the <body> tag on template-based pagesto apply different fonts, background colors, or any of the many CSS formatting options to each template-based pageyou have to make the Class attribute editable. (See Section 6.1.3 for more on CSS classes.)
-
Make sure the "Make attribute editable" box is turned on .
If you decide that you no longer want to allow editing of this property, you can return to this dialog box and turn off editing, as described on Section 17.3.4.
-
Type a name in the Label field .
What you type here should be a simple description of the editable tag and property, which helps page authors correctly identify editable properties. For example, you could use Product Image if you're making a particular image's source (Src) property editable.
-
Choose a value type from the menu .
Your choices are:
-
Text . Use this option when a property's value is a word. For example, you can change the image tag's Align property to top, middle, baseline , and so on. Or, when using Cascading Style Sheets, you could make a tag's Class property editable to allow page authors to apply a particular custom style to the tag content, footer , and so on.
-
URL . Use this option when the editable property is a path to a file, like an image's Src property or a link's Href property. Using its site management tools, Dreamweaver keeps track of these paths and updates them when you move your pages around your site.
-
Color . If the property requires a Web color, like a page's background color, select this option. This option makes Dreamweaver's color box available to people who build pages from the template.
-
True/False . You shouldn't use this option. It's intended for Dreamweaver's Optional Regions feature (discussed on Section 17.4), and it doesn't apply to HTML properties.
-
Number . Use this choice for properties that require a numeric value, like an image's Height and Width properties.
-
-
Type a default value into the Default field .
This step is optional. The default value defines the initial value for this property, when people first create a page based on the template. They can then modify this value for that particular page. If you've already set this property in the template, its value automatically appears in this box.
-
Click OK to close the window .
Dreamweaver adds code to the template page that allows page authors control of the attribute. Setting this attribute on pages created from the template is described on Section 17.6.2.
If you later decide that you don't want a particular tag's property to be editable, Dreamweaver can help. Open the template file, select the tag with the editable attribute, and choose Modify  Templates
  Make Attribute Editable. In the window that appears, turn off the "Make attribute editable checkbox (Figure 17-8). Unfortunately, doing so doesn't remove all of the template code Dreamweaver added. Even after you turn off editing for an attribute, Dreamweaver leaves behind the parameter used to control the tag's property. To eliminate this extra code, see the box on Section 17.4.5.