14.4. Find and Fix Broken Links Broken links are inevitable. If you delete a file from your site, move a page or graphic outside of Dreamweaver, or simply type an incorrect path to a file, broken links and missing graphics may result. In the B.D. era (Before Dreamweaver), the only way to fix such problems was to methodically examine every link on every page in your site. Fortunately, Dreamweaver's link-checking features can automate the process of tracking down broken-link problems.
Note: In this context, a link doesn't only mean a hyperlink connecting one page to another. Dreamweaver also uses the term to include the paths that identify external files incorporated in your Web page, such as GIFs, JPEGs, external CSS style sheets, and Flash movies. For example, if a graphic is missing or isn't in the place specified by the Web page, Dreamweaver reports a broken link .
14.4.1. Finding Broken Links The Check Links Sitewide command scans an entire site's worth of files and reports all links and paths that don't lead to a file. (It's one of Dreamweaver's site management features, meaning that you have to define a local site before using this command; see Section 13.1.1.) Note that Dreamweaver checks only links and paths within the local site folder; it doesn't check links that lead to other people's Web sites.
Note: If your local site contains a lot of pages, you may not want to check links in one or more folders whose pages you know have no broken links. You can exclude files from the Check Links Sitewide operation using the Cloaking feature described on Section 15.2.3. Doing so also makes the link-checking operation go faster.
14.4.1.1. Checking just one page To check links on an open page, save it in your local site folder. Then choose File  Check Page Check Links (or press Shift+F8). Dreamweaver scans the page and opens the Link Checker window, which lists files containing broken links (see Figure 14-5). If Dreamweaver doesnt find any broken linksyou HTML god, youthe window comes up empty. Check Page Check Links (or press Shift+F8). Dreamweaver scans the page and opens the Link Checker window, which lists files containing broken links (see Figure 14-5). If Dreamweaver doesnt find any broken linksyou HTML god, youthe window comes up empty.
Tip: Although Dreamweaver can't check links to the outside world, a free tool from the W3C can. You can find its link checker at http://validator.w3.org/checklink. This tool checks both internal links (between pages on the same site) and external links (to other sites). The only possible downside: the pages you wish to check must already be up on the Web.
14.4.1.2. Checking specific pages You can also check links just on specific pages of your site from the Link Checker panel: -
Choose Window Results to open the Results panel and click the Link Checker tab . The Link Checker panel opens. -
Use the Files panel to select the site you wish to check (see Section 13.1.5) . If you're already working on the site you want to check, you can skip this step. -
In the Files panel, select the files you'd like to check . For techniques on selecting files and folders in the Files panel, see the box on Section 14.4.2.
Tip: Selecting a folder makes Dreamweaver scan all files in that folder.
-
Click the green-arrow icon in the Link Checker panel. From the menu that appears, choose Check Links for Selected Files/Folders in Site . Alternatively, you can right-click (Control-click) the selected files, and then choose Check Links Selected Files/Folders from the shortcut menu. Either way, Dreamweaver scans the pages and opens the Link Checker panel (Figure 14-5). 14.4.1.3. Checking the entire Web site You can check all the links on all pages of your Web site in any of three ways: -
Open the Web site you want to check (press F8 to open the Files panel and use the panel's menu to select the site), and then choose Site Check Links Sitewide. Or use the keyboard shortcut, Ctrl+F8 ( -F8). -
Open the Files panel and right-click (Control-click) any file. Choose Check Links Entire Local Site from the shortcut menu. -
Open the Link Checker panel (Window Results to open the Results panel, and then click the Link Checker tab), click the green-arrow icon, and, from its menu, choose Check Links for Entire Current Local Site. Once again, Dreamweaver scans your site and opens the Link Checker panel, which lists files containing broken links (Figure 14-5). Figure 14-5. The Check Links Sitewide command generates a list of all external links and orphaned files (files with no links to them). If you wish, click the Save (floppy disk) button to save all of this information into a tab-delimited text file. You can also fix a broken link directly inside this panel using the Browse for File button (circled) as described on Section 14.4.3. 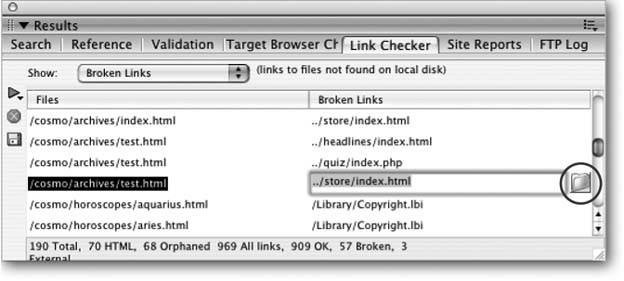
UP TO SPEED
Selection Shortcuts for the Files Panel | | You'll often want to use the tools in the Results panel on more than one page in your Web site. Fortunately, most of these tools can work on multiple pages in the Files panel. You probably can figure out that you should click a file to select it. But you can also select several files that are listed consecutively: click the first one, scroll if necessary, and then Shift-click the last one. Dreamweaver highlights all the files between your first and final clicks. If you want to select several files that aren't consecutive in the list, the trick is to click each one while pressing the Ctrl (  ) key. ) key. Once you've selected one or more files, you can deselect one by Ctrl-clicking ( -clicking) it once again. Dreamweaver also includes a snazzy command for selecting recently modified files in the Files panel. Suppose you want to select all the files you created or changed today (to see if the links work or to upload them to your Web server, as described on Section 15.2). To use this command, you need to click the Files panel's contextual-menu button in the upper-right corner of the panel. From the menu that appears, select Edit Select Recently Modified. The Select Recently Modified window appears. You can either specify a range of dates (for example, files you created or changed between January 1, 2005, and January 7, 2005) or a number of days (to specify all modified files in, say, the last 30 days). (The last optionModified Byworks only with Macromedia's Contribute program.) Set the options, click OK, and Dreamweaver selects the appropriate files in the Files panel. 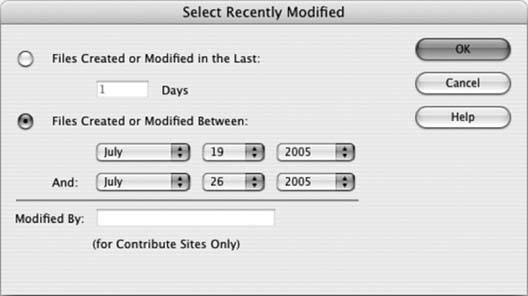 |
14.4.2. Fixing Broken Links Of course, simply finding broken links is only half the battle. You also need to fix them. The Link Checker panel provides a quick and easy way to do this: -
In the Link Checker panel, click a path in the Broken Links column . The path is highlighted, and a tiny folder icon appears to the right (circled in Figure 14-5).
Tip: The Link Checker panel shows you which pages contain broken links, but doesn't show you the text or images of the broken links themselves , which can make it difficult to figure out how you're supposed to fix them ("Was that a button that links to the home page?"). In such a case, double-click the file name in the Link Checker panel. Dreamweaver opens the Web page and, even better, highlights the link on the page.Once you've determined where the link should lead ("Oh yeah. That's the button to the haggis buffet menu"), you can fix the link on the page (see Section 4.4.3) or go back to the Link Checker panel and make the change as described in the next step.
-
Click the tiny folder icon . The Select File dialog box opens. From here, you can navigate to and (in the next step) select the correct pagethe one that should have been opened by that link. If you prefer, you can type a path directly in the Link Checker panel. Doing so usually isn't a good idea, however, since it's difficult to understand the path from one page to another by just looking at the Link Checker panel. Searching for the proper page using the Select File dialog box is a much more accurate and trouble-free method. -
Double-click a Web page in the Select File dialog box . The dialog box disappears, and Dreamweaver fixes the link. If your Web site contains other links pointing to the same missing file, Dreamweaver asks if you'd like to fix the same broken link on those pages, tooan amazing time-saver that can quickly repair broken links on dozens of pages.
Tip: Dreamweaver's behavior is a bit odd in this regard, however. Once you fix one link, it remains selected in the Link Checker panel. You must click another broken link, or one of the buttons in the window, before Dreamweaver asks if you'd like to fix that same broken link on other pages.
-
Continue to fix broken links, following steps 1 through 3 . When you've repaired all the broken links, click the close button. 14.4.3. Listing External Links Although Dreamweaver doesn't verify links to other Web sites on your pages, it does show you a list of such external links when you run the link checker. To see this list, choose External Links from the Show menu of the Link Checker panel (see Figure 14-6). The list includes absolute URLs leading to other sites (like http://www.yahoo.com) as well as email links (like mailto :alien_sightings@nationalexasperator.com). Figure 14-6. Although Dreamweaver can't check external links, you can use this window to change the URL of an external link. 
This window is especially useful if you've created a link to a certain external Web site several times throughout your Web site and you've decided to change the link. For example, you discovered through testing (or through the W3C Link Checker mentioned on Section 14.3.1) that an external link that you've peppered throughout your site no longer works: -
Choose Site Check Links Sitewide (or press Ctrl+F8 [ -F8]) . Dreamweaver scans your site and opens the Link Checker panel. -
From the Show pop-up menu, choose External Links . The window lists links you've created to sites outside your own. -
Click the external link you want to change . Dreamweaver highlights the link, indicating that you can now edit it. -
Type the new URL; press Enter (Return) . If other pages contain the old URL, Dreamweaver asks if you would like to fix them as well. If so, click Yes; the deed is done. 14.4.4. Orphaned Files The Link Checker panel also provides a list of files that aren't used by any Web page in the site orphaned files , as they're called. You wind up with an orphaned graphic file when, for example, you save a GIF into your site folder but then never use it on a Web page. Or suppose you eliminate the only link to an old page that you don't need anymore, making it an orphaned file. Unless you think you may link to it in the future, you can delete it to clean up unnecessary clutter in your site. In fact, that's the primary purpose of this feature: to locate old and unused files and delete them. Here's how it works: -
Choose Site Check Links Sitewide, or press Ctrl+F8 ( -F8) . Dreamweaver opens the Link Checker panel. -
From the Show menu, choose Orphaned Files . The list of orphaned files appears (see Figure 14-7). Figure 14-7. Identify (and delete) unused files using Dreamweaver's Link Checker panel. This panel lists external links and orphaned files as well as broken links; use the Show menu to isolate the different types of link. 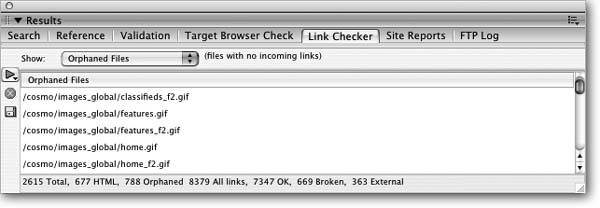 -
Select the files you want to delete . For example, by Ctrl- ( -) clicking the files. -
Press Delete . Dreamweaver asks if you really want to delete the files. Click OK if you do, Cancel if you suddenly get cold feet. -
Click the Close button when you're finished . Before you get spring-cleaning fever and delete all orphaned files in your site, however, keep a few pointers in mind: -
Just because a file isn't currently in use doesn't mean you won't need it again later. For example, say you have an employee-of-the-month page. In March, you included a photo of Robin Albert, your best salesperson. In April, someone else got the award, so you removed Robin's photo. You're not using that photo nowrendering it an orphaned filebut next month you may need it again, when Robin develops a spurt of motivation. Make sure a file is really useless before deleting it. -
More important, Dreamweaver may flag files your site actually needs as orphaned . For example, some sites include what's called a splash page : an introductory page that first appears when someone comes to the site. It can be a page with a bold graphic and the text "Click here to enter the site." Or it may be a fancy Flash movie intended to make a big impact on your visitors . Usually, this page is nothing more than a welcome mat that leads to the real home page. Since it's simply an introductory page, no other page in the site links to it. Unfortunately, that's precisely what Dreamweaver considers an orphaned file. -
If you write your own JavaScript code, you may reference graphic files and Web pages. Dreamweaver doesn't keep track of these references, and identifies those files as orphans (unless they're inserted or linked to elsewhere in the page or site). On the other hand, Dreamweaver is somewhat smarter when it comes to behaviors. It can track files referenced as part of its own JavaScript programsfor example, graphic files you use in a rollover effectand doesn't list them as orphaned files. The bottom line is that while this report is useful, use it cautiously when deleting files. 14.4.5. Changing a Link Throughout a Site Suppose you've created a page on your site to teach your visitors about the basics of the HTML language. You think this page would be really, really helpful to your visitors, so you create links to it from every page on your site. After a while, you realize you just don't have the time to keep this page up to date, but you still want to help your visitors get this information. Why not change the link so it points to a more current and informative source? Using Dreamweaver's Change Link Sitewide command, you can do just that: -
Choose Site Change Link Sitewide . The Change Link Sitewide dialog box opens (see Figure 14-8). Figure 14-8. Dreamweaver uses a root-relative link to specify the page, as indicated by the slash (/). Don't worry: this doesn't mean Dreamweaver makes the link root-relative. It's just how Dreamweaver identifies the location of the page in the site. See Section 4.1.3 for more on root-relative links. 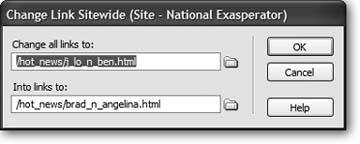 This dialog box offers two different fields: "Change all links to" and "Into links to." Understanding what you're supposed to do at this point is easier if you imagine that the first label is actually "Change All Links That Currently Point To." In other words, first you'll indicate where those links point now; then you'll indicate where you'd like them to go instead. At this point, you can type the new Web address into the "Change all links to" field. For example, if your aim is to round up every link that now points to Yahoo! and redirect them to Google, you could start by typing http://www.yahoo.com here. If the links you're trying to change refer to a page in your own site, however, proceed to step 2. -
Click the folder icon to the right of the "Change all links to" field . The Select Link to Change dialog box opens. You're about to specify the file that the links point to now . -
Select a file in the local site folder; click OK (Windows) or Choose (Mac) . In the following steps, Dreamweaver will change every link that leads to this file , whether it's a graphic, Cascading Style Sheet file, or any other external file that can be part of a Web page.
Tip: As a shortcut to following steps 1, 2, and 3, you can select a file in the Files panel, and then choose Site Change Link Sitewide. Dreamweaver automatically adds the selected files path to the "Change all links to" field.
Now it's time to substitute the new URL or filethe one to which all of those links will be redirected. If you're reassigning them to a different Web site, you can type its URL directly into the "Change all links to" field. For example, in the previous example, you can type http://www.google.com.
Tip: For another way to change one external link into another, see Figure 14-6.
If you'd like the changed links to point to a file on your own Web site instead, proceed to step 4. -
Click the folder icon to the right of the "Into links to" field . The Select Link to Change dialog box opens. -
Select a file in the local site, and then click OK (Windows) or Choose (Mac) . You've just selected the new file you wish to link to. In other words, every link that once led to the file you selected in step 3 now links to this file. You can select graphics, Cascading Style Sheet files, and any other external files you can include in a Web page. You'll get unpredictable results, however, if you change a link that points to a graphic file into, say, a link that points to a Web page, or vice versa. Make sure the "before" and "after" links share the same file type: Web page, style sheet, or graphic. -
Click OK to make the change . The same Update Files dialog box you encountered in the last chapter appears, listing every page that will be affected. -
Click Update to update the pages . Dreamweaver scans your site and updates the pages. |