Section 13.2. Viewing a Site Map
While the Files panel's list of files and folders is a great aid in managing those files, it doesn't give you a picture of how your site's Web pages are linked together. You can see that the index.html file in the root folder is the site's home page, for instance, but you can't see how it relates to the other pages in the site. In other words, you can't tell which pages link to or from it. To see those relationships, you need Dreamweaver's Site Map view.
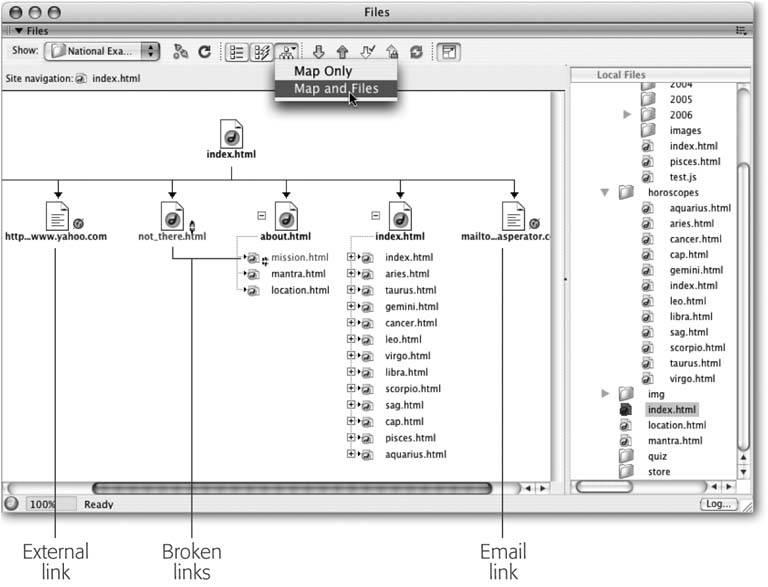
The Site Map is a visual guide to the links in a site (see Figure 13-10). An icon representing the home page appears at the top of the map, and arrows connect the home page to icons, representing each of the links it contains. As shown in Figure 13-10, special icons clearly mark external, broken, and email links.
Figure 13-10. The Site Map displays icons for each link in a Web site. Symbols provide added information about the pages: The globe icon indicates an external link, such as http://www.yahoo.com. The broken-link icon indicates that the file either doesn't exist or has been misfiled, so that the link won't work. Dreamweaver also highlights the name of the missing file in red. For more on finding and fixing broken links, see Section 14.4.
The best way to view these links is by expanding the Files panel (see Section 13.1.5.1), which spreads the links out into easy-to-read columns . In regular collapsed view, all the links in the map are put into a single column, so you need to scroll down to see each one. Furthermore, the Site Map does more than just provide a visual overview; it also gives you an easy way to rename files and even retitle Web pages.
Note: Web designers often create site maps to show the organization of a site. These neatly formatted, hierarchical charts demonstrate the structure of the site by indicating the logical sections in which the site's content has been divided. Warning: Dreamweaver's Site Map doesn't show this kind of organization. It treats every link on the page the same, whether it links to a major section of the site, or just to an insignificant side note; so just by looking at the Dreamweaver's Site Map, you won't necessarily get a good idea of the logical structure of the site.
13.2.1. Setting Up Site Map View
To view a Site Map, you'll first need to do a little preparation:
-
Choose Site
 Manage Sites (or, from the Site menu in the Files panel, choose Manage Sites) .
 The Manage Sites window appears, listing all of your sites.
-
Click a site name and click Edit (or just double-click the site name) .
The Site Definition window opens.
If you're defining this site for the first time, you can also follow the steps on Section 13.1.1.
-
In the Category list, choose Site Map Layout .
You see the dialog box shown in Figure 13-11.
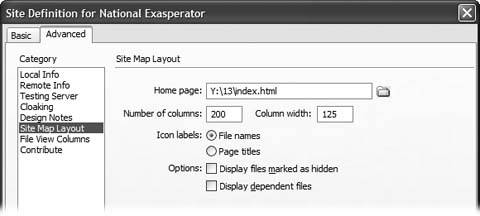
Figure 13-11. Here, you define the site's home page and set preferences for Dreamweaver's Site Map view. If your home page file is named anything other than index.html or index.htm, you must specify it in the Home Page field.
-
Click the folder icon next to the Home Page field. Navigate to the home page file in the site's root folder .
Click Select (Windows) or Open (Mac) to set this page as the home page.
Remember that your home page must be in the root folder. Technically, you can choose a file that's buried several folders deep in your site folder, but don't do itunless, of course, you really want to tell people to visit your company's home page at www.mycompany.com/about_us/about_me/my_dog/ralphie.html. By specifying a home page in the outer level of your root folder, you ensure the home page is at www.mycompany.com.
-
Set any other Site Map preferences you wish .
The "Number of columns" field determines how many links are displayed in a single row of the Site Map. For instance, if you set the number of columns to five, but the home page has 10 links on it, the Site Map has only enough columns for the first five links; the remaining five icons get bumped down to a second row directly below the first. Displaying more than one row of links from the home page is confusing, so it's best to use a number of columns that's at least equal to the number of links on the home page. Dreamweaver's default value of 200 is just fine.
The "Column width" represents the width, in pixels, of each column. As you can see in the box on Section 13.2.2.1, file names and page titles may not fully appear if the column width is too small. Again, stick with Dreamweaver's default value of 125.
Note: The column width and number settings have no effect except when the Files panel is in expanded view (Figure 13-7).
Using the "Icon labels" buttons , choose whether you want the Site Map to display the file name ( index.html ) or page title ("Welcome to The National Exasperator") next to each page's icon. Ctrl+Shift+T (
 -Shift-T) toggles between the two views when viewing the Site Map.
 Once you've got your Site Map on display, you can hide certain files for the sake of clutter reduction by marking them as hidden. To make sure they stay hidden, leave "Display files marked as hidden" turned off. You can always make the hidden files reappear using the steps described on Section 13.2.2.2.
The "Display dependent files" option makes GIF, JPEG, CSS, Flash, and all other non-HTML files show up in the Site Map. Since this can make the Site Map a confusing jumble of files, it's best to leave this option turned off.
-
Click OK .
You return to the Files panel.
13.2.2. Viewing and Customizing Site Map View
Once you've set up Site Map view as described above, you can see it by choosing Map View from the Files panel's unlabeled View menu (identified in Figure 13-6). Because the Files panel is narrow, click the Expand/Collapse View button (also shown in Figure 13-6) to maximize the map area.
When you first view the Site Map, only the first two levelsthe home page and all of the pages linked from itappear. A + symbol next to a page indicates that there are additional links on that page; clicking the + expands the list of links on that page. If those pages in turn have links, additional + symbols appear. You can continue to follow the links by expanding each page, but viewing too many levels at once can produce a confusing complication; see the box below for advice.
As in the Site file list, you can open a page by double-clicking its icon in the Site Map. In fact, if the Files panel is expanded (so that both the Site Map and Local Site file listings appear), selecting a page in the Site Map highlights the corresponding page in the File list, and vice versa.
13.2.2.1. Identifying pages in the Site Map
The Site Map view starts out displaying the file name of each Web page, which is less than informative. If you've structured your site (as recommended on Section 13.1) so that the main page for each section of the site is stored in a different folder and is named index.html , the Site Map is an unhelpful sea of index.html labels (see Figure 13-10).
A better approach: use each page's title as the icon label. You can do this either when you first set up the site, as described on Section 13.2.1, or choose View Site Map Options Show Page Titles from the Files panels contextual menu. Repeat the same command to see the file names again. The keyboard shortcut Ctrl+Shift+T ( ![]() -Shift-T) is a fast way to toggle between the two views.
-Shift-T) is a fast way to toggle between the two views.
| TROUBLESHOOTING MOMENT Don't Get Lost in the Site Map |
| The Site Map clearly displays links between pages, but if you're not careful, you may end up chasing your tail. Very often, Web pages link back and forth to each other. For example, the home page may link to a page in the site that, in turn, links back to the home page. In the example illustrated here, the horoscopes main page ("Horoscopes") has a link to the home page ("The National Exasperator"), which links to the horoscopes page, which links back to the home page, which links to the horoscopes pageand so on. All three of the pages indicated by arrows are, in fact, the same page! As shown here, the Site Map shows the horoscope page, which is a link from the home page. When you then click the + sign to expand the horoscopes page, you see a duplicate icon for the home page (whose original icon appears at the top of the Site Map). When you click the + sign next to the home page icon under the horoscopes page, you don't get a new level of site links, even though the Site Map displays it that way. What you've done is "re-expand" the home page to display more duplicate icons. 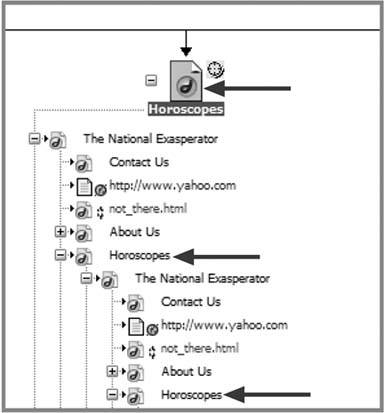 |
Note: In Windows, if the Files panel is expanded, you'll see a menu across the top of the panel. This menu offers the same options as the contextual menu visible in the collapsed panel, circled in Figure 13-6.
13.2.2.2. Viewing just part of a Web site
When viewing large Web sites, you may find the Site Map awkward . Perhaps you're working on just a single section and don't want to be bothered with the extraneous details of the rest of the site. No problem: You can isolate a particular page when viewing the Site Map. Right-click (Control-click) the page and select View as Root from the menu that appears. The page you selected appears as the top-level page in the Site Map (see Figure 13-12).
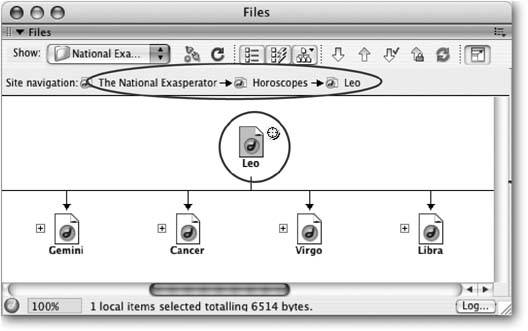
Figure 13-12. This Site Map is zoomed in on a single page (Leo), which appears at the top level of the Site Map where the home page normally would be. The path from the home page to this file appears above the map in the Site Navigation bar. The home page is titled "The National Exasperator." A link from the home page leads to a page titled "Horoscopes," which in turn links to the "Leo" horoscope page. To once again view the home page as the top level of the Site Map, click its name in the Site Navigation bar.
13.2.2.3. Hiding extraneous links
Like some people you may know, the Site Map loves detail; it includes all links from your pages, including external links and email links. At times, this may be a bit more information than you need. Suppose you provide 200 email addresses on a single page; you probably don't need to see all of those listed in the Site Map.
Fortunately, Dreamweaver lets you hide any links you wish. All you have to do is select the files you want to hide (Shift-click them, or drag across a group of them) and then choose View Show/Hide Link from the Files panels contextual menu, or right-click (Control-click) the selected files and choose Show/Hide Link from the menu that appears; Dreamweaver makes them disappear.
To show hidden files again, choose View Map Options Show Files Marked as Hidden from the Files panels contextual menu. Dreamweaver makes all hidden files appear with their names italicized, indicating that you've marked them as hidden.
You can turn off a file's "hidden" status by selecting it and choosing View Show/ Hide Link, or right-clicking (Control-clicking) the file and choosing Show/Hide link.
13.2.3. Renaming Pages in the Site Map
You can rename files in Site Map view, which works similarly to renaming them in the File List view. However, only the Site Map lets you easily change the titles of your site's Web pages. In fact, this is one of the best features of the Site Map. While displaying the page titles, you can quickly scan your site for missing or incorrect page titles and fix them without having to open the documents.
You rename a file in the Site Map just as you do in the Files panel; the steps appear on Section 13.1.5.4. In this case, just be sure you're looking at the right kind of dataeither page titles or file namesbefore you begin. Press Ctrl+Shift+T ( ![]() -Shift-T) to switch back and forth when viewing the Site Map.
-Shift-T) to switch back and forth when viewing the Site Map.
When you're finished, Dreamweaver rewrites the title in the HTML of the page. The new title also appears next to the page icon. Or, if you've changed the name of the file, Dreamweaver's Update Files dialog box appears, letting you fix any links that point to the newly named file.