13.4. Tutorial: Building a Print Style Sheet In this tutorial, you'll create a print style sheet. To make the printed version of a Web page look better, you'll add styles that remove unwanted page elements and backgrounds, change text formatting, add a printable logo, and print the URLs attached to any links on the page. To get started, download the tutorial files from this book's companion Web site at www.sawmac.com/css/. Click the tutorial link, and then download the files. All of the files are in a ZIP archive, so you need to unzip them first (You'll find detailed instructions on the Web site.) The files for this tutorial are in the chapter_13 folder. 13.4.1. Remove Unneeded Page Elements To get started, you first need to understand how the page is laid out so you can decide which elements you want printed. -
Launch a Web browser and open chapter_13  cosmo.html . cosmo.html . This CosmoFarmer Web page is a float-based layout consisting of several <div> tags (see Figure 13-4). In all likelihood , anyone printing this page is most interested in the main contentthe Bathtub Hydroponics story. Printing the Subscribe and Contact links, the navigation bar, and the news links is just a waste of toner, so your print style sheet should hide these parts of the page. -
In a text editor, create a new file named print.css and save it in the chapter_13 folder . In your new print style sheet, the first order of business is to hide the navigation bar and other parts of the page that you don't want to print. -
Using the display property, create a new group selector that hides site tools, navigation bar, and news sidebar, like so : #sitetools, #nav, #news { display: none; } With the display property set to none , Web browsers hide those elements so they won't print. But first you need to attach this external style sheet to your Web page so browsers can find it. -
In your text editor, open chapter_13 cosmo.html . This page already has an attached style sheet global.css . This external style sheet provides all of the formatting for the page when it's displayed in a browser. Also, since the style sheet is attached using the <link> tag with no media attribute specified, it applies when the page is printed as well. Your print style sheet, then, needs to override any styles from the global.css file that won't look good in print. The first step in that process is attaching the print style sheet after the global.css file in the html of this page. Figure 13-4. CSS layout lets you control the placement of elements on a page. When printing a page, some elements are better off not appearing at all. The nav and news sidebars don't add useful information to a printed document. 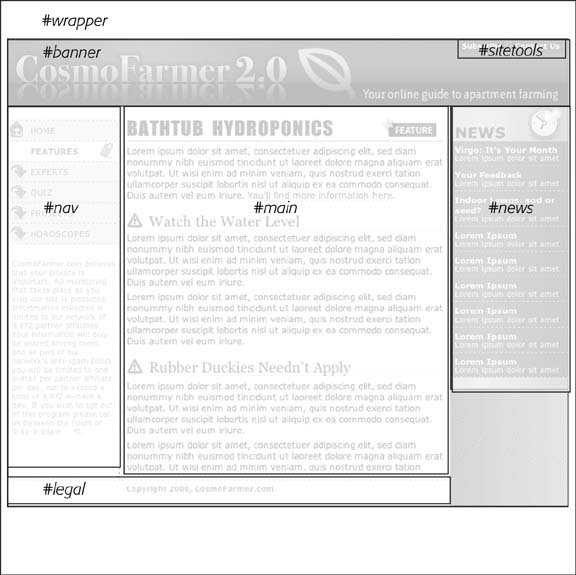 -
Locate the <link> tag in the head of the page used to attach the global.css file. Insert a blank line after that tag, and then add the following : <link href="print.css" rel="stylesheet" type="text/css" media="print" /> If properties from two styles with the same name conflict, the properties from the style sheet last linked on the page wins, so this <link> must go after the other <link>. That way, if the global.css file has a class named .copyright that creates white, 10 pixel type on a black background, you can create another style named .copyright in the print style sheet with black, 12-point type on a white background. Even though the two styles share the same name, the properties from the print style sheet win because it's the last one linked. (See Section 5.2.1 for more detail on this cascading rule.) -
Save the print.css and cosmo.html files, and then preview cosmo.html in a Web browser . The page should look no different than it did in step 1 above. That's because you haven't printed it yet. You can see the effect of the print style sheet by using your Web browser's Print Preview command. -
If you're using Windows, choose File Print Preview. Mac fans should choose File Print, and then, in the Print window that appears, click the Preview button . In the Print Preview window, you'll see that the left and right sidebars as well as the two links in the banner area have disappeared. But the design still doesn't look that great. The main content doesn't fill the page as it should. You'll fix thatand a few other thingsnext. 13.4.2. Removing Backgrounds and Adjusting the Layout Sometimes background images and colors print out, but often they don't. It all depends on the browser and the visitor's settings. Some browsers don't print background elements at all; others can print them but give folks the option of turning them on or off. Printing backgrounds is useful when it's important for the printed page to look just like the screen version. But when you have backgrounds that would only be a distraction and a waste of ink, do your visitors a favor and disable them. -
Return to your text editor and the print.css file. Add two new styles to remove the background color and banner : body { background: #FFF; } #banner { background: #FFF; } When viewed onscreen, this page has a gray background and a graphic that creates the drop shadow effect to the left and right edges of the content. The banner has a graphic that includes the site's logo. These two styles set the background color of the page and banner to white and remove the graphic. (See Section 8.6 for the story on why the background image disappears as well.) Now it's time to adjust the layout a bit, so that the text fills an entire printed page. Start by changing the # wrapper ID style that sets the entire width of the content area of the page to 760 pixels. -
Add another style to the print.css style sheet : #wrapper { background: #FFF; border-style: none; width: auto; } The first declaration in this style works just like the previous step: It sets the background to white and removes any background images. The second property removes the black border that appears on both the left and right edges of the wrapper. The last declaration width:auto affects the overall layout of the page. It overrides the 760-pixel width setting from the global.css file and leaves the exact width up to the Web browser. Auto simply lets the <div> fill the entire available width, so no matter the paper sizeletter, A4, or whateverthe content fills the width of the printed page. The next problem's the part of the page containing the article. It's a <div> tag called # main , as you can see in Figure 13-4. -
Add a new style to the print.css file : #main { border: none; padding: 0; width: auto; } The first two properties eliminate the borders and the extra white space visible in the onscreen version of the page. The third declaration lets the text fill the width of the page, just like the width: auto setting you added for the # wrapper in step 2. Now it's time to get a little picky. The copyright notice at the bottom of the page is indented left using a large padding-left value. This element would look better if it lined up at the left with the other text on the page. -
Add a style for the copyright region of the page : #legal { padding-left: 0px; } Feel free to save this file, preview the cosmo.html file in a Web browser, and use the Print Preview function to see how the printed version's coming along. 13.4.3. Reformatting the Text While colored text and pixel- sized fonts may work on the screen, laser printers understand point sizes better. Also, solid black text looks better on white paper. In this section, you'll adjust the text accordingly to look better in print. -
In the print.css file, add the following CSS rule : * { color: #000000 !important; } This style is the CSS equivalent of a sledgehammer. It essentially tells every tag to use black text no matter what. The * (universal selector) is a quick way of specifying a style for every single element on a page (see Section 3.1), while the !important declaration cancels out any conflicts caused by the cascade. So even though * isn't a very specific style, the color property here trumps the same property in much more specific styles like # main h1 or # nav #mainNav a . Next you'll set new font sizes for the text. -
Add the following three styles : h1 { font-size: 18pt !important; } h2 { font-size: 14pt !important; font-weight: bold !important; } p { font-size: 10pt !important; } These styles make each of these tags use a more printer-friendly font size. The addition of !important makes these sizes always apply to those tags regardless of any style conflicts with the global.css style sheet.
Note: In this case, h1, h2, and p are the only tags that print from the cosmo.html page. Your pages may require you to redefine text sizes for other tags like lists, blockquote, and so on.
13.4.4. Displaying the Logo Since the logo in the banner is a background-image, not all browsers will print it. Because the powers that be at CosmoFarmer international headquarters don't want to lose any opportunity to promote their brand, they've devised another way to get their logo on the printed page. In the HTML of the cosmo.html Web page is an <img> tag that includes a smaller black and white version of the logo. However, it doesn't appear onscreen because the global.css file hides it using the display: none trick just like step 3 in Section 13.4.1. Now it's time to make it visible. -
In the print.css file, add a style to make the logo appear : #logo { display: block; } Block is the value required to counter the effects of the display property's none value. That's all it takes. Now when your visitor prints the page, the simplified logo appears. 13.4.5. Displaying URLs For a final flourish, you'll add one more style that prints the URL next to the text of each link on the page. That way, the onscreen text "Click here to found out more" will print as "Click here to found out more (http://www.outmore.com/)" so anyone reading the printed version can visit the site referenced by the link. This technique uses some advanced CSS that Internet Explorer 6 (and 7 as of this writing) doesn't understand, but it doesn't do any harm in those browsers, either. And it is a great enhancement for visitors who print from your site with Firefox and Safari. -
Add one last style to the print.css style sheet : a:after { content: " (" attr(href) ") "; } In the content : line, this style adds the URL (the attr(href) part) at the end of each link (the a:after part). -
Save the print.css file. In your Web browser, open cosmo.html and print it . The printed page should look something like Figure 13-5a simple, barebones , just-the-facts page. You'll find a completed version of the page in the chapter_13_finished folder. Figure 13-5. Its looks aren't much to write home about, but this page's simplicity makes it perfect for printing. It'll earn you the appreciation of visitors who are looking for a clean presentation of the facts, free from navigation buttons , ads, and tonerwasting background images. 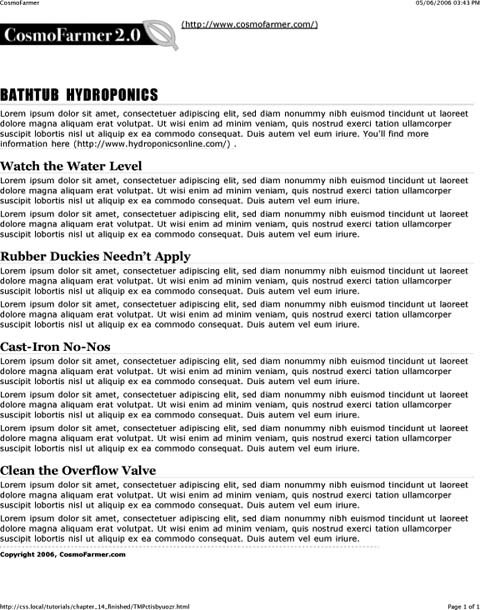
|