B.2. Adding Styles to Web Pages Once you've created styles, applying them is easy. In fact, if you created HTML tag styles, then you don't need to do anything to apply them because their selectors automatically dictate which tags they affect. When you put your styles in an external style sheet, Dreamweaver automatically links it to the current document. To use its styles in a different Web page, you must attach it to the page, as described next . B.2.1. Linking to an External Style Sheet When you add a new Web page to your site, usually you want to use the same CSS styles as you did in existing pages, for a consistent look. But you need to tell Dreamweaver which style sheet you're using by attaching it to the page. To do so, open the Web page to which you wish to add the style sheet. Then click the Attach Style Sheet button (see Figure B-1) on the CSS Styles panel. (If the CSS Styles panel isn't open , choose Window  CSS Styles or press Shift-F11.) CSS Styles or press Shift-F11.)
Tip: You can also use Dreamweaver's Property inspector (at the bottom of the window) to attach a style sheet. Just choose Attach Style Sheet from the Style menu.
When the Attach External Style Sheet window appears (Figure B-4), click Browse. In the Select Style Sheet File dialog box that appears, navigate to and double-click the CSS (.css) file you wish to attach to the document. If Dreamweaver offers to copy the style sheet file into your site's root folder, then click Yes. Figure B-4. Most of the options in the Media menu aren't very useful, since there aren't any devices programmed to work with them. However, "printer" and "screen" are handy ways to control how your page displays when viewed on a monitor and when printed on paper. 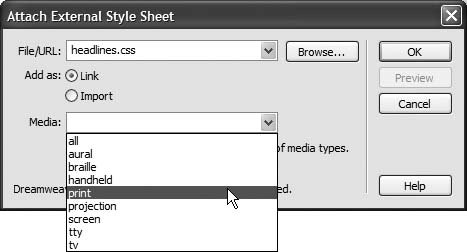
The Attach External Style Sheet window provides two other options: how to attach the style sheet, and what type of media you want the styles to apply to. -
When attaching an external style sheet, you can choose to either Link or Import it. These two choices are nearly identical, as described in Section 2.2. -
The Media menu defines which type of output device or display should use the style sheet. Selecting "print" means that the style sheet will only apply when the document is printed. Most of these optionssuch as TV for televisions , or TTY for teletype machinesaren't of any use to the average Web designer. You can read about these different media types and the two most important ones, "printer" and "screen," starting in Section 13.1. Most of the time, you can safely ignore this menu. The "all" option in the Media menu is the same as not selecting anythingthe style sheet applies when printed, viewed on a monitor, felt on a Braille reader, and so on. ( Dreamweaver 8 also includes a helpful toolbar for controlling the display of style sheets aimed at different mediasee Figure B-5).
Tip: You can preview the effect of the style sheet on your page by clicking the Preview button on the Attach External Style Sheet window.
After choosing your options, click OK. Dreamweaver adds the necessary HTML code to the head of the Web page, and automatically formats any tags in the document according to the style sheet's HTML tag styles. You'll see the formatting changes take place in the document window immediately after attaching the external style sheet. If the style sheet contains class styles, on the other hand, you won't see their formatting effects until you apply them to an element on the page, as described next. Figure B-5. To turn on Dreamweaver's Style Rendering toolbar (top right), choose View Toolbars Style Rendering. Click a button on the toolbar to show styles that match the media type you selected when you attached the page (see Section B.1.1). Screen (top-left, circled) and Print (bottom-left, circled) are the two most useful, though you can hide all CSS styles by clicking the button on the far right of the toolbar (bottom-right, circled). 
B.2.2. Applying a Class Style You can apply class styles to any selection in the document window, whether it's a word, an image, or an entire paragraph. (You can apply any class style to any element, although doing so doesn't always make sense. If you format a graphic with a style that specifies bold, red Courier type, then it won't look any different.) Suppose your company's name appears in a paragraph of text on a Web page that includes a class style named .company (either in an internal style sheet, or in a linked, external style sheet). To format that text using the class style, you select the name in the document window and apply the style, as described below. Similarly, to format larger selections, such as an entire paragraph, you'd select the paragraph and apply the class style. In fact, you can apply a class style to any HTML tag, such as the <p> (paragraph), <td> (table cell ), or <body> tags. When you apply a class style (like .company ) to a tag, Dreamweaver adds a special class property to the page's code, like this: < p class="company" >. On the other hand, when you apply a class to a selection that isn't a taglike a single word that you've double-clicked Dreamweaver wraps the selection within a < span> tag like this: < span class="company" > The National Exasperator </ span >. This tag, in other words, applies a style to a span of text that can't be identified by a single tag. To apply a class style to text, select some words. Then, from the Style menu in the Property inspector, select the style name (Figure B-6, top). To style an entire paragraph, place the cursor anywhere inside the paragraph (or heading) before using the Property inspector. To apply a class style to an object like an image, select the object (the tag selector in the bottom of the document window is a great way to select a tag). Then use the Class pop-up menu on the Property inspector (Figure B-6, bottom) to select the style name. Figure B-6. Using the Property inspector is the easiest way to apply a class style. Depending on what you've selected on the page (text, an image, or some other HTML tag), you'll encounter one of two different menusthe Style menu (top) or the Class menu (bottom). Either way, it's the same menu with the same options, and you use it to select the name of a style to apply it to whatever you've selected in the document window. You can also remove a style by selecting None from the menu. 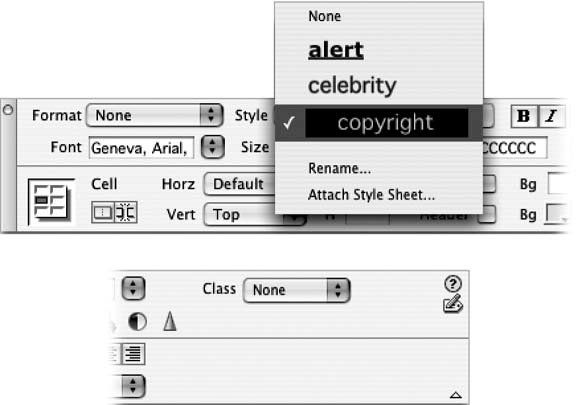
You can also apply a class style by selecting whatever element you wish to style, choosing Text CSS Styles, and then selecting the style from the submenu. (Alternative method for the anti-menu crowd : right-click [Control-click] the styles name in the CSS Styles panel, and then choose Apply from the shortcut menu.) Finally, you can also apply a class from the document window's tag selector, as shown in Figure B-7. Figure B-7. You can apply a class style directly to a tag using the document window's tag selector. Just right-click (Control-click) the tag you wish to format, and then select the class style from the Set Class submenu. In addition, the tag selector lets you know if a tag has a class style applied to it. If so, you'll see the style's name at the end of the tag. In this figure, a class style named .colContent has been applied to a <div> tag (circled). 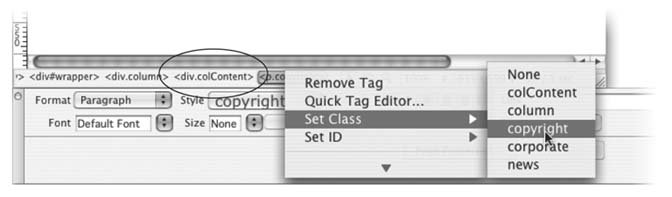
B.2.3. Un-Applying a Class Style To remove a style from an object on a Web page, simply select the element and then select None from the Property inspector's Style menu (see Figure B-6). You can also choose Text CSS Styles None to remove a style from any selection (even non-text elements like images or tables).
Tip: If you've applied a class style to a selection of text, then you don't actually have to select all the text to remove the style. Just click anywhere inside it and select None from the Property inspector's Style menu (or choose Text CSS Styles None). If you applied the style to a tag, then Dreamweaver removes the Class property from the tag. If you applied the style using the <span> tag, then Dreamweaver removes that tag.
You can't remove tag styles from HTML tags. Suppose you've redefined the <h1> tag using the steps outlined in Section B.1.1. If your page has three Heading 1 (<h1>) paragraphs, and you want the third heading to have a different style than the other two, then you can't simply "remove" the <h1> style from the third paragraph. Instead, what you'd need to do is create a new class style with all of the formatting options you want for that third heading and apply it directly to the <h1> tag (by the magic of CSS, the class formatting options override any existing tag style optionssee Section 5.2 for more on this sleight of hand). |