| While the Layout mode is a great way to lay out a page, it can't do everything. You can't, for instance, set a table cell 's Background Image property in Layout mode. Nor can you add color to a row of cells , or even insert a simple table for displaying data. Likewise, if you're already comfortable visualizing table-based layouts in your head (or if you find the Layout tools cumbersome), you may prefer the basic approach offered by the Table object. In fact, even if you're sold on the Layout mode, it's a good idea to familiarize yourself with these steps so that you can troubleshoot tables more easily. To insert a table, first switch to Standard view by clicking the Standard View button on the Layout tab of the Insert bar (see Figure 7-3) or by choosing View  Table Mode Standard View. Then proceed as follows . Table Mode Standard View. Then proceed as follows . -
Place the insertion point in the document window where you'd like to insert a table. You can add a table anywhere you can add graphics or text. You can even add a table to another table, by clicking inside a table cell. NOTE If you've never built HTML tables before, you may find them confusing. For an excellent set of tutorials, check out www.dwfaq.com/Tutorials/Tables/ . -
Choose Insert Table. You can also click the Table Button on the Insert bar. It appears under both the Common tab and the Layout tab. You can also press Ctrl+Alt+T (Option-  -T). Either way, the Insert Table dialog box opens (see Figure 7-12). -T). Either way, the Insert Table dialog box opens (see Figure 7-12). -
Using the Rows and Columns fields, specify how many rows and columns you want your table to have. If you're using the table for layout purposes, you might only want two or three columns. If you plan to create a spreadsheet, you could create many rows or columns. (Don't panic about your estimate, since you can always add or remove rows or columns later.) -
Type the amount of cell padding, in pixels, you want for the table. Cell padding is the margin inside the cellthe space from the edge of a cell to its contents (see Figure 7-2). Unfortunately, this property applies to every cell in a table. You can't add this space to an individual cell in a table unless you use the Cascading Style Sheet Padding property as described in the note in Section 7.2.3. -
Type the amount of cell spacing, in pixels, you want for the table. Cell spacing specifies how many pixels of space separate one cell from another (see Figure 7-2). Again, this property applies to every cell in a table. (Note that leaving these fields empty isn't the same as setting them to zero; see Figure 7-12.) -
Using the Width field, specify how wide you want the table to be (in units that you specify using the pop-up menu). Tables can have either a specified, fixed minimum width, or they can take up a specified percentage of the space available on the page. To set a fixed width, choose Pixels as the unit of measurement and type a pixel amount in the Width field. Fixed width tables remain the same size regardless of size of the browser window. Percentage widths let tables grow or shrink relative to the space available. In other words, the size of a table that's 100 percent wide stretches all the way across your visitor's browser window, no matter how wide or narrow. (You achieve a similar effect with the Autostretch feature in Layout mode, as described in Section 7.2.6.) NOTE Because of differences in the way browsers interpret HTML, the exact pixel dimension of percentagebased tables may differ from browser to browser. In some cases, a Web browser leaves room at the right edge of the browser window for scroll barseven if the page isn't long enough to require scroll bars! -
In the "Border thickness " box, type a number, in pixels, for the border. If you don't want a border, type . Dreamweaver uses dotted lines to help you identify rows, columns, and cells whose border is 0. (The dotted line won't appear on the finished Web page.) Again, CSS offers a much better method of adding borders (Section 6.7.5). -
Using the buttons in the middle of the dialog box, select a Header option. If you're actually using a table for its intended purposeto display a grid of informationyou'll find the Header property useful. It converts the HTML tag used for the cells (<td>) in the top row or right column into <th> tagsa table header tagwhich indicates that a cell is a headline for a column or row of data. You'd use this, for example, to announce the purpose of the table ("UFO Sightings by City: 1980 - 2004") or to provide an explanation for the data in each column or row ("1980," "1981," "1982"), and so on. The only visible change is that, in most Web browsers, header cell text changes to bold type, center aligned. However, this option also makes the table more accessible by telling screen readers that the cell serves as a header for the information in the column. (You can always change the look of these cells using CSS; just create a style for the <th> tag as described in Section 6.2.) -
In the bottom section of the Table dialog box, add any Accessibility settings you wish. Use this feature when creating full tables of data, spreadsheet-style, not when using tables to lay out the design of a page. Type information identifying the table in the Caption box; it will appear above the table on the page. From the Align menu, choose how to align the caption over the table. Use the Summary box to provide a detailed explanation of the table. For more information on these options and to get a complete rundown on table accessibility, visit www.w3.org/TR/WCAG10-HTML-TECHS/#tables . -
Click OK to insert the table. The Insert Table dialog box lets you define the properties of the table. Leaving the Cell Padding and Cell Spacing fields empty isn't the same as setting them to 0. If these properties are empty, most Web browsers insert 1 pixel of cell padding and 2 pixels of cell spacing.
If you notice unwanted gaps between cells in a table or between content in a table and the cell's edges, empty settings here are the most likely culprit. To truly leave zero space, set Cell Padding and Cell Spacing to 0. (Dreamweaver remembers the settings you use. When you use the Insert Table dialog box again, it starts with the same settings you entered previously.) 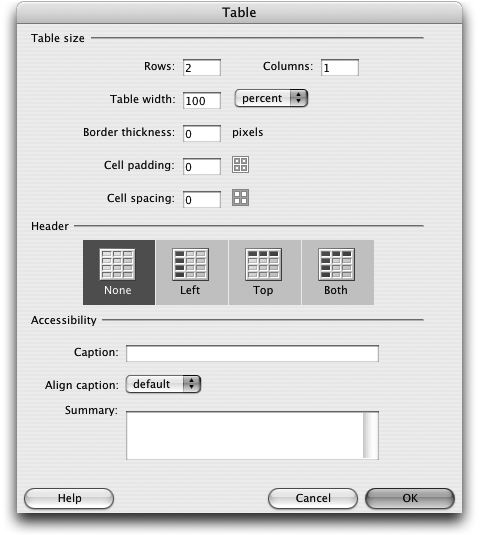 Once you've added a table to a page, you can begin filling the table's cells. A cell works like a small document window; you can click inside it and add text, images, and links using the techniques you've already learned. You can even insert a table inside of a cell (see Section 7.10). To move the insertion point from one cell to the next , press Tab. When you reach the last cell in a row, the Tab key moves the insertion point to the first cell in the row below. And if the insertion point is in the last cell of the last row, pressing Tab creates a new row at the bottom of the table. Shift-Tab moves the cursor in the opposite directionfrom the current cell to a cell to the left. |