Adding interactive elements to a Web page can be quite a chore. Unless you're a programmer, learning and using the JavaScript programming language can be timeconsuming and frustrating. Fortunately, Dreamweaver does most of the work for you, with its powerful yet easy-to-use Behaviors.
NOTE
Before you begin, you'll need the tutorial files from www.sawmac.com/dwmx2004/ . Click the Tutorials link. Under Images Tutorial, click the Windows or Macintosh link, depending on the kind of machine you're using, to download the files.
After you've downloaded and decompressed the files, you should have a DWImages folder on your computer, containing the Web pages and graphics needed for this tutorial. If you're having difficulties, the Web site contains detailed instructions for downloading the files you'll be using with this book.
-
In Dreamweaver, choose Site  Manage Sites.
The Manage Sites window opens.
-
Click the New Button and select Site from the pop-up menu.
The Site Definition window opens. In the first tutorial, you used Dreamweaver's Site Definition wizard (the Basic tab in this window) to get started. You'll use the Advanced tab this time, so make sure you've selected it. (There's more detail about the Advanced tab in Chapter 14).
-
In the site name box, type Rollovers .
Dreamweaver will use this name while you're working on this tutorial.
-
Click the folder icon next to the Local Root Folder field, browse to and select the DWImages folder, and then click Choose. Click OK.
If you see a message that Dreamweaver is about to create a cache for this site, click OK.
-
Click Done to close the Manage Sites window.
You've now defined the site you'll be working on in this tutorial. Defining Web sites and using Dreamweaver's site management features are discussed in depth in Part I.
The site's Files window should appear, listing all of the files in the DWImages folder. (If it doesn't, choose Window Files.)
-
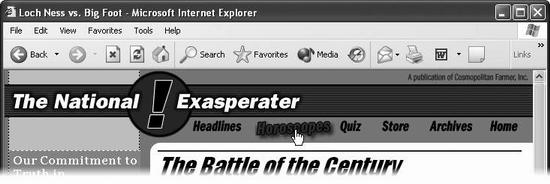
Click in the empty blue-gray space below the "X" in the National Exasperater logo.
If you first selected the photo or clicked anywhere inside the main area of the page, you may see some translucent boxes ( marked with numbers like "100% 900") covering this empty blue-gray area. These boxes are helpful aids for working with tables (Chapter 7), but they can make it difficult to click inside that space. If you're having trouble, first select an image (like the logo) near the top of the page. Now you should be able to clearly see ”and click ”in the blue area.
The insertion point should now be blinking. You've just placed the cursor inside a table cell where you can add other content such as images or text.
-
Choose Insert Image Objects Rollover Image.
You may prefer to select Rollover image from the Image menu on the Common tab of the Insert bar (Figure 5-2). Either way, the Insert Rollover Image dialog box opens (Figure 5-21).
-
In the Image Name field, type Headlines .
In order for this effect to work, each button must have its own name, which the JavaScript program will use to communicate with and control the graphic. Dreamweaver gives the graphic a generic name like Image1, but using a more descriptive name will make it easier for you to edit this effect later on.
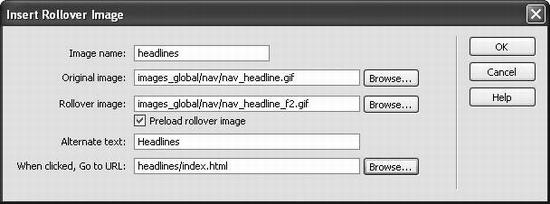
The Insert Rollover Image window lets you define the name, graphics, and link for a rollover. Make sure the Preload Rollover Image checkbox is turned on.
-
Click the first Browse button.
The Original Image dialog box appears. In the next step, you'll select the image for the button that will appear on the page.
-
Browse to the DWImages images_global nav folder; double-click the graphics file called nav_headline.gif.
Graphics for just the navigation bar are in a special folder ( nav ) which is, in turn , inside the main images folder ( images_global ). The path to that graphic ” images_ global/nav/nav_headline.gif ”appears in the Original Image field. Next stop: choosing the graphic that will appear when a visitor moves the cursor over the button.
-
Click the second Browse button; this time, double-click the file called nav_headline_ f2.gif .
Now, you'll make the button more accessible to people who have turned off their graphics, or who are using screen-readers to read the page.
-
In the Alternate Text box, type Headlines.
Now all you need to do is add a link to turn the graphic into a navigation button.
-
Click the third Browse button (next to the When Clicked, Go To URL field).
The On Click, Go To URL dialog box opens, awaiting your selection of a Web page that will open when you click your rollover button.
In this case, your button will link to the main page of the "Headlines" section of the site.
-
Browse to the headlines folder in the DWImages folder, find and double-click the file index.html.
At this point, the dialog box should look like Figure 5-21
-
Click OK.
You're back at your Web page document, where your new, rectangular button, called Headlines, proudly appears.
Congratulations! You've made your first rollover. To try it out for yourself, press F12 to preview the page in your Web browser. When you move your cursor over the button, the text should turn red and pop out at you. When you click the button, it should open the "Headlines" page.
-
Return to Dreamweaver.
Do so however you switch programs on your computer ”by using the Windows taskbar or the Mac OS X Dock, for example.
If you like, you can finish up the navigation bar by adding the five other rollover images. Simply click next to the Headlines button, and then repeat steps 8-16 above. Here are the names , graphics and pages you should use: