| After inserting a graphic, you can work on it in several ways: by attaching a link to the image, aligning it on the page, or adding a border and margin to it, for example. Dreamweaver MX 2004 also introduces some basic tools that let you crop, resize, optimize, sharpen, and adjust contrast and brightness (see "Editing Graphics" in Section 5.3). As with most objects on a Web page, you set image properties using the Property inspector (see Figure 5-4). 5.2.1 Naming an Image Just to the right of an image's thumbnail on the Property inspector is a small field where you can type a name for that image. Most of the time, you'll leave this field blank. However, if you plan to add interactive effects to itlike the rollover effect discussed in Section 5.5, using Dreamweaver Behaviors (see Chapter 12) or your own JavaScript programmingyou must name your picture. Whatever name you choose should only use letters and numbers no spaces or other punctuation. Furthermore, every graphic's name must be unique on the page. This rule is what allows JavaScript to "talk" to a specific image. The Property inspector (for Windows, top, and Mac), shows the selected graphic's dimensions, source, alignment, border, and margins. A thumbnail version appears in the upper-left corner, in this case, bearing the log of Fireworks, which created it. 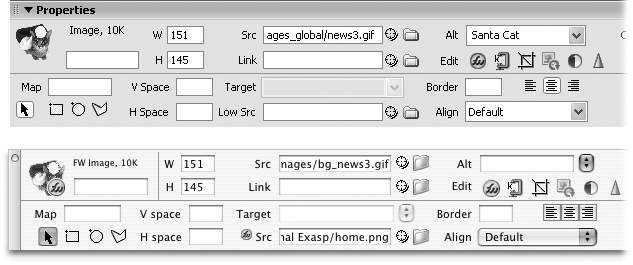 UP TO SPEED
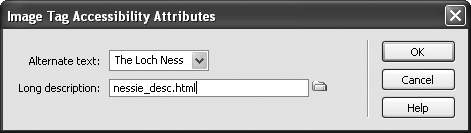
Making Accessible Web Sites Many people using the Web have disabilities that make reading, seeing, hearing, or using a mouse difficult. Visually impaired people, for example, may be unable to benefit from images on the screen, even though they have software that can read aloud a Web page's text. Dreamweaver includes a number of new features for making your Web sites more accessible. That's good news if you're building a Web site for the federal government or one of the many states that support Section 508 of the Workforce Investment Act. This law requires Web sites built for or funded by the government to offer equal or equivalent access to everyone. Throughout this book, you'll find tips for using Dreamweaver MX 2004's accessibility features, and in Section 15.7 you'll learn how to use a tool to find out if your site is compliant with Section 508. The Alt property described in Section 5.2.2 is an important first step for assisting visually impaired Web surfers. For complex images, such as a graph that plots changes in utility rates over time, you can also supply a more detailed description on a separate Web page. The Longdesc (long description) property of an image lets you specify a link to a page containing a text description of the image. Some Web browsers understand this property, allowing visually impaired visitors to jump to a page with a text description that screen-reading software can read aloud. While you can't find the Longdesc property in the Property inspector, you can turn on an accessibility option in Dreamweaver that lets you add it every time you insert a graphic. Choose Edit  Preferences (Dreamweaver Preferences on the Mac) to open the Preferences window, and select the Accessibility category. Turn on the Images checkbox. Preferences (Dreamweaver Preferences on the Mac) to open the Preferences window, and select the Accessibility category. Turn on the Images checkbox. Now whenever you insert a graphic, the window shown here will appear, so that you can quickly set the Alt text and select an HTML page containing a long description. Note that you're not required by Section 508 to use the long description property when inserting images. It's merely recommended if the image is particularly complex or includes information that can't be explained in the Alt propertyfor example, graphs or images that include a lot of text information.
|
When you add a name, Dreamweaver adds both a Name property and an ID property to the image tag. The name tag is still used by most browsers, but the more recent ID tag is fast becoming the standard way that JavaScript identifies an object on a page. The Alt property can be an important aid for people who are surfing without graphics.
In the top figure, graphics denote the different sections of the site, such as Features, Site of the Week, and Insights.
With graphics turned off (bottom), that information is still available, thanks to the Alt text. However, graphics without an Alt property simply disappear or display the generic label IMAGE. In the case of an important identifying graphic like the site logo (the "design interact" banner in the first figure), a missing <alt> tag leaves visitors wondering where they are. 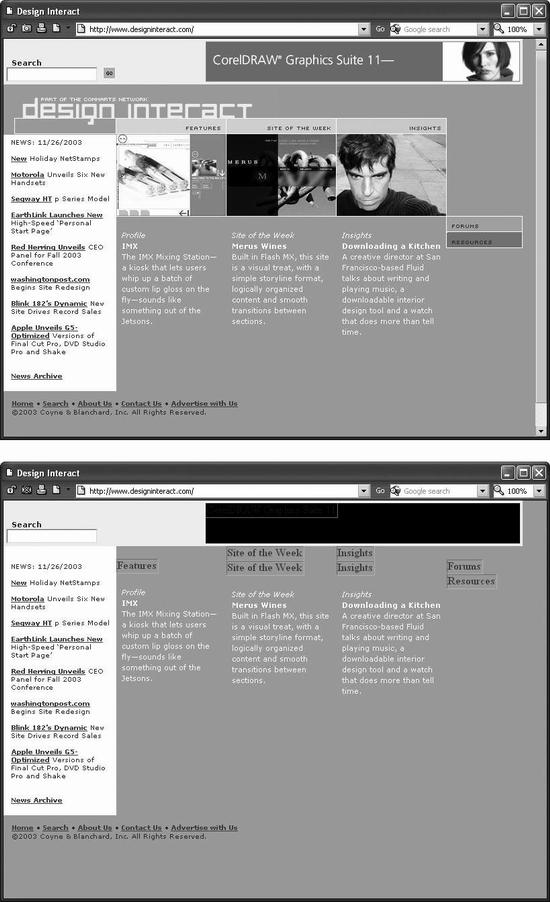 NOTE JavaScript uses the image name or ID that you type in the Image Placeholder box for its own reference; no one actually sees this name in a Web browser. In other words, this isn't the place to give your graphic a text label that shows up when your reader has graphics turned off. For that purpose, read on. 5.2.2 Adding a Text Description to an Image Not everyone who visits your Web site gets to see those stunning photos of your last summer vacation. Some people deliberately turn off graphics when they surf, enjoying a Web without the wait, since graphics-free Web pages appear almost instantly. Other people have vision impairments that prevent them from enjoying the visual aspects of the Web. They rely on special software that reads Web page text aloud, including any labels you've given your graphics. To assist Web surfers in both situations, make a habit of setting the Alt property of the image. Short for alternative text , the Alt property is a text description that Web browsers use as a stand-in for the image (see Figure 5-5). To add a text description to an image, type it in the Alt field in the Property inspector. If you're naming graphics that will be navigation buttons , you could just use the same text that appears on the button, such as Home or Products . For images that carry greater meaningsuch as a photo of the product itselfyou might use a more detailed description: "Photo of the Anodyne 3001the most powerful apartment gardening tool ever devised." NOTE In some cases, however, a description can be more of a distraction than a help. For example, a common technique in laying out a Web page involves using invisible 1-pixel imagesoften called spacer images (Section 7.2.6.2). Because these images serve as a layout aid and don't convey any meaningful information, a description isn't necessary. In this instance, you can use the pop-up menu that appears to the right of the Alt field. This menu lets you choose one option: "<empty>". Use the <empty> Alt property for any images that don't add meaning to the page, like spacer GIFs. This trick will help your pages meet accessibility requirements without adding distracting and unnecessary descriptions (see the box in Section 5.2.1). 5.2.3 Changing the Size of an Image The Width and Height properties of a graphic do more than determine its screen size; they also help Web browsers load it quickly and efficiently . Since the HTML of a Web page downloads before any graphics do, a Web browser displays the text on the page first, and then adds the images as they arrive . If width and height attributes are missing, the browser doesn't know how much space on the page to give each image, so it has to redraw the page after each image is downloaded and its dimensions are determined. The stuttering appearance of this redrawing is disconcerting, makes Web pages appear slowly, and shatters your reputation as a cool, competent Web designer. Fortunately, you don't have to worry about specifying the picture's dimensions yourself: Whenever Dreamweaver inserts an image into a Web page, it automatically calculates its width and height and enters those values into the W and H fields in the Property inspector (see Figure 5-4). NOTE This cool feature only works in Design view. If you use the Insert Image command to add an image while working in Code view, Dreamweaver only adds the <img> tag with the proper reference to the graphic file; it leaves out the Width and Height properties. You can, if you like, shrink a graphic by typing smaller values into the W and H fields, but doing so won't do anything to speed up the download time. You'll make the picture appear smaller, but the Web browser will still have to download the entire graphics file. To make your graphic smaller both in appearance and file size, do it in an image-editing program like Fireworks, Photoshop, or ImageReady, or use the new Resample Image tool described in Section 5.3.1.2. Not only will you get an image that's exactly the size you want, but you'll also trim a few bytes off its file size, and maybe even save a second or two in download time. On the other hand, setting width and height values that are larger than the actuallarger dimensions of the graphic merely distorts the image by stretching it, creating an undesirable pixellated effect. If you want a larger image without distortion or pixellation, start with a larger original image. To do so, return to your digital camera or stock photo CD, or recreate the graphic at a larger size in Photoshop or Fireworks. WORKAROUND WORKSHOP
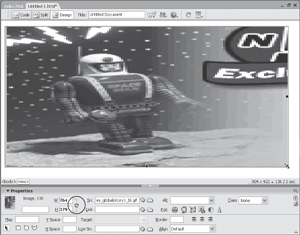
Watch Those Resize Handles! After you insert an image in the document window, a thin black border appears around it, indicating that it's selected. Three small black squaresthe resize handlesappear on the right edge, bottom edge, and lower-right corner, as shown here. Dragging these handles changes the width and height of the graphicor, rather, the Width and Height properties in the Property inspector. Pressing Shift while dragging the corner handle keeps the proportions of the image the same. The graphic file itself remains unchanged. As noted above, however, dragging one of these handles to make the picture appear bigger is almost always unsuccessful , resulting in distortion and ugly pixellation. But those pesky resize handles are far too easy to accidentally grab and drag. In fact, sometimes you might resize a graphic and not know it. Perhaps you accidentally dragged the left resize handle a few pixels, making the graphic wider, but not enough to notice. Fortunately, the Property inspector provides some subtle feedback to let you know if your graphic is distorted . A boldfaced number in the W or H field tells you that the Width or Height property now differs from the actual dimensions of the graphic. Clicking the letter W or H in the Property inspector resets the Width or Height property back to that of the original graphic file, undoing your little slip of the mouse. Clicking the recycling- symbol icon (circled here) resets both properties.
|
 | You can use the image-distorting properties of the Property inspector's width and height fields to your advantage when working with solid- color shapes . Say you want to insert an orange line, 580 pixels wide and 4 pixels tall, to separate two paragraphs on a page. Sure, you could insert a GIF graphic with an orange background that's 580 x 4 pixels. But the clever Web designer would save on file size by creating an orange GIF graphic that's only 1 pixel by 1 pixel, inserting it into the page, and using Dreamweaver to change its size to 580 x 4. After all, stretching a solid-color graphic doesn't break it up; it just makes more of the solid color. And the 1-pixel GIF is a smaller file than the 580 x 4 one. Even better, you can reuse it to make lines of other sizes and take advantage of a Web browser's download-saving cache (see the tip in Section 15.8). | |
5.2.4 Aligning an Image Images, like text, appear in the normal flow of HTML in a page. In other words, a picture can appear as a paragraph by itself, or within a sentence or paragraph of text. The Property inspector has two sets of alignment controls that affect images (Figure 5-6). Only the Align menu, however, controls alignment specific to an image. (The second set of alignment options applies to the entire paragraph; see Section 3.1.4). Only the Align menu provides options specific to the image. The alignment icons affect the entire paragraphnot just the image. If you just want to center-align a graphic, however, without affecting any text around it, put the image in its own paragraph and click the center align button. Or use the Cascading Style Sheet Text Align property (Section 6.7.3). 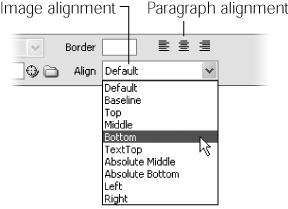 If you've inserted a graphic into a text paragraph, you can specify exactly how the image relates to the words around it. The Align menu in the Property inspector lets you select ten different options (see Figure 5-7). However, only six of them work in all browsers. Avoid the other four, as noted below, which work only in a few certain browsers. To set a graphic's vertical alignment, click the image to select it. Then choose one of the options from the Align menu at the right side of the Property inspector. You can see each illustrated in Figure 5-7. -
Default means that the graphic will sit on the baseline (the bottom of the line of text on which the graphic appears). The effect is identical to choosing Bottom. -
Middle aligns the text on the current line with the middle of the graphic, but may add an awkward -looking complication. Subsequent lines of text move below the graphica problem you can solve by using either of the two wrap alignment options, as described below. -
Top aligns the image with the top of the line of text in the paragraph. Again, because top alignment can create a gap between the first line and the rest of the text, consider using the Left or Right wrapping options described below. -
Left places an image to the left of any text, which then wraps down the right side. -
Right moves the image to the right and wraps text along its left edge. -
Baseline, TextTop, Absolute Middle, and Absolute Bottom are not part of the official HTML standard and only work in a few browsers, so avoid them. NOTE Only Top, Bottom, Middle, Left, and Right are considered valid transitional XHTML code. In other words, future Web browsers probably won't understand options like Absolute Middle or TextTop. Furthermore, strict XHTML (a kind of XHTML that Dreamweaver doesn't yet create on its own) doesn't offer any alignment options for the image tag. You can, however, use Cascading Style Sheets to provide alignment for images. The CSS left and right Float properties discussed in Section 6.7.4 work the same as the Left and Right options. You can apply top, middle, or bottom alignment by setting the Vertical Alignment property found in the Block category of CSS properties (see Section 6.7.3). You can control the alignment of an image in a paragraph with text or other images using the Align menu in the Property inspector. In this figure, six images are placed at the beginning of six different text paragraphs. Each image has a different alignment option, which controls how the image appears in relation to the text. 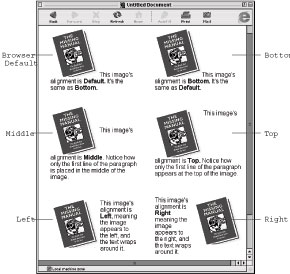 5.2.5 Adding a Margin Around an Image When you place an image into a paragraph, text butts right up to the edge of the graphican invasion of the picture's personal space that's often visually unappealing. Fortunately, you can add a margin of space around your images with the Horizontal Space and Vertical Space properties. You add a margin around an image by telling Dreamweaver how many pixels of space to add on each side. As shown in Figure 5-8, about 20 pixels makes an attractive amount of space. To add a margin above and below a graphic, type a number of pixels in the V Space field in the Property inspector. To add space to the left and right of an image, type a number in the H Space field. NOTE You can't specify independent values for each of the four margins using these the HTML properties; in fact, they aren't even valid XHTML code. Instead, use the CSS Margin property (Section 6.7.4) to control the space around an image. 5.2.6 Adding a Border Dreamweaver offers a quick, easy way to add a border around a graphic using the Border field on the Property inspector (see Figure 5-4). To add a border, click the image to select it and then type a width, in pixels, into the Border field. One pixel creates a fine, almost invisible border; ten pixels makes a fat one. Press Enter or Return to apply the new border. Click anywhere on your page to remove the selection border and resize handles, the better to see the results of your work. | | The color of a border you create this way depends on what browser your visitor's using. For some, such as Netscape Navigator 4, Opera 6 (on Windows), and Internet Explorer 5 (on the Mac), the color is the same as the text color you chose in the Modify Page Properties dialog box (see Section 1.3). Internet Explorer 6 and Opera 6 (on the Mac), on the other hand, draw a black border. (However, if you add a link to an image with a border, the color changes to the link colors specified for the page, as discussed in Section 1.3.) To avoid all that confusion, use the Cascading Style Sheet Border property. Using CSS, as described in Section 6.7.4, you can individually control the size, style, and color of each of the four borders. | |
EASTER EGG HUNT
Meet the Geeks Behind Dreamweaver Hidden throughout Dreamweaver are amusing diversions programmed by Dreamweaver's engineers : so-called Easter Eggs , a computerindustry term for buried credit screens that appear only when you stumble onto the secret and unusual combination of words, keystrokes, and mouse-clicks. One of these is hidden in the Property inspector. Select an image in the document window. Then Ctrl-double- click (  -double-click) the thumbnail of the graphic in the left side of the Property inspector. A picture of one of Dreamweaver's programmers appears, along with his name. Ctrl ( )-double-click the thumbnail repeatedly to cycle through the names and pictures of other members of the Dreamweaver team. -double-click) the thumbnail of the graphic in the left side of the Property inspector. A picture of one of Dreamweaver's programmers appears, along with his name. Ctrl ( )-double-click the thumbnail repeatedly to cycle through the names and pictures of other members of the Dreamweaver team.
|
It's worth noting that if you don't specify any border for an image that you've defined as a link (by leaving the Border box empty), most Web browsers add a border around the image anyway. This automatic border is two pixels wide and colored with the link colors defined in the Page Properties dialog box. To remove this distraction, give the image a Border value of 0 (as opposed to leaving the box blank). Dreamweaver usually adds the 0 automatically when you add a link to an image, but occasionally, you may need to do this by hand. |