| You've probably encountered find-and-replace tools in word processing programs and even some graphics programs. As the name implies, the command finds a piece of text ( Webmaster , for example) and then replaces it with something else ( Webmistress ). Like Microsoft Word, Dreamweaver can search and replace text in the body of your Web pages. But it also offers variations on this feature that enhance your ability to work within the tag-based world of HTML. What's more, Dreamweaver lets you find and replace text on every page of your Web site, not just the current, open document. In addition, you can remove every appearance of a particular HTML tag, or search and replace text that matches very specific criteria. For example, you can find every instance of the word "Aardvark" that appears within a center-aligned paragraph. These advanced find-and-replace options are some of the most powerfuland under-appreciatedtools in Dreamweaver's toolbox. If you learn how to use them, you'll be able to make changes to your pages in a fraction of the time it would take using other methods .  | You can use Find and Replace to search an entire site's worth of files. This is powerful, but can also be slow, especially if some folders hold files you don't want to searchold archives, for example. You can use Dreamweaver MX's new cloaking feature to hide files from find-and-replace operations. See Section 15.8 for more detail. | |
19.3.1 Find and Replace Basics To start a search, press Ctrl+F (  -F), or choose Edit -F), or choose Edit  Find and Replace. The Find and Replace window opens (see Figure 19-4). Now all you have to do is fill in the blanks and set up the search. Find and Replace. The Find and Replace window opens (see Figure 19-4). Now all you have to do is fill in the blanks and set up the search. Whether you perform a simple text search or a complex tag-based search and replace, the procedure for using the Find and Replace command is basically the same. First, you need to tell Dreamweaver where to search (in a file, a folder, or an entire Web site). Next , tell it what to search for (text, HTML, or a particular tag with a specific attribute). Finally, you can decide what to replace the item with. This last step is optional; you can use the Find and Replace window as a way to locate an item on the page, or in your site, without actually changing it to anything.
Dreamweaver's Find and Replace feature lets you replace text and HTML quickly and accurately. By using the Load Query and Save Query buttons, you can even save complex searches to use in the future. 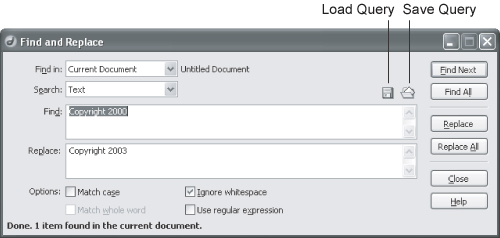 19.3.2 Basic Text and HTML Searches Dreamweaver can either search all of the source code in a page or simply focus on text that appears in the document window. You'll choose one of these in Phase 2 below. -
A source code search lets you find and replace any character in the code of a page, including words, letters , and symbols. This means anything you see in Code view such as HTML, CSS, or server-side programming code used to create the dynamic database-driven sites described in Part VI of this book. -
Text searches are more re.ned. They look only for text that appears within the body of a page. That is, Dreamweaver ignores HTML tags, properties, and comments when searchingin short, it ignores anything that doesn't appear as actual words in the document window. By using a text search when you want to change the word "center" to "middle," for example, you won't accidentally alter the center alignment option of a table cell <td align="center">by setting the alignment value of its HTML tag to "middle" (an invalid value that Web browsers would just ignore). If you've used Find and Replace in other programs, this routine will seem familiar: 19.3.2.1 Phase 1: Determine the scope of your search Using the "Find in" menu (see Figure 19-5), choose any of these options: -
Selected Text. Searches only the current selection of the Web page you're working on. This can be useful if you're working in Code view and you want to search the code in just a certain section of the page, such as the head of the document. It's also great when you're writing your own server-side programs (like those described in Part VI of this book) and you want to search only one part of the code. The Find and Replace command is not limited to the current document. You can also search multiple Web pages or even an entire site. 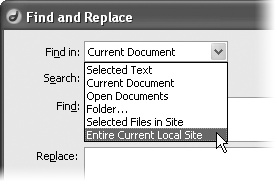 -
Current Document. Searches the Web page you're working on. -
Open Documents. Searches all currently open Dreamweaver documents. This is great if you're working on a bunch of pages at the same time and realize you've made the same typo on each page. -
Folder. Search all Web pages in a particular folder. Dreamweaver also searches Web pages in all folders within the selected folder. You can use this option to search pages that aren't part of the current site. -
Selected Files in Site. To use this option, open the Site window and select files that you want to search in the local file list. (See Section 14.1.5.1 for details.) -
Entire Current Local Site. Searches every Web page in the current site folder, including pages in folders inside the site folder. This option is invaluable when some basic piece of information changes throughout your site. For instance, use this when your boss's sex-change operation requires you to replace every instance of "Mark Jones" with "Mary Jones" throughout your company's site.  | Using the Find and Replace command is one of the best ways to quickly make changes to an entire site, but it's also one of the easiest ways to wreck a site's worth of Web pages. Dreamweaver can't undo changes made by the Find and Replace command to files that aren't open on your computer. So be careful. If you plan on making extensive changes, make a backup copy of your files first! | |
19.3.2.2 Phase 2: Specify what to search for For your next trick, you'll tell Dreamweaver what you want to search for. Use the Search pop-up menu to choose one of these two options: -
Text. This makes Dreamweaver search for a certain word or phrase of text that appears in the body of the documents you've specified. Type the text you want to find into the Search field. If you're searching for a pattern in your text, enter a regular expression here and turn on "Use regular expression" (see the box in Section 19.3.2.4). -
Source Code. Basic text searches are very useful, but they're limited to text that appears in the body of the page (what you see in the document window). If you want to search and replace code, you need the Source Code option. Source-code searches work identically to text searches. The only difference is that Dreamweaver searches everything within the filetext, HTML, JavaScript, Cascading Style Sheets (CSS), and so onand replaces any part of the file. Using this option, you could search for any instance of the tag <img src="mark_jones_photo. jpg">, for example, and replace it with <img src="mary_jones_photo.jpg">. (If you're in Code view, Dreamweaver automatically selects the Source Code option.) As you fill in the Search field, be aware that some plain-English words are also special words in HTML, JavaScript, or CSS. If you try to replace table with desk using a source-code find and replace, you'll completely destroy any <table> tags on the page. You can also enter a regular expression to search for patterns in your HTML source code (see the box in Section 19.3.2.4). 19.3.2.3 Phase 3: Provide the replacement text If you want to change the text that Dreamweaver finds, type the replacement text into the Replace box. It may be the word or words you'd like to swap in (for a Text search), or actual HTML code if you're performing a source-code search. If you only want to find the text without replacing it, then skip this step. | | If you want to find the specified text and replace it with nothing (that is, deleting every occurrence of the text), leave the Replace field blank and perform a replace operation, described below. | |
19.3.2.4 Phase 4: Choose the search settings Dreamweaver gives you three options that govern its search and replace; some of them are quite complex: -
The Match Case option limits the Find command to text that exactly matches the capitalization you used in the Search field. If you search for the text The End with the Match Case box turned on, Dreamweaver will find a match in "The End is near," but not "You're almost at the end." Use this trick to find every instance of web and replace it with Web . -
Match Whole Word searches for an entire wordnot a portion of a larger word. For example, if you check this option, a search for Rob will match only "Rob," and not any parts of "Robert," "robbery," or "problem." If you don't select this option, Dreamweaver will stop on "rob" in all four instances, and could cause serious problems if you also replace "rob" with something else. (Note that if you selected the Match Case option, Dreamweaver would match Rob in "Rob" and "Robert," but not in "robbery" and "problem," since they don't include a capital R.) -
The Ignore Whitespace Differences option treats multiple spaces, tabs, non-breaking spaces, and carriage returns as a single space when searching. For instance, if you search for the dog and turn on this option, Dreamweaver matches "the dog" as well as "the dog"even if the multiple spaces are actually the HTML non-breaking space character (see Section 2.1.1.2). This option is especially helpful when you're searching the source code of a page. The HTML of a page can contain lots of extra spaces, line breaks, and tabs that don't appear in a Web browser or in Dreamweaver's document window. For example, in the HTML of a document, it's possible to have two lines of code that look like this: <p>This sentence will appear on one line in a Web browser</p> Even though this text would appear on a single line in the document window, a search for "one line" without the Ignore Whitespace Differences would find no match. The carriage return at the end of "one" is not an exact match for the space character in "one line." In other words, it's best to keep this option turned on. POWER USERS' CLINIC
Turbocharge Your Searches If you want to find the phone number 555-123-5473, no problem; just type 555-123-5473 into the search field. But what if you wanted to find any and every phone number -555-987-0938, 555-102-8870, and so on-on a Web page or in a site? In such a case, you need to use regular expressions , the geeky name for a delightfully flexible searching language, carried over from early UNIX days, consisting of wildcard characters that let you search for patterns of text instead of actual letters or numbers. Each phone number above follows a simple pattern: three numbers, a dash, three more numbers, another dash, and four more numbers . To search for a pattern, you use a variety of symbols combined with regular text characters to tell Dreamweaver what to find. For example, \d, in the world of regular expressions, stands for "any number." To find three numbers in a row, you could search for \d\d\d, which would find 555, 747, 007 and so on. There's even shorthand for this: \d{3}. The number between the braces ({}) indicates how many times in a row the preceding character must appear to match. To finish up the example of the phone numbers, you could use a regular expression like this: \d{3}-\d{3}-\d{4}. The \d{3} finds three numbers, while the hyphen (-) following it is just the hyphen in the phone number. Here are some of the other symbols you'll encounter when using regular expressions: . (period) stands for any character, letter, number, space, and so on. \w stands for any letter or number. * represents the preceding character zero or more times (and is always used after another character). This is best explained with an example: the regular expression colou*r, for instance, matches both colour and color the * following the u indicates that the u is optional (it can appear zero times). This would also match colouuuuur (handy for those times when you've fallen asleep at the keyboard). To see a complete list of the regular expression characters Dreamweaver understands, launch the Dreamweaver online Help system (press F1) and search for the topic "Regular Expressions." A full-length discussion of regular expressions couldand doesfill a book of its own: check out Mastering Regular Expressions by Jeffrey E. F. Friedl. |
| | Sometimes it's better to turn this feature off. For example, the Word Paste bug (see Section 2.2.2) sometimes causes a space to be inserted before or after punctuation marks. So "McFarland, Dave" can sometimes end up as "McFarland , Dave" when you paste it into Dreamweaver. You can search for instances like thisa space followed by a commaand replace them with just a comma, but it won't work unless you've turned off the Ignore Whitespace Differences option. (As this book went to press, Macromedia was readying a patch that fixes a number of bugs , including this one. To see if the patch is available, visit www.macromedia.com/support/dreamweaver/downloads_updaters.html .) | |
-
The Use Regular Expression option is used for matching patterns in text. For a discussion of this advanced technique, see the box in Section 19.3.2.4. 19.3.2.5 Phase 5: Take action Finally, you're ready to set the search in motion by clicking one of the four action buttons in the Find and Replace window (see Figure 19-4): -
Find Next locates the next instance of the search term . If you're searching the current document, Dreamweaver highlights the matching text. If you're searching an entire Web site or a folder of pages, Dreamweaver opens the file and highlights the match. You can cycle through each instance of the search term by repeatedly clicking this button. | | As in other programs (notably Microsoft Word), you can press Enter or Return to repeat the Find Next function. If you've clicked into the document windowor even closed the Find windowyou can press F3 ( -G) to repeat the Find Next function. | |
-
Find All locates every instance of the search terms, all at once, and shows them to you in a list in the Search tab of the Results panel (Figure 19-6). The name and location of each file (if multiple files are searched) appear to the left, and the matched text appears to the right. Dreamweaver displays part of the sentence in which the matched word or words appear. The exact match is underlined with a squiggly red line, so that you can see the search in context and identify text you may not want to replace. Unlike the Find Next action, Find All doesn't automatically open any of the Web pages containing matches. Instead, to open a matched page, double-click its name in the results list. Only then does Dreamweaver open the Web page and highlight the match. -
Replace locates the next instance of the search term and replaces it with the text in the Replace field, leaving the replaced text highlighted for your inspection. You can use this button in combination with Find Next to selectively replace text. First, click Find Next. Dreamweaver locates and highlights the next match. If you want to replace the text, click Replace. If not, click Find Next to search for the next match, and repeat the cycle. This cautious approach lets you supervise the replacement process and avoid making changes you didn't intend. The green arrow button reopens the Find and Replace window. Click the red Stop button to abort the current search (for example, when you inadvertently began a search for "the"). 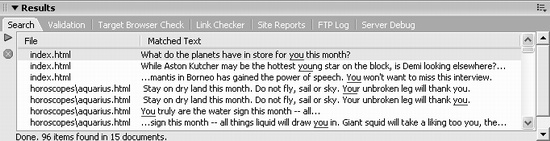 -
Replace All is the ultimate power tool. It finds every instance of the search term and replaces it with the text entered in the Replace field. Coupled with the Find in Entire Local Site option, you can quickly make sitewide changes (and mistakesso back up all before you Replace All!). When you click this button, Dreamweaver warns that you can't undo this operation on any closed files. You can erase mistakes you make with the Find and Replace in open documents, by choosing Edit Undo, but Dreamweaver permanently alters closed files that you search and replace. So be careful! (On the other hand, changes to open documents aren't permanent until you save those files.) If you use the Find All or Replace All commands, the Find and Replace window closes , and the results of the search appear in the Search tab (see Figure 19-6). To reopen the Find and Replace window (with all of your previous search criteria still in place), click the green arrow on the Search tabcalled the Find and Replace buttonor press Ctrl+F ( -F). 19.3.3 Advanced Text Searches If you want greater control over a text search, you can use the Find and Replace command's advanced text search option, which lets you confine a search to text either inside or outside of a specific tag. For example, when Dreamweaver creates a new blank document, it sets the page's Title property to Untitled . Unfortunately, if you forget to change it, a site can quickly fill up with untitled Web pages. A basic text search won't identify this problem, because it searches only the body of a page; titles appear in the head. And a source-code search for Untitled would turn up the word "untitled" wherever it appeared in the page, not just inside the <title> tag. In cases like this, an advanced text search is your best choice. Simply set the Find and Replace command to search for Untitled whenever it appears within the <title> tag. To use the advanced text search, use the same general routine as described on the previous pages. But before using one of the action buttons, you can make a few additional setup changes to the dialog box: 19.3.3.1 Limiting the search by tag Choose Text (Advanced) from the Search pop-up menu to make the expanded, new controls appear (see Figure 19-7). Use an advanced text search to limit your search to text that appears within a particular HTML tag. Or, conversely, use it to search for text that doesn't appear in a particular tag. 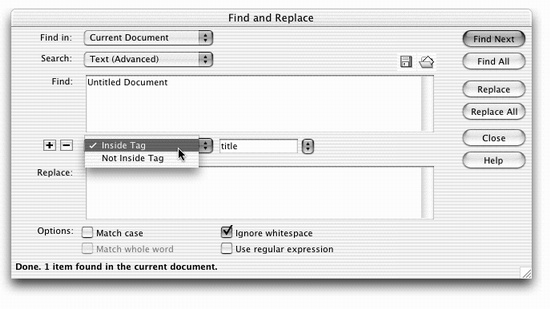 Now, from the menu next to the + and - buttons, choose either Inside Tag or Not Inside Tag. For example, consider this line of code: "Stupid is as <strong>stupid</ strong> does." The first instance of "stupid" isn't inside the <strong> tag, but the second one is. NOTE A more descriptive name for the first option would be " Enclosed By Tag"; Dreamweaver actually searches for text that's between opening and closing tags. In fact, an advanced text search using this option doesn't identify text that's literally inside a tag. For example, it won't find "aliens" in this line of code: <img src="ufo.jpg" alt="Aliens live among us.">, but it would find "aliens" in this one: <strong> Aliens live among us.</strong>. In the first example, aliens appears as part of the <img> tag, while in the second, aliens is enclosed by the opening and closing <strong> tags. Once you've specified whether you're looking for text inside or outside of tags, you can choose a specific HTML tag from the Tag menu identified in Figure 19-7. The menu lists all HTML tagsnot just those with both an opening and closing tag. So the image tag (<img>), even though Dreamweaver won't identify text inside it, still appears. | | A great way to search for text in both the title and body of a Web page is to choose the HTML tag from this menu. That way, you can search for any text that appears within the opening <html> and closing </html> of the pagewhich, since those tags start and end any Web document, is all text on a page. This trick is handy when you want to change text that might appear in the body and the title of a page (for example, a company name). | |
19.3.3.2 Limiting the search by attribute To limit the search further, click the + button (see Figure 19-8); yet another new set of fields appears. When you click the + button on the Find and Replace window, a new set of fields appears. Use these options to carefully hone your Find and Replace commands and zero in on text that matches precise criteria. 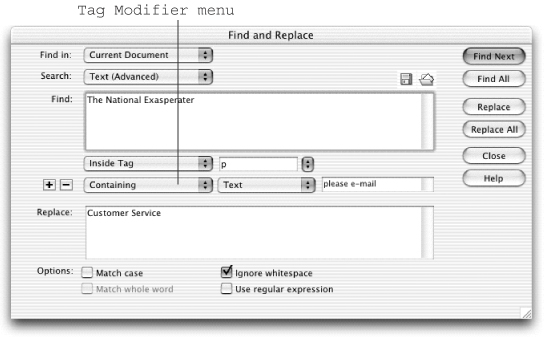 Using the Tag Modifier menunext to the + and - buttons (Figure 19-8)you can choose from any of six options that break down into three groups: -
With Attribute/Without Attribute. To limit the search, you can specify that a tag must either have (With Attribute) or not have (Without Attribute) a specific property. For example, say the following line of code appears throughout a Web site: <p>For assistance, please email <a href="mailto:mail@nationalexasperater.com"> The National Exasperater.</a></p> Now, for the sake of argument, you need to change it to say "For assistance, please email Customer Service." A basic text find and replace would incorrectly change the words "The National Exasperater" to "Customer Service" everywhere on the site. However, an advanced text search using the With Attribute option would do the trick. You could look for the text "The National Exasperater" wherever it appears inside an <a> tag whose Href attribute is set to "mailto:mail@nationalexasperater.com." (To learn about the different HTML tags and attributes, use Dreamweaver's built-in code reference; see Section 10.5.) After you choose With Attribute, use the menu on the right to select which of the tag's properties you want to find. (Dreamweaver automatically lists properties that are appropriate for the tag you've specified.) For example, if you search inside a <table> tag, the menu will list such properties as align, background, bgcolor , and so on. Advance to the next pop-up menu to choose a type of comparison: = (equals), != (not equal to), > (greater than), or < (less than). These options are useful only when the property's value is a numeric amount, such as the Width property of an image. In this way, you could locate all images that are wider than 100 pixels (width > 100). (This setting has no effect on values that are words, such as center in this example: <td align="center">.) Finally, type the value of the property in the last field. For instance, if you were searching for a black-colored background, the value would be #000000 (the hex value for black; see Section 1.3.3). You can also click the menu and choose [any value]a useful option when you want to find tags that have a certain property, but you're not interested in the property's value. For example, if you want to find all <table> tags with a background color (no matter whether the color's #336699, #000000, or #FFFFFF), choose the Bgcolor attribute and [any value]. -
Containing/Not Containing. These options let you specify whether the tag contains, or does not contain, specific text or a particular tag. When you choose this option, a different set of fields appears. Choose either Text or Specific Tag from the menu to the right, and then either enter some text or select a tag in the last field in the row. For example, another solution to the problem above would be to search for the text "The National Exasperater" wherever it appears inside a <p> (paragraph) tag that also contains the text "please email" (Figure 19-8). -
Inside Tag/Not Inside Tag. These last two choices are identical to those described in Section 19.3.3.1. They let you specify whether the tag is inside or not inside a specific tag. Use these to limit a search, for example, to text that appears only within a <span> tag that's inside a Heading 1 (<h1>) tag. If you like, you can add even more restrictions to your search, adding new rules by clicking the + button and repeating the setup just described. When you're really on a roll, it's even possible to add so many modifiers that the Find and Replace window actually grows past the bottom of your monitor. To remove a modifier, click the - (minus) button. 19.3.4 Advanced Tag Searches If you find the number of options an advanced text search offers overwhelming, you haven't seen anything yet. Dreamweaver's tag search adds more choices to help you quickly search for, and modify, HTML tags. You can use a tag search to strip out unwanted HTML tags (for example, if you're migrating an old site to CSS, you could remove the <font> tag), transform one tag into another (you could turn old style bold [<b>] into the more widely accepted strong [<strong>] tag), and perform a host of other powerful actions. In its basic outline, a tag search is much like the regular text search described in Section 19.3.2. But this time, from the Search menu, you should choose Specific Tag. Now a Tag menu appears next to the Search menu, and the dialog box expands to display a new set of fields (see Figure 19-9). Some of them are the same as the controls you see when performing an advanced text search (Section 19.3.3), such as the Tag Modifier menu and the + button that lets you add additional restrictions to the search. It's a snap to remove tags when you use the Specific Tag option in Dreamweaver's Find and Replace command. This option is handy if you're replacing old-style text formatting with cascading style sheets. Use it to strip out unwanted <font> tags, for example. 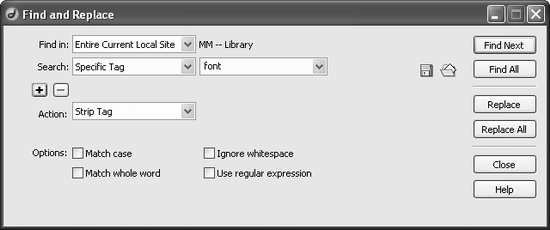 But a key difference here is the Actions menu (Figure 19-10), which lets you specify the action Dreamweaver will perform on tags that match the search criteria when you click Replace or Replace All (if you intend to search but not replace, these options don't apply): -
Replace Tag & Contents replaces the tag, and anything enclosed by the tag (including other tags), with whatever you put into the With box to the right of this menu. You can either type or paste text or HTML here. -
Replace Contents Only replaces everything enclosed by the tag with text or HTML that you specify. The tag itself remains untouched. -
Remove Tag and Contents deletes the tag and everything inside. -
Strip Tag deletes the tag from the page, but leaves anything inside the tag untouched. -
Set Attribute adds an attribute to the tag. For example, you could set the Alt property of an image this way (see the box in Section 19.3.4). -
Remove Attribute removes an attribute from a tag. For example, you could remove the not-so-useful Lowsrc attribute from all image tags on your pages. -
Add Before (After) Start (End) Tag. The last four actions in the menu simply offer variations on the same theme. They each let you place content in a Web page just before or after the tag you're searching for. To understand how these actions work, remember that most HTML tags come in pairs. The paragraph tag, for example, has an opening tag (<p>) and a closing tag (</p>). Say you searched for a paragraph tag; you could add text or HTML before or after the start tag (<p>) or before or after the end tag (</p>). (For an example of this action at work, see "Convenient Copyright Notices" at the end of this chapter.) Once Dreamweaver finds a specific tag, it can perform any of eleven different actions on the tag or its contents. 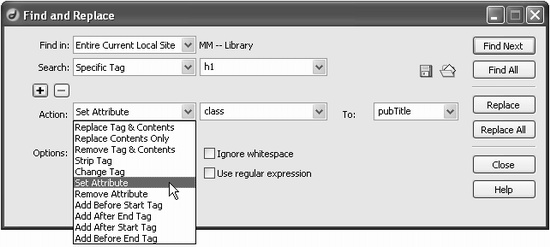 19.3.5 A Powerful Example: Adding Alt Text Fast You've just put the finishing touches on the last page of your brand-new , 1,000-page site. You sit back and smileand then snap bolt upright when you notice you forgot to add an Alt description for the site's banner graphic (Section 5.2.2). This graphic, called site_banner.gif , appears on every single one of the 1,000 pages. With rising dread , you realize that you'll have to open each page, select the graphic, and add the Alt property by hand. And then you remember Dreamweaver's advanced tag-based find and replace. Here's what you do. Press Ctrl+F ( -F) to open the Find and Replace window. Set up the dialog box like this: -
From the "Find in" menu, choose Entire Local Site. You want to fix every page on your site. -
From the Search pop-up menu, choose Specific Tag; from the pop-up menu to its right, choose "img." You'll start by identifying every image (the <img> tag). -
On the next row, use the three pop-up menus to choose With Attribute, "src," and the equals sign (=). This tells Dreamweaver to look for specific imagesin this case, images with a Src attribute (the path that tells a Web browser where to find the image file on the Web server) with a specific value. -
Type .* site_banner\.gif in the box next to the = sign. For this exercise, assume the graphic file is stored in a folder called images located in the root folder of the site. The name site_banner.gif is the name of the image file. The .* is the magic, and it'll be explained in a moment. -
Click the + button. Another row of Tag Modifier menus appears. -
From the new row of menus, choose Without Attribute and "alt." You've further limited Dreamweaver's search to only those images that don't already have the Alt attribute. (After all, why bother setting the Alt property on an image that already has it?) The numbers shown here correspond to the steps in this fictional example, in which you want to add an <alt> tagfor the benefit of people who can't, or don't want to, see graphics in their browsersto every occurrence of the banner logo. 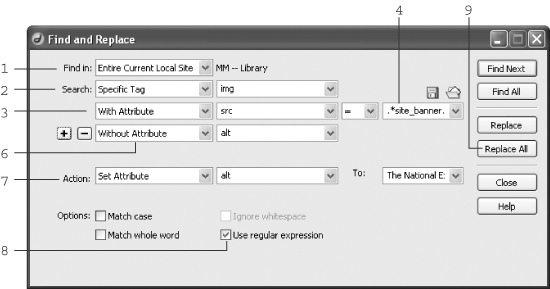 -
From the Action menu, choose Set Attribute; from the Tag menu, choose "alt." You've just told Dreamweaver what to do when you click the Replace or Replace All button. When Dreamweaver finds an <img> tag that matches the search criteria, it will then add an Alt property to that tag. In this example, you might type The National Exasperater in the To field; you've just specified the Alt text that Dreamweaver will add to the image. -
Turn on Use Regular Expressions. Regular expressions, described in Section 19.3.2.4, let you search for specific patterns of characters, and in this case, will help you accurately identify the banner graphic file everywhere it appears. You know you're looking for the file site_banner.gif , wherever it appears in the site. Unfortunately, if you just type site_banner.gif as the value of the Src property of step 3, Dreamweaver won't succeed in its task. That's because the Src attribute, the part of the <img> tag that includes the name of the file, varies from page to page. Depending on where a page is relative to the graphic, the Src might be site_banner. gif, images/site_banner.gif, or even ../../../images/site_banner.gif . What you need is a way to match every Src attribute that ends in site_banner.gif . A simple regular expression, .* site_banner\.gif , does the trick. The period stands for any character (6, g, or even %, for example), while the * (asterisk) means "zero or more times." When you add these codes to the graphic name, site_banner.gif , you instruct Dreamweaver to find every src value that ends in site_banner.gif . Note the backslash before the last period: \.gif . Since in the world of regular expressions a period means "any character," simply using site_banner.gif would not only match site_banner.gif , but also site_banner1gif , site_bannerZgif , and so onin other words, any character between site_banner and gif . The backslash means treat the next character literally; it's just a period with no special regular expression power. The dialog box should look like the one in Figure 19-11. FREQUENTLY ASKED QUESTION
Convenient Copyright Notices I want to add a copyright notice to the bottom of each page in my Web site. Is there a way to automate this process so I don't have to edit every page in my site by hand? Of course there is. Use Dreamweaver's Find and Replace command to add text or HTML to the bottom of any Web page. The trick is knowing how to use the command's Specific Tag option. First, choose Edit Find and Replace to open the Find and Replace window. Next, choose Entire Local Site from the Find In menu, and choose Specific Tag from the Search menu. Choose "body" from the Tag menu. Remember, the <body> tag in HTML encloses everything that appears inside a browser window; it's equivalent to what you see in the document window.
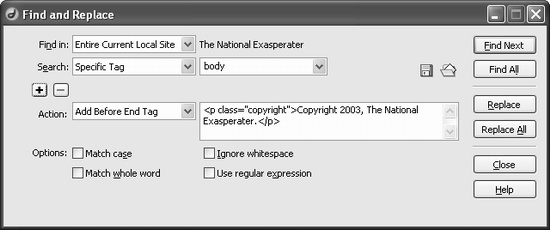
From the Action menu, choose Add Before End Tag. The end tag in this case is </body>. Since </body> marks the end of any content in a Web page, whatever appears directly before this closing tag will appear at the bottom of the Web page (you can probably see where this is going). Now, in the text field next to the Action menu, type (or paste) the copyright notice you'd like to use on each. You may want to first design the copyright message using Dreamweaver, then copy and paste the HTML into this field. Click Replace All. Dreamweaver handles the rest. |
-
Click the Replace All button and sit back. In a matter of moments, Dreamweaver updates all 1,000 pages. To test this out first, you might try a more cautious approach: Click the Find button to locate the first instance of the missing Alt property; verify that it's correct by looking in the Search box (see Figure 19-6); then click the Replace button to add the proper Alt value. You can continue updating pages one at a time this way, or, once you're sure it works correctly, press Replace All. |