Connect to Another Mac
Once your Mac is set up to access the network, you can connect to any other Mac on the network, as long as they have file sharing turned on. (To find out how to turn on file sharing, see the upcoming section “Share Files on a Network.”)
There are two ways to connect to another Mac on a network. The first uses the Network icon in the Finder window sidebar. (If you don’t see this icon, check Chapter 4 to find out how to display it by changing the Finder preferences.) Click this icon and you’ll see which servers are available on your network. If you’re in Columns view, as in Figure 12-4, click the server icon, and then click the Connect button to authenticate. If you’re in Icon or List view, double-click the server icon.
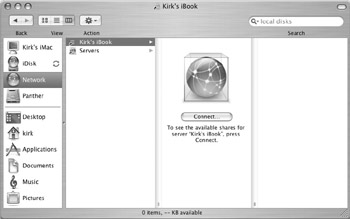
Figure 12-4: Click Connect to connect to the selected server.
Enter your user name (if it’s not displayed in the Name field) and your password. Click Connect if you are connecting as a registered user (if you have an account on the Mac you’re connecting to) or click Guest if you’re connecting as a guest.
If you connect to a Mac you have an account on, you’ll see one or more icons, depending on the number of volumes on the server, and the permissions you have. If you connect as a guest, you’ll see icons for each user account on the other Mac. By connecting to one of these accounts, you can access the user’s Public folder.
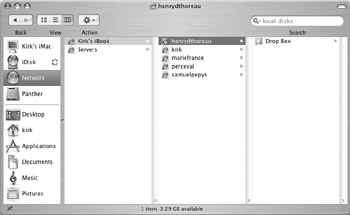
When you click a user’s icon, as shown in the preceding illustration, you are in their Public folder, and can access files they have put there, as well as copy files to their Drop Box.
Now that you have access to another user’s Public folder, you can share files with them. When they want you to be able to access files, have them place the files in their Public folder. When you want to send them files, put them in their Drop Box.
If you let a user connect to your Public folder, it works the same: put files you want to share in the Public folder, and check for files sent by the other user in your Drop Box.
If you connect as a registered user, you’ll see the same folders that you would see on the other Mac. For example, connecting from my iMac to my iBook, I see this:
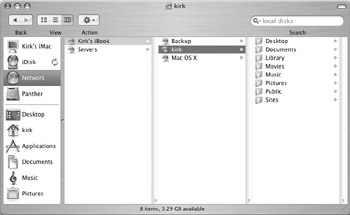
I can access any of the items in my home folder on my iBook, as well as items in the two volumes it contains: Mac OS X and Backup.
If you are on a network that contains both Macs and PCs running Windows, you’ll see additional icons when clicking the Network icon. (See Figure 12-5.) You’ll see icons for all the available servers, both Macs and PCs.
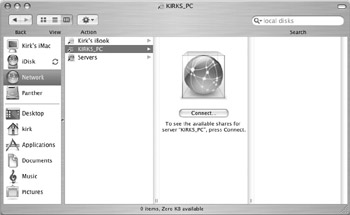
Figure 12-5: In this example, KIRKS_PC is an icon for a shared folder on a PC on the network.
You can connect to the PC on the network by clicking the PC’s icon, and clicking the Connect button and authenticating; you can then browse available shares in the next column.
To disconnect from any server, click the Network icon, and then select the icon of the server you want to disconnect. Select File | Eject, or press z-E.
If you want to share more than just the files in other users' Public folders, the best way is to have an account set up for yourself on the computer whose files you want to share. When you log in to your account, you'll be able to access not only your files on that computer that are in your home folder, but also any other shared volumes on that computer.
Say you have a Mac on your office network that stores archives on a shared volume (a partition on the computer or an external hard drive). To ensure that all users can access this volume, select it in the Finder, and then select File | Get Info (or press z-I). Click the disclosure triangle next to Ownership & Permissions, and then check Ignore Ownership on this Volume. This turns off permissions for files this volume contains, and allows any user to access its contents.
Now, when you connect to the Mac with this volume, as a registered user, you'll see this shared volume in the connection dialog. Select this volume and click Connect, and you'll have access to all its files.
Use the Connect to Server Dialog
Another way to connect to computers on your network is via the Connect to Server dialog in the Finder. This works a bit differently, and shows your servers in a different way.
From the Finder, select Go | Connect to Server... The Connect to Server window opens.
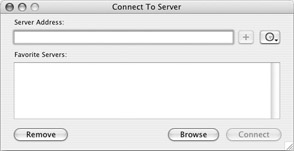
Enter a server address if you know the server’s IP address, or a name if you know it. If not, click Browse. This opens a Finder window where you’ll connect as you did previously, using the Network icon.
| Note | Your Mac’s name is found in the Sharing pane of the System Preferences. You can change its name by clicking Edit beneath the Computer Name field. While you can use punctuation and spaces in your computer name, note the way this name is displayed just beneath the Computer Name field. That’s the way you’ll need to enter it in the Connect to Server dialog. If you want to connect to a Mac running Mac OS X 10.2 (Jaguar), you need to know its Rendezvous name, not its Computer Name, which you’ll find in the Sharing preference pane. |
After you’ve entered the computer name or IP address, click Connect. If you have an account on the computer you are connecting to, click Registered User and enter your name and password. If not, click Guest, and then click Connect.
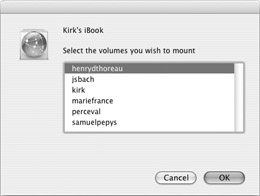
The next window shows you the volumes you can mount, or connect to. If you connect as a guest, this shows all the users who have accounts on this computer. By connecting to one of these accounts, you can access the user’s Public folder only. If you have an account on the computer, you have more access, depending on the access rights for your account. Click one of the volumes, and then click OK.
There are a few differences when working with servers connected using the Connect to Server dialog. First, these servers mount on the Desktop (if you have set the Finder preferences to show connected servers on the Desktop) and they display in the Finder window sidebar.

To work with files in this volume, click the icon in the Finder window sidebar and work as you do with any other volume or folder. To disconnect from this volume, click the Eject icon next to the server icon, or drag the volume’s icon from the Desktop to the Trash. (This does not delete the volume; you’ll see the Trash icon change to a Disconnect icon as you do this.)
If you have a network of Macs, all using Mac OS X 10.2 or later, you can take advantage of Apple's Rendezvous networking. This system automatically finds other Macs on your network, and can be used for a number of applications, including printing, file sharing, and more. One such application is iChat, Apple's instant messaging program. When you log in to iChat (see Chapter 10 for more on using iChat) and select Window | Rendezvous (or press z-2), you'll see a list of other available users on your network. (Make sure each user has iChat running and is logged in to Rendezvous messaging. To do this, they should select iChat | Log In to Rendezvous.)
To send files to another user, start a chat session by double-clicking a user's name, and then drag the file or folder you want to send to the text input field at the bottom of the chat window. Press Return, and iChat starts sending the file. The other user sees a small window showing the file's name in a clickable link; all they have to do is click it to start downloading the file. By default, this file is saved to their Desktop.
You can only send individual files or folders via iChat; if you try to select, say, three files and send them, it won't work. So if you have more than one file to send, put them in a folder, or make a compressed archive of them to send them even faster.
The advantage to sending files like this is that they go directly to the user; you don't have to log in to their Mac, send files to their Public folder, and then tell the user that files are waiting for them.
Share Files on a Network
You saw earlier how to connect to other computers on a network. If you want to share files with other users on your network, you need to turn on file sharing on the computer that will be sharing its files. You can do this in the Sharing pane of the System Preferences application. (See Figure 12-6.)
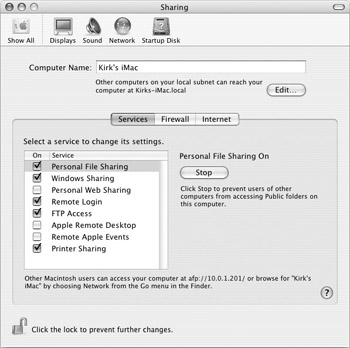
Figure 12-6: The Sharing preference pane lets you control what you share on your Mac.
You can share a lot of things on your Mac, and this preference pane lets you turn all of them on or off with a single click:
-
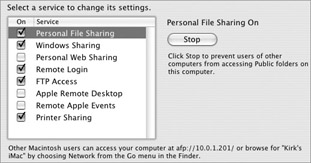
Personal File Sharing If you turn on Personal File Sharing, other Mac users can access Public folders and shared volumes on your Mac.
-
Windows File Sharing If you turn this on, Windows users can access shared folders on your Mac.
-
Personal Web Sharing If you turn this on, other users can access web pages in your Sites folder using a web browser.
-
Remote Login This lets users log in remotely using the SSH secure shell protocol.
-
FTP Access If you turn this on, users can connect to your Mac and transfer files using the FTP protocol.
-
Apple Remote Desktop If you turn this on, other users can access your Mac using the Apple Remote Desktop program if you have the program installed.
-
Remote Apple Events This lets applications on other Mac OS X computers send Apple Events to your Mac.
-
Printer Sharing This lets you share a printer that is connected to your Mac. (See Chapter 14 for more on Printer Sharing.)
As you can see, your Mac is a ready-made network machine, capable of sharing many things with many computers, whether they are Macs or Windows computers. If you click any of these services, you’ll see a brief explanation in the right-hand part of the window. You’ll also see a description at the bottom of the pane showing the exact network address that others must use to access your computer using the selected service. (Most of these sharing services are beyond the scope of this book. You’ll find some information about using them in your Mac’s online help.)
If you do turn on any of these network services, you should be aware that there are related security risks. The Firewall tab in this preference pane helps you protect your Mac against intrusions; I’ll tell you about using the Firewall tab and other firewall software in Chapter 19.
EAN: 2147483647
Pages: 171