The Application Browser
| The application browser presents a somewhat different solution to the same problem. With an application browser, the entire application is dynamic, and it usually cannot operate in disconnected mode (although you can add code to ensure that it does). The basic principle behind an application browser is that the functionality of the target application is partitioned into distinct modules. When a given user logs in, the application browser queries an XML Web service to determine which modules are allowed for this user. It uses this information to configure the interface (perhaps adding a list of options to a menu or creating a group of buttons). When the user attempts to use one of the modules, the application browser downloads it from the server. Several key differences exist between application launchers and application browsers:
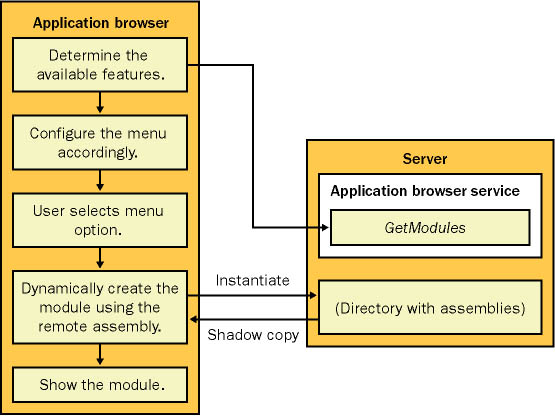
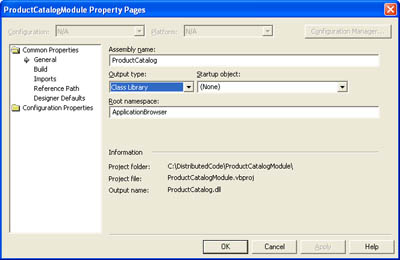
You can think of an application browser as a Windows Forms equivalent of an Internet browser. Like an Internet browser, it retrieves its content from the Internet. As soon as you change the contents of the Web server, all users of the application are affected there is no manual download process. However, the application browser has greater processing power than what is available in traditional client-side scripting languages. It can handle a rich graphical user interface with all the customary GUI frills and windowing. Figure 15-3 diagrams how an application browser works. As with all XML Web services, this technique can be used over the Internet with a remote server or locally over an intranet. Note that the assemblies must be hosted in a public directory on the server because the XML Web service no longer shoulders the burden of transmitting the files. You should protect this directory with Microsoft Internet Information Services (IIS) authentication settings (or network security settings with a network share in an intranet scenario). If Windows authentication won't work for your environment, you might want to steer away from the application browser approach and the possible security risks. Figure 15-3. Using an application browser The Application Browser XML Web ServiceThe first step in creating the application browser XML Web service is to define a custom structure or class that encapsulates the information about an application module. In our simple example (the BrowserModule class shown in Listing 15-7), this information includes the friendly (display) name and the URL for the corresponding assembly. If you want, you can add additional information such as the application browser menu under which a given module should appear. Listing 15-7 The module informationPublic Class BrowserModule Public MenuName As String Public AssemblyUrl As String ' Could add addition properties to configure ' order, menu shortcuts, and so on. Public Sub New() ' A default public constructor is required for XML Web service ' serializable types. End Sub Public Sub New(ByVal menuName As String, _ ByVal assemblyUrl As String) Me.MenuName = menuName Me.AssemblyUrl = assemblyUrl End Sub End Class Note that you need to include a default constructor. This is because the version of this class that the client will use will contain only the public members. It won't contain any constructor logic. Next you must create the single required Web method, which returns an array of BrowserModule objects, as shown in Listing 15-8. Note that the array is strongly typed. If you use a generic collection of objects (such as an ArrayList or a Hashtable), .NET wouldn't create a copy of the BrowserModule class in the client's proxy file and the client wouldn't be able to retrieve BrowserModule properties. Listing 15-8 The application browser XML Web servicePublic Class AppBrowser Inherits System.Web.Services.WebService <WebMethod()> _ Public Function GetModules() As BrowserModule() Dim Modules As New ArrayList() ' In this service, every custom setting corresponds to a ' module. A more powerful approach would be to create a custom ' configuration file section just for modules, ' and use a custom configuration file reader class to get the ' settings. Dim Keys() As String Keys = ConfigurationSettings.AppSettings.AllKeys Dim Key As String For Each Key In Keys Dim Item As New BrowserModule(Key, _ ConfigurationSettings.AppSettings(Key)) Modules.Add(Item) Next ' It's important for this method to return a strongly-typed ' BrowserModule array, not an ArrayList. Otherwise, the ' BrowserModule class will not be included in the automatically ' generated proxy, because .NET will not be able to tell that ' it's required. Return Modules.ToArray(GetType(BrowserModule)) End Function End Class The information about available browser modules is stored in a configuration file that looks like this: <?xml version="1.0" encoding="utf-8" ?> <configuration> <appSettings> <add key="Product Catalog" value="http://localhost/AppBrowser/CodeBase/ProductCatalog.dll" /> <add key="Invoice Module" value="http://localhost/AppBrowser/CodeBase/InvoiceModule.dll" /> </appSettings> <!-- System.web settings omitted --> </configuration> This is the only code that's required on the server side. However, you must create the modules before continuing. We'll tackle this task next. The Application Browser ModulesEach application browser module should be created in a separate project, compiled as a DLL assembly, and deployed to the CodeBase virtual directory on the server. In Visual Studio .NET, you can just create a new Windows Forms project and change the output type to Class Library, as shown in Figure 15-4. Note that the namespace has also been modified to ApplicationBrowser. The form itself is nothing remarkable. It's just given a text caption "Product Catalog" so you can quickly determine whether the application browser test is successful. Figure 15-4. Configuring project properties for a browser module The application browser is created as another Windows Forms project. On startup, it loads an MDI parent window and configures its menu with a list of supported modules. You need only three steps to implement this design:
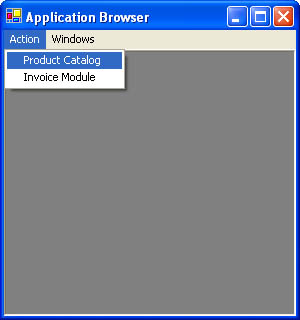
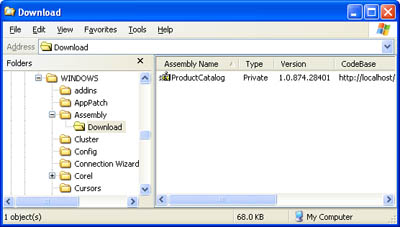
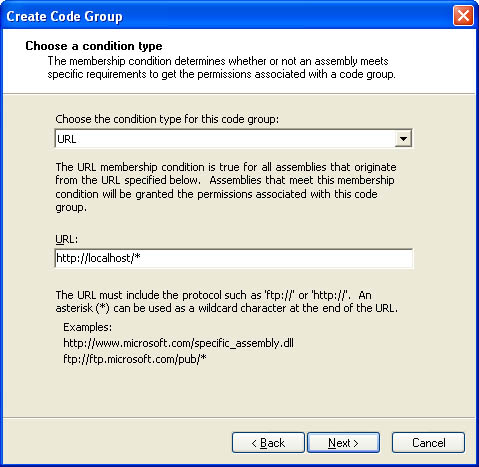
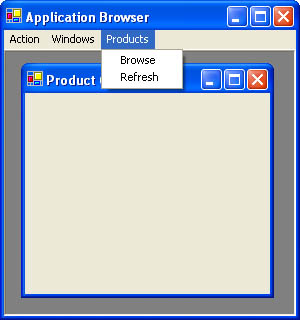
The form stores a form-level variable for a Hashtable that tracks all the supported modules: ' Stores a collection of BrowserModule objects. ' Each object is indexed using the menu item that displays the ' corresponding module. Public AvailableModules As New Hashtable() On startup, the program contacts the XML Web service and retrieves the array of BrowserModule objects (as shown in Listing 15-9. Each BrowserModule object is added to the menu using its friendly name. The complete object is added to the AvailableModules collection so that it can be retrieved later. Listing 15-9 Initializing the application browserPrivate Sub ApplicationBrowser_Load(ByVal sender As System.Object, _ ByVal e As System.EventArgs) Handles MyBase.Load Dim Proxy As New localhost.AppBrowser() Dim mnu As MenuItem Dim BrowserModule As localhost.BrowserModule For Each BrowserModule In Proxy.GetModules() mnu = mnuAction.MenuItems.Add(BrowserModule.MenuName) ' Add the item so we can retrieve it later (when the menu ' option is clicked) and determine the necessary DLL. AvailableModules.Add(mnu, BrowserModule) ' Connect the event handler for the menu option click. AddHandler mnu.Click, AddressOf mnu_Click Next End Sub Figure 15-5 shows the lists of retrieved modules on the application browser menu. Figure 15-5. The list of dynamic modules The event handler for the corresponding menu item is also hooked up dynamically using the AddHandler statement. When the menu item is clicked, the event handler in Listing 15-10 looks up the corresponding BrowserModule item and loads the appropriate assembly using the Assembly.LoadFrom method with the full URL. The startup form is then instantiated as an MDI child. Listing 15-10 Dynamically loading a module Private Sub mnu_Click(ByVal sender As System.Object, _ ByVal e As System.EventArgs) ' Get the related BrowserModule object. Dim BrowserModule As localhost.BrowserModule BrowserModule = AvailableModules(sender) ' Load the corresponding assembly. Dim ModuleAssembly As [Assembly] ModuleAssembly = [Assembly].LoadFrom(BrowserModule.AssemblyUrl) Dim ModuleForm As Form ModuleForm = _ ModuleAssembly.CreateInstance("ApplicationBrowser.ModuleForm") ' Show the module as an MDI child. ModuleForm.MdiParent = Me ModuleForm.Show() End Sub Note that the fully qualified name for the startup class is hard-coded. A better approach is for this piece of information to be a public property of the BrowserModule class. The current design for the application browser uses custom configuration settings, however, which means it can store only two pieces of information about each module. To allow for more information, you need to create a custom configuration section or just read the information out of a database. The process that takes place behind the scenes is quite interesting. Every time this method runs, it instructs .NET to use an assembly from the remote computer. However, .NET does not treat the remote assembly like a local component if it did, the application could slow down dramatically for low-bandwidth clients. Instead, .NET checks the version of the remote file and downloads a cached copy, if required. If it already has the most recent version cached locally, it won't take any additional action. This is similar to the logic we coded manually in the application launcher. The most significant difference is that the cached file is not stored in the local application directory. Instead, it's placed in the GAC so that it can be used by multiple applications if required. You can verify this by browsing the GAC on your computer. Just navigate to C:\[WindowsDir]\Assembly\Download using Windows Explorer. (Download is the special subdirectory used for cached assemblies.) Figure 15-6 shows the automatically downloaded assembly. Figure 15-6. The dynamically downloaded assembly There's only one problem with the application so far: as written, it won't work. As soon as you attempt to launch an application module, you'll receive a security exception because .NET knows that the assembly originated from a remote location. The default code access security policy doesn't give remote code the execute permission. As you'll see, you can fine-tune these settings by adding a known trusted source. Note Based on the analysis in Chapter 13, you might believe that you can solve this problem by using a security assertion. However, this won't work because .NET always walks up the stack. That means it checks the downloaded assembly for permission and then it checks the application browser code. You can't assert the permission in your application browser code because a security exception will have already been thrown. Code Access SecurityCode access security can be a confounding issue for new .NET developers because it springs into action at the most unexpected times. Consider, for example, our application launcher. Because it manually downloads the assembly as a stream of bytes and then re-creates the file on the local computer, .NET has no way to know it originally came from the Internet. When we run the application, it's identified as a component from the local computer zone and given full trust. With the application browser, on the other hand, the assembly is executed directly from the Internet using the LoadFrom method. In this case, the assembly will have markedly different evidence and be granted a much lower level of trust. Note The same considerations that apply to code access security with the LoadFrom method also apply if you're using a configuration file with the <codeBases> setting (as demonstrated in Chapter 2). If you specify a URI, .NET will use the same process to download the assembly into the GAC and will apply the same security restrictions. To test this principle, you can add a little code to the application browser and application launcher to display the evidence for the assembly you want to use. In this case, we want to examine the host evidence (which includes information such as the origin of the code). Assembly evidence is not important because we haven't digitally signed the assembly. Listing 15-11 shows a rewritten version of the menu event handler, which just displays the evidence piece by piece in separate message boxes. Listing 15-11 Displaying assembly evidencePrivate Sub mnu_Click(ByVal sender As System.Object, _ ByVal e As System.EventArgs) ' Get the related BrowserModule object. Dim BrowserModule As localhost.BrowserModule BrowserModule = AvailableModules(sender) ' Load the corresponding assembly. Dim ModuleAssembly As [Assembly] ModuleAssembly = [Assembly].LoadFrom(BrowserModule.AssemblyUrl) ' Get an enumerator that allows us to walk through the ' host evidence. Dim Enumerator As IEnumerator Enumerator = ModuleAssembly.Evidence.GetHostEnumerator() Do While Enumerator.MoveNext() ' Show the current piece of evidence. MessageBox.Show(Enumerator.Current.ToString()) Loop End Sub Notice two significant items. First of all, the security zone is recognized as the intranet: <System.Security.Policy.Zone version="1"> <Zone>Intranet</Zone> </System.Security.Policy.Zone> This is the piece of evidence that ultimately causes the code to be denied permission to execute. The URL identifies the location more specifically: <System.Security.Policy.Url version="1"> <Url>http://localhost/AppBrowser/CodeBase/ProductCatalog.dll</Url> </System.Security.Policy.Url> And the site pinpoints the server: <System.Security.Policy.Site version="1"> <Name>localhost</Name> </System.Security.Policy.Site> So how has .NET made these decisions? Clearly, the URL is drawn directly from the parameter used in the LoadFrom method. What might not be immediately clear, however, is how .NET analyzes this parameter. If it is a path name (or a URL that begins with file:///), the CLR identifies that the request is attempting to access the local computer. If the URL begins with http://, the CLR performs a little more sleuthing. In this case, because the first 3 bytes of the IP address match, .NET determines that the computer is on the same network. (The first 3 bytes of the IP address are the first three numbers separated by periods. In other words, the address 127.2.44.11 is on the same intranet as 127.2.44.300 but not the same intranet as 127.2.46.300, provided you use a subnet mask of 255.255.255.0. For more information, you might want to consult a detailed book about networking.) Incidentally, in this case the URL is using the localhost loopback alias, which points to the current computer. However, .NET cannot identify this fact and therefore still denies the request. You can solve this problem in more than one way. You can disable the security policy altogether for the client computer, using the caspol.exe command-line utility included with .NET. This is the most radical approach. Alternatively, you can create a new security rule that will recognize your strongly signed assemblies. The easiest approach, however, is to configure a new security group for the remote server. This is the approach we'll take in the next section. To change the security policy, you can manually edit the machine.config file or you can use the .NET Framework Configuration tool, which is by far the easiest option. Just choose Settings, Control Panel, Administrative Tools, Microsoft .NET Framework Configuration. The basic approach we'll take is to create a code group that includes any assembly downloaded from the localhost computer. You need to create this code group as a subset of the LocalIntranet_Zone code group. Conceptually, you're adding a special case that modifies how .NET processes an assembly from the local intranet. If you try to create your custom code group as a subset of My_Computer_Zone, it won't work because the ProductCatalog.dll assembly is not being executed from the local computer. Adding the code group is easy. First of all, find the Runtime Security Policy, Machine, Code Groups, LocalIntranet_Zone node (as shown in Figure 15-7). Figure 15-7. Adding a custom group for localhost Right-click on this node and choose New. You'll travel through a three-step wizard that prompts you to first create a descriptive name and then select the type of code group. In this case, you can create a site-specific or URL-specific code group. The site-specific code group includes all the assemblies downloaded from a specific server. The URL-specific code group is similar but more granular. It enables you to specify a specific directory on a server. Figure 15-8 shows the URL-specific condition that will allow any assembly downloaded from a URL that begins with localhost. Figure 15-8. The code group URL The final step is to select the permissions for this code group. In this case, the full trust permission set is recommended. Note Keep in mind that this condition applies only to URLs that match exactly. If the client tries to download a file from the same server computer using its IP address, the security LocalIntranet_Zone security restrictions apply because .NET won't match the code group. You can alter this behavior by adding multiple URL rules. If you run the simple evidence tester shown in Listing 15-11 again, you'll find that the same evidence still appears. However, the matched code group now has increased permissions. With this change, the application browser runs smoothly and loads the remote form seamlessly, albeit with an unremarkable user interface (as shown in Figure 15-9). The MDI list even tracks the currently displayed modules. Figure 15-9. The application browser at work However, life isn't perfect for the administrator of a large distributed system, who must coordinate the security policy updates to hundreds or thousands of client computers! The easiest way to manage this feat is to export a separate XML file that contains the new security settings and run the caspol.exe command-line utility on each client computer to apply the settings. The following caspol.exe command applies the custom security settings from the CustomPermissions.xml file. Keep in mind that the user running this utility needs administrator privileges. caspol machine addpset CustomPermissions.xml The MSDN reference has much more information about the caspol.exe utility and the steps required to administer code access security. Be warned, however making and deploying code access security changes will complicate your system. Improving Communication in the Application BrowserOne of the challenges with creating an application browser is striking the right balance when you divide functionality between modules. Ideally, the modules will perform completely independent tasks and require no interaction. In some cases, however, a little bit more cooperation is required. For example, the application module might need to tailor the application browser interface, perhaps modifying the window caption and adding a new set of menu items when it gains the focus. You can implement these features by using the Form.MdiParent property of the child window. Using this property, you can give the application module direct access to the parent and allow it to perform any basic modification supported by the Form class (such as modifying the window text or obtaining reference to the overhead menu). However, this direct approach can run into a good deal of trouble. As most .NET developers realize, it's rarely a good idea for one form to tinker directly with the controls and properties of another form. Instead, the child form should call a custom method that you've added to the parent form. The custom parent method can then perform the required modifications. This extra layer of indirection improves encapsulation and ensures that you can modify the application browser (for example, renaming control variables) without causing mysterious errors to appear in the application modules. All this is well and good, but it's not necessarily easy to implement. What happens, for instance, if you develop the application browser and application modules separately? To call a custom method in a Form class, you need to have a reference to the assembly that contains the form. Or do you? As with .NET Remoting, the solution to this problem is to program using interfaces. The basic technique is to define a contract that the application browser must respect and a separate contract that all application modules must respect. The application browser can rely on the application module interface to interact with the application module, and the application module can rely on the browser interface to interact with the application browser. Consider the application module interface shown in Listing 15-12. It defines a ModuleClosed event and a dedicated Start method. Neither of these details is required, but they enable you to write cleaner code in the application browser. They also make the overall logic clearer. Looking at this interface, it's immediately apparent that the application browser needs to know when the module closes and relies on this notification to perform some task. Listing 15-12 The application module interfacePublic Interface IApplicationModule Sub Start(ByVal parent As Form) Event ModuleClosed(ByVal sender As Object, ByVal e As EventArgs) End Interface Listing 15-13 shows the revised application module code required to implement the IApplicationModule interface. Listing 15-13 Implementing IApplicationModulePublic Class ModuleForm Inherits System.Windows.Forms.Form Implements AppBrowserInterfaces.IApplicationModule ' Implement the required event. Public Event ModuleClosed(ByVal sender As Object, _ ByVal e As System.EventArgs) _ Implements AppBrowserInterfaces.IApplicationModule.ModuleClosed ' Use the Start() method to show the window. ' By putting this logic in the application module, you ' gain the ability to configure the window display, choosing ' a default size or even showing it as a non-MDI modal window. Public Sub Start(ByVal parent As System.Windows.Forms.Form) _ Implements AppBrowserInterfaces.IApplicationModule.Start Me.MdiParent = parent Me.Show() End Sub ' Raise the appropriate event when the form closes. Private Sub ModuleForm_Closed(ByVal sender As Object, _ ByVal e As System.EventArgs) Handles MyBase.Closed RaiseEvent ModuleClosed(Me, New EventArgs()) End Sub End Class This interface-based approach proves useful if you need to limit the user to a single instance of an application module. Currently, the application browser enables the user to start any number of instances of the same module. Using interfaces, you can easily modify this logic. There are several possible solutions, but one is to just disable a menu item when it is clicked and re-enable it when the module form closes. The next example demonstrates this technique. Listing 15-14 shows the revised code that the application browser uses to create the module and to subscribe to the ModuleClosed event. Note that the menu item that triggered the action is disabled after the method has completed successfully. The changed lines are highlighted in bold. Listing 15-14 Creating the module through its interfacePrivate Sub mnu_Click(ByVal sender As System.Object, _ ByVal e As System.EventArgs) ' Get the related BrowserModule object. Dim BrowserModule As localhost.BrowserModule BrowserModule = AvailableModules(sender) ' Load the corresponding assembly. Dim ModuleAssembly As [Assembly] ModuleAssembly = [Assembly].LoadFrom(BrowserModule.AssemblyUrl) ' Create the module through the interface. Dim ModuleForm As AppBrowserInterfaces.IApplicationModule ModuleForm = _ ModuleAssembly.CreateInstance("ApplicationBrowser.ModuleForm") ' Disable the menu item so the module can't be loaded twice. CType(sender, MenuItem).Enabled = False ' Keep track of the disabled menu item. DisabledMenuItems(ModuleForm) = sender ' Subscribe to the close event. AddHandler ModuleForm.ModuleClosed, AddressOf ModuleClosed ' Display the module. ModuleForm.Start(Me) End Sub When the module is closed, the application browser responds to the ModuleClosed event, checks which module has been deactivated, and then reenables the corresponding menu item, as shown in Listing 15-15. Listing 15-15 Handling the ModuleClosed eventPrivate Sub ModuleClosed(ByVal sender As Object, _ ByVal e As System.EventArgs) Dim mnu As MenuItem = CType(DisabledMenuItems(sender), MenuItem) ' Re-enable the menu. mnu.Enabled = True ' Remove the menu from the collection. DisabledMenuItems.Remove(sender) End Sub Communication from the module to the browser can be just as important. Consider the application browser interface shown in Listing 15-16. It defines a method that allows application modules to add and remove a linked menu of options. Listing 15-16 The application browser interfacePublic Interface IApplicationBrowser Sub AddMenu(ByVal menu As MenuItem) Sub RemoveMenu(ByVal menu As MenuItem) End Interface In this case, the MenuItem corresponds to a top-level menu with a collection of contained menu options. The application browser attaches this top-level menu to the main MDI menu. Whenever an option is selected, however, the event is handled by the appropriate module (as shown in Figure 15-10). Figure 15-10. Attaching dynamic menus Listing 15-17 shows the implemented code in the application browser. Listing 15-17 Implementing IApplicationBrowserPublic Class ApplicationBrowser Inherits System.Windows.Forms.Form Implements AppBrowserInterfaces.IApplicationBrowser Public Sub AddMenu(ByVal menu As System.Windows.Forms.MenuItem) _ Implements AppBrowserInterfaces.IApplicationBrowser.AddMenu mnuMain.MenuItems.Add(menu) End Sub Public Sub RemoveMenu(ByVal menu As _ System.Windows.Forms.MenuItem) _ Implements AppBrowserInterfaces.IApplicationBrowser.RemoveMenu mnuMain.MenuItems.Remove(menu) End Sub ' (Other code omitted.) End Class Finally, Listing 15-18 shows how the application module can use the IApplicationBrowser interface to communicate with the parent, adding a menu at startup and removing it when the module closes. Listing 15-18 Using IApplicationBrowser to add a dynamic menuPublic Class ModuleForm Inherits System.Windows.Forms.Form Implements AppBrowserInterfaces.IApplicationModule ' Add the menu. Private Sub ModuleForm_Load(ByVal sender As System.Object, _ ByVal e As System.EventArgs) Handles MyBase.Load Dim Parent As AppBrowserInterfaces.IApplicationBrowser Parent = CType(Me.MdiParent, _ AppBrowserInterfaces.IApplicationBrowser) Parent.AddMenu(mnuProducts) End Sub ' Remove the menu. Private Sub ModuleForm_Closed(ByVal sender As Object, _ ByVal e As System.EventArgs) Handles MyBase.Closed Dim Parent As AppBrowserInterfaces.IApplicationBrowser Parent = CType(Me.MdiParent, _ AppBrowserInterfaces.IApplicationBrowser) Parent.RemoveMenu(mnuProducts) RaiseEvent ModuleClosed(Me, New EventArgs()) End Sub ' (Other code omitted.) End Class In short, interface-based programming is a key technique for programming application browsers. When in doubt, however, strive for the least amount of interaction possible. The more your forms interact, the greater the chance that an unusual combination of different modules will lead to an unexpected error. A More Dynamic Application BrowserThe application browser developed in this chapter uses a static set of available modules. In this case, the list of available modules will change only when you modify the application. Alternatively, you could create an XML Web service in which the user needs to log in before calling the GetModules method. In this case, the list of module names might correspond to the allowed user functions. In a bug-tracking (incident-reporting) application, for example, some users will be allowed to report bugs, whereas others might have access to task-assignment or user-configuration modules. This approach of partitioning an application into dynamic modules is extremely useful for low-bandwidth clients because users won't need to wait while the assemblies are downloaded for features they will never use. It also tightens security one more notch, ensuring that users won't ever see the code that contains the restricted functionality (unless more than one individual uses the same workstation). However, there are some drawbacks. The dynamic interface can lead to unnecessary support headaches because different users will end up using subtly different hybrid versions of the application. You might need to test the application under these different scenarios. It also becomes impossible for different modules to communicate with one another unless the application browser takes on the responsibility of facilitating this communication. |

EAN: 2147483647
Pages: 174
- Step 1.1 Install OpenSSH to Replace the Remote Access Protocols with Encrypted Versions
- Step 1.2 Install SSH Windows Clients to Access Remote Machines Securely
- Step 2.1 Use the OpenSSH Tool Suite to Replace Clear-Text Programs
- Step 3.3 Use WinSCP as a Graphical Replacement for FTP and RCP
- Step 3.4 Use PuTTYs Tools to Transfer Files from the Windows Command Line