Section 5.3. Smart Ways to Apply Formatting
5.3. Smart Ways to Apply FormattingEarlier in this chapter, you took a comprehensive tour of Excel's formatting fundamentals. But of course, just because the features exist doesn't mean they're easy to use. Digging through the different options and applying a full range of formatting settings can be a tedious task. Fortunately, Excel also includes a few timesavers that let you speed up many formatting jobs. In the following sections, you'll try out the essential formatting techniques that every Excel guru loves. They include:
None of these tools are new to Excel 2007, but Microsoft has vastly improved the styles and themes so they look better, do more, and are easier to use. Once you master these three timesavers, you'll have the secret to making great-looking worksheets. 5.3.1. The Format PainterThe Format Painter is a simple yet elegant tool that lets you copy all of a cell's format settingsincluding fonts, colors, fill, borders, and even the number formatfrom one cell to another. (Apparently, the Excel team decided that the more accurate label "Format Copier" wasn't nearly as exciting as the name Format Painter.) To use the Format Painter, follow these steps:
Excel doesn't let you get too carried away with format paintingas soon as you copy the format to a new cell or selection, you exit format painting mode. If you want to copy the desired format to another cell, you have to backtrack to the cell that has your format, and start over again. However, there's a neat trick you can use if you know you're going to repeatedly apply the same format to a bunch of different cells. Instead of single-clicking the Format Painter button, double-click it. You'll remain in format painting mode until you click the Format Painter button again to switch it off. Tip: The Format Painter is a good tool for quickly copying formatting, but it's no match for another Excel feature called styles . With styles, you can define a group of formatting settings, and then apply them wherever you need them. Best of all, if you change the style after you've created it, Excel automatically updates all cells that you've formatted using that style. Styles are described in the next section. 5.3.2. Styles and ThemesStyles let you create a customized collection of format settings, give that collection a name, and store it in a spreadsheet file. You can then apply these settings anywhere you need them. For example, you could create a style called Great Big Header that uses the Cambria font, pumps up the font size to 46 points, and colors the text bright red. Every Excel spreadsheet starts off with a collection of prebuilt styles. Microsoft designed these styles with two goals in mind: to give you quick access to most common and practical formatting choices, and to make great looking documents. To take a look at the styles waiting for you, choose Home You can apply more than one style to the same cell to get a combination of formatting options. For example, you could use the Currency style to get the right number format, and then pick the Bad style to flag a huge debt with a light red background fill. (Bad is simply the name of a prebuilt style that applies a light red background fill and a dark red font color.) If you apply more than one style and they conflict (for example, both styles use a different background color ), the style you applied last takes over. Styles use Excel's live preview feature, which gives you try-before-you-buy formatting. When you select a group of cells and then hover over one of the styles in the ribbon, your selected cells change instantaneously to reflect that style. Run your mouse over the different style options, and you see a quickly changing series of different formatting choices. To actually apply a style, click it.
Tip: Longtime Excel users will recognize the Number Format group of styles shown at the bottom of Figure 5-19. These styles are the only ones that Excel included in previous versions. The Number Format styles simply apply a different number format (Section 5.1.1), like Currency, Percentage, and so on. They don't change other appearance details. However, they're still useful. For example, you could use Currency style for all the dollar figures in your worksheet. Then, at some later point, you could modify that style to set a different currency symbol, alignment, or number of decimal places. This one change updates every cell that uses the Currency stylein this case, all the prices across your entire worksheet.
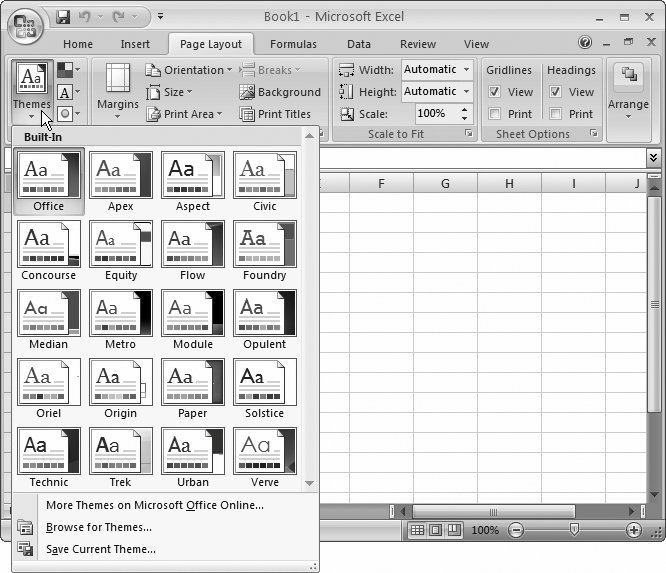
5.3.2.1. Themes: A package of stylesAs nice as the prebuilt styles are, they don't suit everyone. For example, the standard style colors favor subdued shades of red, gray, brown, and green, which make sense for the company accountant but aren't the most exciting choice for an urban hipster. To jazz things up, you can choose a different theme that features livelier colors. When you do, your entire worksheet gets an immediate faceliftyou don't need to track down each individual cell and reformat it. Technically, a theme is a combination of three ingredients :
To choose a theme, choose Page Layout
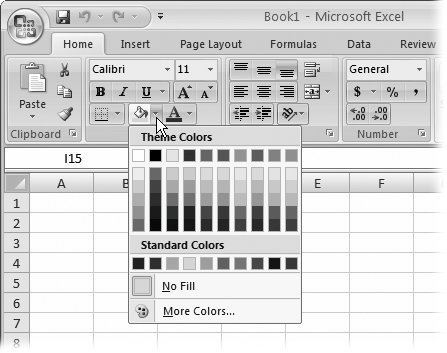
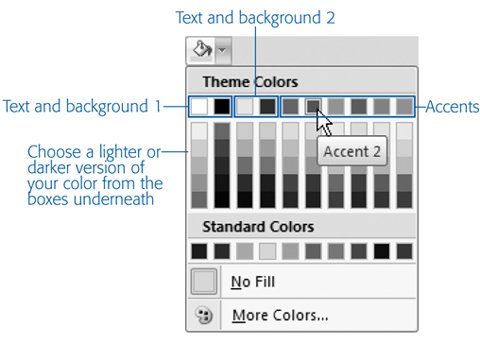
The secret to understanding themes is realizing how changing the theme affects your worksheet. In other words, how does Excel apply the theme's fonts, colors, and effects to your worksheet? The following sections break it down. Fonts . Every workbook has a standard body font that it uses in every cell. Excel uses this standard font unless you explicitly choose a different font using the ribbon's Home In a brand new Excel spreadsheet, everything you type starts out in easy-on-the-eyes 11-point Calibri font. If you apply a new theme, you get a new standard font. For example, switch to the traditionally styled Apex theme, and you'll get the elegant Book Antiqua font instead. Note: All the fonts used in Excel themes are installed as part of Microsoft Office. The same sort of magic works with the heading font , but it's more limitedin fact, the only style that uses the heading font is Title. If you use the Title cell style and switch from one theme to another, Excel updates your cell to use the heading font from that style. In some themes, the heading font is the same as the standard body font (as it is for the standard Office theme). In other themes, these two fonts are different, but complementary. For example, the Apex font uses the stylish Lucida Sans font for all titles. Note: You might assume that the heading styles (Heading 1, Heading 2, Heading 3, and so on) use the heading font. Oddly enough, that's not how it works. All the heading styles use the body font. Title is the only style that uses the heading font. If you're feeling a bit reckless, you can override the default font that Excel uses for all new workbooks. To override it, select Office button Colors . Every theme relies on 12 key colors. When you move from one theme to another, Excel swaps in the new set of colors. Excel alters any place where you've used the 12 theme colors. However, other colors aren't affected. Note: Although there are only 12 base colors in a theme, Excel varies the saturation of the color to make it bolder or lighter, based on the style you use. For example, the Office theme includes a steel blue color that you can use at full strength (with the style named Accent 1), or lighten to a faint grayblue mist (with the style named 20% - Accent 1). To make this system a bit clearer, imagine a designer runs amok, formatting cells with different background fills. Some of these cells are filled with theme colors, while others are filled with custom colors. (Figure 5-21 shows the difference.) When you switch themes, the cells that have the theme colors are changed, while the other cells aren't.
Tip: You're always better off using the theme colors rather than picking a new custom color. That way you can give your workbook a facelift by switching from one theme to another, and the colors still match. On the other hand, if you choose custom colors that look nice with a specific theme, they're likely to clash horribly when you change to another theme. Experienced Excel workers rarely waste time picking background and foreground colors out of the ribbon. Instead, they use styles. Any time you use one of the styles from the Themed Cell Styles category (Home The theme system works well because each color in a theme plays a specific role. In other words, some colors are intended for text, while others are designed to play the role of a complementary background; a few more add eye-catching accents. To see the intended purpose of each color, hover over it in the ribbon (Figure 5-22).
Effects . Effects are the simplest part of any theme because Excel applies them with no work on your part (all you need to do is switch themes, and then the Effects kick in). Excel automatically applies effects to any graphics you've created. |
 Clipboard
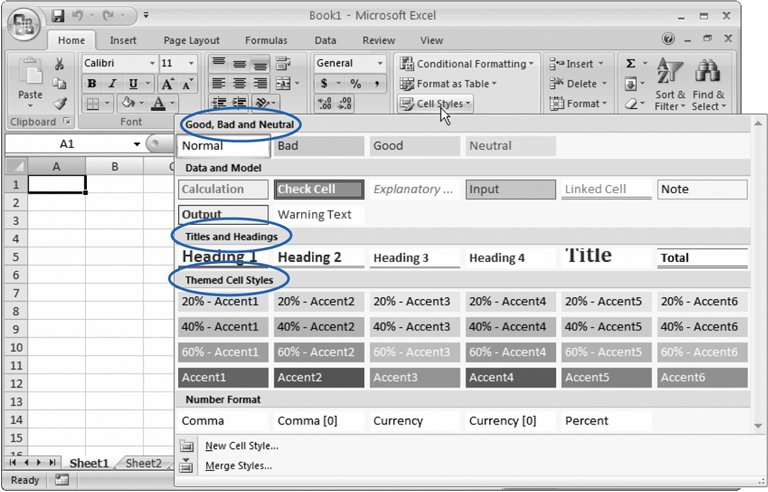
EAN: N/A
Pages: 75