General Document Issues
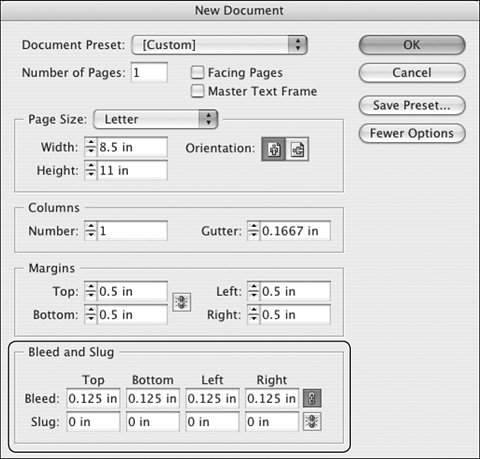
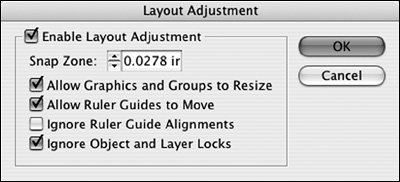
IDLK FilesWhen you have an open InDesign document, there is an additional file with a similar name that magically appears in the same directory as the file you have open. For example, if you have opened a file named Chapter_1.indd, you'll see a companion file named ~chapter_1~p965so.idlk in the directory. The tilde (~) in front of the name and the file extension.idlk tell you that this is an InDesign lock file. Its purpose is to prevent another user from simultaneously opening your InDesign file and thinking they're making progress. Instead, they'll see an alert informing them that they do not have permission to open the document. Don't delete .idlk filesInDesign cleans up after itself. The files will evaporate when you save and close the open file. If InDesign should crash while a document is open, it won't have time to delete the .idlk file, but just leave it anyway. InDesign will take care of the housekeeping the next time you open, save, and then close the file. Automatic RecoveryAs you work, InDesign keeps track of what you're doing, but not in a creepy way. Without impeding performance, it keeps a private version of your working file. This is the same mechanism that gives you unlimited undo capability. If your system crashes for any reasonpower outage, corrupt font, system crashlet InDesign recover as much of your document as it can. To that end, don't just reopen your original file. Instead, reopen InDesign and marvel as your document reappears. You may lose the last few things you did, but you won't lose everything you did in that session. That's because InDesign keeps your most recent operations in memory so you can quickly undo, and it may not have time to write those to disk as it crashes. But it's better than losing the whole shebang. You can't turn off Automatic Recoveryand why would you want to? Going Back in TimeIf you need to backsave an InDesign CS2 document for use in InDesign CS, you'll find that backsaving is not available through File > Save. Instead, you must export an InDesign Interchange file (File > Export). In order to open this file from the future, the users of InDesign CS must first update their software with a free patch from Adobe. In the Downloads section of the Adobe site, go to the InDesign area and find the heading Adobe InDesign CS 3.0.1 April 2005 (CS2 Compatibility) update. Reducing File SizeInDesign files are fluffy by nature. Even a simple file is larger on disk than an equivalent QuarkXPress file. It's just a fact of life. But you can economize a bit by performing a File > Save As at the end of the job. When you just choose File > Save, InDesign adds any new data to the existing file on disk. It's faster than rewriting the entire contents of the file, but it adds to file size. However, when you choose File > Save As, InDesign rewrites the file. You should see a reduction in file size, especially in a document with a lot of large graphics. For example, the file for this chapter had ballooned to 3.9 MB. Performing a Save As reduced that to 2.8 MB. Enormous disk capacities have made us lax about taking up spaceI have a 250 GB hard drive. Why should I ever throw anything away?but you may find that document performance improves as a result of using Save As instead of Save. Let It BleedWhen you create a new InDesign document, you're given the option to create a dedicated bleed zone (Figure 12.20). In the New Document dialog, click the More Options button and you'll see the Bleed and Slug options. Entering a value in the Bleed fields does more than just provide spiffy red bleed guides. It earmarks a special bleed area so you can easily invoke it with one click when you print or export the file. Figure 12.20. Click the More Options button (not shown, because it's already been clicked) and InDesign allows Bleed and Slug entries. Creating a dedicated bleed area in this manner makes it easy to invoke bleed as you print or export. It's important to note that InDesign makes a distinction between this official bleed area and any bleed you manually create by extending frames beyond the trim edge of the page, and this fact can bite you. During print or output, if you select Use Document Bleed Settings, InDesign looks for the dedicated bleed value entered in the Bleed options fields of document setup. If you haven't entered values in these fields, InDesign sees a zero value and obligingly gives you zero bleed (Figure 12.21). Figure 12.21. If you select Use Document Bleed Settings and see the correct value in all the Bleed fields (left), you're in good shape. But if you see all zeroes (right), you'll have no bleed on printed or exported output, regardless of any manual bleed you add. If you forgot to designate the official bleed area when you created the document, you can still do so at any time by choosing File > Document Setup and then clicking the More Options button in the resulting dialog. You can then create the bleed area. When the Use Document Bleed Settings check box is selected, you will get the desired result during output. One Size Fits All: Layout AdjustmentIf you've (oops) built a document with the incorrect page size or need to change margins, the world has not ended. InDesign's Layout Adjustment can save your proverbial bacon. Choose Layout > Layout Adjustment (Figure 12.22), and then change the document size or margin settings. The default settings will do all the right things. Guides will move as will objects snapped to those guides. Text frames created by autoflowing text will expand or contract as necessary, adhering to shifting margins. Radical changes in page size or margin settings may require some massaging after the treatment, but you may be surprised by how good the initial results are. Figure 12.22. So what if your evil twin built the document the wrong size? Select the Enable Layout Adjustment check box to give InDesign permission to fix it. Checking Out of the LibraryInDesign libraries are a great way to have a ready repository of commonly used elements, including text, graphics, and page geometry. These elements can then be quickly dragged into a page without having to re-create them each time. Libraries can be stored locally or on a server (although they must be locked on a server for multiple users to have access). As you drag content from a library into an InDesign document, however, there's something the library doesn't tell you. If you're missing graphics that are required by the library content, you get no warning when you open the Library, and none when you drag content from the Library into an InDesign document. You won't make the discovery until you preflight the document. One workaround for this dilemma is to embed the graphic in InDesign before dragging content to the library. In the Links palette, select the link name, and then go to the Links palette menu and select Embed File. Then drag the graphic or a group containing it to the Library palette. When you drag the Library item onto another page, the embedding is maintained, and there's no need to hunt for the original artwork. One caveat: This is most appropriate for small artwork, since embedding increases the InDesign file size by the amount of the graphic. Embed a 2 MB image in an InDesign file, and you have increased the InDesign file size by 2 MB. Do this for 20 images in a document andwell, you get the idea. |
EAN: 2147483647
Pages: 132