Using Native Files
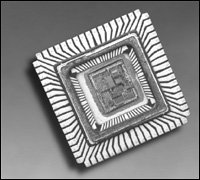
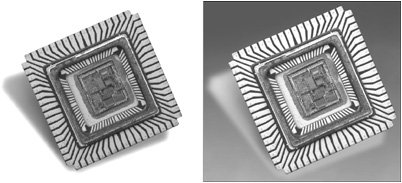
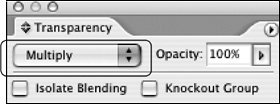
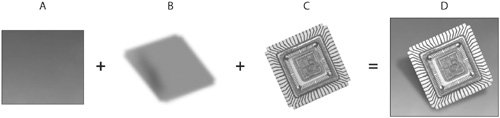
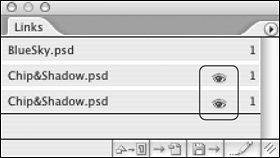
| One of the joys of InDesign is its ability to use native Photoshop, Illustrator, and PDF files. There's certainly nothing wrong with using old-fashioned TIFF and EPS files, but there are advantages to using native files, including the ability to maintain live transparency and to keep layers aloft. Photoshop Native Files (PSD)It's not necessary to flatten Photoshop layered files before placing them in an InDesign page. In fact, unless a Photoshop file has reached an unwieldy size, there are compelling reasons not to flatten it because of the flexibility and editability you sacrifice. Maintaining live layers means simplified housekeeping because there's no need to keep a separate working image file. But there are some situations that present challenges. Drop That ShadowBoth Photoshop and InDesign make it easy to add drop shadows to objects, which is why you see shadows under everything these days. Tastefulness aside, InDesign creates perfectly nice drop shadows that interact correctly with other elements in a page (Figure 12.8). As long as you want a simple, concentric drop shadow, it's just one click away. Figure 12.8. If you just need a simple drop shadow, InDesign makes perfectly good ones. But there's a limitation in the way InDesign perceives shadows from Photoshop. As mentioned in Chapter 9, "Photoshop Production Tips," Photoshop's blending modes are ignored by InDesign. If the shadow falls on empty space, this doesn't matter. However, if the shadow needs to realistically darken other content beneath it in InDesign, it will require some special handling. To place an image containing a custom shadow on top of other content already in InDesign (Figure 12.9), you'll have to perform some surgery to allow the shadow to interact correctly with underlying elements. Since the Multiply blend mode applied to the shadow in Photoshop is not honored by InDesign, it lightens (rather than darkens) underlying elements in the page. Figure 12.9. Custom shadows created in Photoshop (left) need special handling when placed in an InDesign file, or they will not interact correctly with underlying elements in the page (right). To force the shadow to darken elements beneath it on the InDesign page, you need to set the blending mode of the shadow to Multiply (Figure 12.10). To do that, you'll have to isolate the shadow from its parent object so you can control its blending mode. Figure 12.10. Select the frame containing the shadow, and then set its blending mode to Multiply in the Transparency palette. If you're using a version of InDesign prior to CS2, you need to save two separate images to address the shadow issue. You'll need one image for the main object and a separate image for the shadow. Set the shadow's frame to use the Multiply blend mode, and then place the separate object on top of the shadow (Figure 12.11). If the images are derived from the same original image, use the Align palette to align the top and left edges of the shadow and object images so that they're positioned correctly relative to each other. If you have InDesign CS2, you can perform this trick with a single image, thanks to the Object Layer Options feature. Figure 12.11. Think of this process as creating a shadow sandwich. Start with a background (A). Then place the shadow image (B), and set its frame to Multiply in InDesign. Top it off with the silhouetted object (C), and you have the finished assembly (D). InDesign CS2: Object Layer OptionsThe Object Layer Options dialog (Object > Object Layer Options) allows you to selectively hide or display layers within a placed Photoshop file or PDF. Think of the possibilities for versioning and design flexibility. A single, layered Photoshop file can be placed multiple times in an InDesign document, displaying a different combination of layers in each instance. Layered PDF files can be treated the same way, whether they were generated by Illustrator or InDesign. And it just so happens that Object Layer Options are a splendid solution to the Photoshop shadow dilemma. You can choose to invoke Object Layer Options either when you import an image or after it's placed in the page. During import (File > Place), select the Show Import Options check box to select which layers you wish to display (Figure 12.12). To correctly handle the shadow, you'll still have to place the image twice (or duplicate the frame)once for the shadow and once for the silhouetted object. But at least you only have to keep track of one image on disk with this method. Figure 12.12. Invoked during image import or after an image is placed, Object Layer Options allow you to selectively show or hide layers within a Photoshop or PDF file (A). Extra credit: If you use Layer Comps in Photoshop, InDesign allows you to select them by name (B). The Update Link Options determine what happens if you edit the image in Photoshop after placement.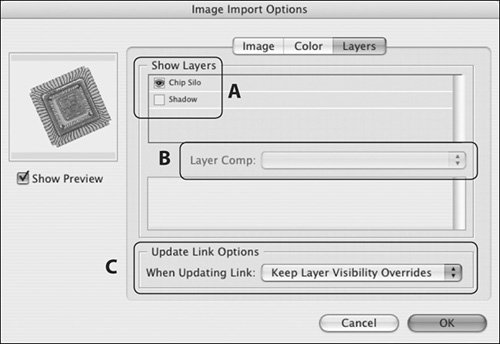 If you selectively reveal layers, what happens if you edit the image in Photoshop, and then update it? You can choose whether to keep InDesign's layer visibility overrides or start over when updating. If you've invoked Object Layer Options for a placed graphic, InDesign politely provides an indicator in the Links palette in the form of a staring eyeball icon (Figure 12.13). Figure 12.13. If the Object Layer Options feature has been used, InDesign provides a helpful eyeball reminder in the Links palette. To take advantage of InDesign's Object Layer Options feature, you have to save graphics files appropriately from other applications:
Illustrator Native Files (AI)Illustrator native files offer several advantages over the traditional EPS files when placed in InDesign. Transparency and blending modes in Illustrator files are fully honored by InDesign. Drop shadows created in Illustrator with the Effect > Stylize > Drop Shadow method will interact correctly with underlying elements in an InDesign pageunlike Photoshop's drop shadows. Illustrator objects with blending modes such as Multiply, Screen, or Darken will affect InDesign elements as expected. A native file can also be considerably smaller on disk than an EPS version of the same file with no loss of data. While it's unnecessary to open your vast store of Illustrator EPS files and resave them as native AI files, there is one circumstance that may require you to change the format of an old EPS. If you are adding a drop shadow to an EPS placed in InDesign CS or earlier, you will encounter a quirk in the way the shadow is rendered (Figure 12.14). The fix is to resave the art as an AI file or an EPS file with a TIFF preview. Figure 12.14. Drop shadows created for EPS files placed in InDesign CS1 and earlier have an unfortunate bug. If you add a drop shadow, it will display correctly (top), but will print as if the shadow is following the containing frame (bottom). The answer? Save the artwork as a native AI filethen the shadow displays and prints correctly. (This was fixed in InDesign CS2.) PDF Files as ArtworkIn general, you'll use PSD, AI, EPS, and TIFF files as graphic content, but there are situations in which only a PDF will do what you need:
|

EAN: 2147483647
Pages: 132