Exporting Freehand Files
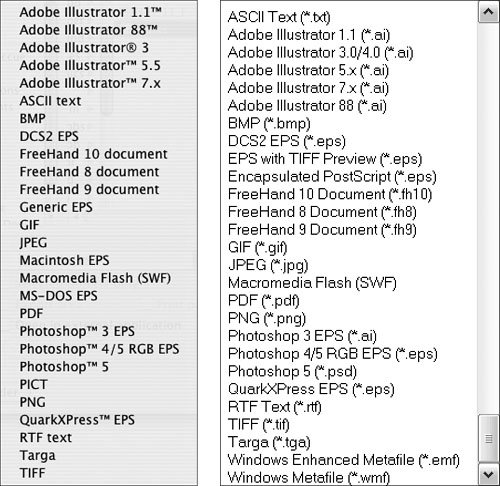
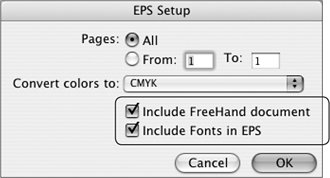
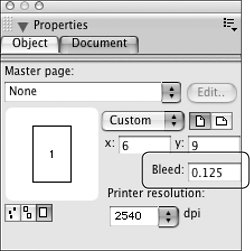
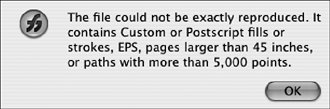
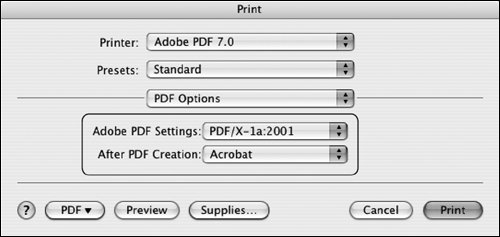
| When you choose File > Export, you'll discover that FreeHand offers a dizzying list of export formatsmost of which you will probably never need for print production (Figure 11.23). How can you choose the correct format? It depends on how you intend to use the file. If you need to export a FreeHand file so that someone else can open it in Illustrator, choose the most recent version of Illustrator from the list, rather than one of the EPS options. Think of the EPS option as a format for placement in other applications, such as page-layout applications, rather than as a way to share artwork that will be further edited by someone else. So if you're collaborating with someone who is using Illustrator, it's better to send them a file that's intended for Illustrator editing, rather than an EPS file. In truth, it's ideal for all collaborators to use the same version of the same application throughout a project, but that isn't always possible. Figure 11.23. Something for everyone27 export formats on the Macintosh (left) and on Windows (right). Exporting Raster FormatsBesides losing the sharp detail inherent in a vector format, exporting FreeHand files with complex fills to a raster format such as TIFF may result in loss of content. PostScript fills manifest themselves in the exported image the same as they appear in FreeHand: as rows and rows of letters. What is the preferred solution if you truly need a raster image? You'll have more control if you export the file as Generic EPS (Mac), and then open the file in Photoshop to rasterize the content at an appropriate resolution (usually 300 ppi at final size). In Windows, export to EPS, and then open the EPS file in Photoshop to rasterize it appropriately. Exporting Vector FormatsThe most reliable export format for print is vector EPS. FreeHand offers two methods of creating vector EPS files: File > Save and File > Export. Choose File > Export on the Macintosh, and you can select from a long list of formats, including Generic EPS, Macintosh EPS, and MS-DOS EPS. On a PC with Windows, you'll see EPS with TIFF Preview and Encapsulated PostScript. While the internal content of an EPS is the same regardless of the choice you make, the file's appearance when imported or placed into other applications depends on the type of EPS you make (Figure 11.24). Figure 11.24. When generating EPS files, you'll find that some previews are more realistic than others. Selecting the Generic EPS format on the Macintosh or the plain Encapsulated PostScript option on Windows displays as a gray block in other applications (left). Choosing MS-DOS EPS yields a rough bitmap preview (center). The Macintosh EPS provides the best preview on the Macintosh, matched by the quality of the EPS with TIFF Preview option on Windows (right).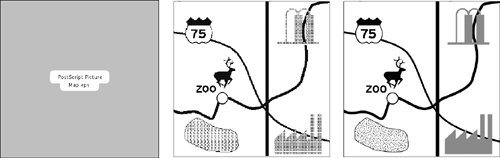 The MS-DOS EPS option produces an EPS that displays a coarse black-and-white bitmap preview when imported into other applications such as QuarkXPress and PageMaker, although InDesign creates its own color preview. Despite its appearance, the file's content should image correctly to a PostScript printer. The Generic EPS option creates a file that provides no preview when placed in QuarkXPress. You'll just see a gray rectangle with the text PostScript Picture. However, PageMaker and InDesign automatically generate a color preview for such files. Regardless of the application, though, the file should output correctly on a PostScript printer. The Macintosh EPS option creates a file that displays and prints correctly with most common Macintosh graphic arts programs, but displays the gray PostScript Picture rectangle when placed into the Windows version of QuarkXPress. In Windows, PageMaker generates a color preview. Again, the preview isn't the whole story. When it is output, the artwork should be correct. Using FreeHand on Windows, the Encapsulated PostScript option gives you the gray rectangle appearance in QuarkXPress but a color preview in PageMaker and InDesign. Choosing EPS with TIFF Preview provides a color preview in all applications. Conclusion? While there's no single, cross-platform, one-sizefits-all flavor of EPS, Macintosh users can create good previews by choosing the Macintosh EPS format, and Windows users will achieve the same results by selecting EPS with TIFF Preview. Regardless of the format you select, click the Setup button in the Export dialog, so you can check the appropriate options. Select the Include FreeHand document option so you can place the EPS in other applications and still reopen in FreeHand for editing. Select the Include Fonts in EPS option to ensure correct imaging of text from other applications (Figure 11.25). Figure 11.25. Be sure to select the option to Include Fonts in EPS to ensure that the file will image correctly. If you select File > Save As > Editable EPS, FreeHand automatically includes the native FreeHand document in the resulting EPS. This may seem nonsensical: Isn't the EPS file the same thing as the FreeHand document? Well, strangely, no. FreeHand's native format is for use in FreeHand only. It's not understood by other applications such as Illustrator, QuarkXPress, or InDesign. Therefore, to place this artwork into a QuarkXPress page, for example, you have to send it out of FreeHand as an EPS file. Including the FreeHand document within the EPS file creates a two-for-one file: To other applications, it's an EPS file. But if you wish to edit the file, FreeHand sees the original FreeHand document inside. This sleight of hand is possible both when saving and when exporting to EPS files. But there is a very important difference between exported and saved EPS files. When placed in other applications, exported EPS files are cropped at the visible edge of the FreeHand page, eliminating any artwork that extends outside the document edge. Saved EPS files, however, display artwork in its entirety within other applications, even if the artwork extends beyond the page limits of the FreeHand file. Keep this in mind as you choose between Save and Export for generating EPS files from FreeHand documents. Providing Correct Bleed for ExportWhen building a FreeHand document that requires bleed, you have two choices. Either build your artwork inside an oversized page and include sufficient bleed within the page, or create the document to the correct final trim size, create sufficient bleed outside the document bounds, and specify the desired bleed value in the Document panel (Figure 11.26). The bleed value entered in the Document panel doesn't inspire FreeHand to magically create bleed artwork for you. Instead, it allows FreeHand to earmark a designated bleed area so that its content is honored when it is printed or exported, even though artwork in that bleed area may fall outside the document bounds. And you don't have to be concise as you yank on selection handles to create bleed. The bleed value in the Document panel will see to it that any artwork outside the bleed zone is lopped off during export, provided you select the correct export settings. Figure 11.26. Specifying a bleed value in the Document panel allows FreeHand to give special handling to artwork that bleeds. For example, if you've created a business card with bleed in the center of a letter-sized page rather than setting the document dimensions to the correct measurements, the edges of the FreeHand document don't matter. Just the artwork itself is important. Such a file can be either exported to EPS or saved to EPS with the same results. All the artwork is maintained, and empty space outside the artwork is not included. You must carefully create exactly the depth of bleed you want. Don't just add an arbitrary amount of extra art rather than a uniform eighth of an inch, for example. If you've created a FreeHand document whose dimensions equal the final trim size (for example, an 8.5by11 inch letterhead created on an 8.5-by-11 inch FreeHand page), and then you've specified a bleed value in the Document panel, you should export it as an EPS, rather than choosing File > Save. Saving the document as an editable EPS allows all visible artwork to appear in the saved EPS. If you were a bit sloppy in adding bleed artwork, your page will be off-center in the saved EPS, which would throw off subsequent processes such as imposition. However, if you use File > Export, FreeHand uses the document bleed setting to determine the boundaries of the exported EPS, ensuring that it will be correct when placed into other applications. Exporting Documents Containing Multiple PagesIf you have created a multipage document in FreeHand, you'll discover that the option to save it as an EPS is not available. Instead, you must use File > Export. Multiple EPS files will be generatedone for each page in the FreeHand document, and named filename_1.eps, filename_2.eps, and so forth. If you select the Include FreeHand Document option, each single-page EPS will still contain the complete, original multipage FreeHand file. While this facilitates editability, since each EPS file provides access to the complete originating FreeHand file, it also adds to the file size of the exported EPS files. Exporting PDF FilesThe highest level of PDF that FreeHand can generate is Acrobat 4.0 (PDF 1.3). That in itself is actually not a serious limitation. But the built-in PDF export features in FreeHand are inadequate for correctly handling anything but the most basic artwork. If your FreeHand file is fairly simple, the PDF export feature may be adequate for successfully generating PDF files. But to create acceptable PDF files from some FreeHand documents, you may have to use other methods of creating PDF files. First, it's important to know the limitations of the built-in PDF export function. Exporting Directly to PDFTo export a PDF directly from FreeHand, choose File > Export, and then select PDF from the Format menu. If your document contains Textured, PostScript, or Custom fills, FreeHand displays an alert to warn you that such content may not be maintained (Figure 11.27). It's not kidding, and it's referring to a very serious limitation in FreeHand's ability to render your document to PDF. Figure 11.27. FreeHand warns you during PDF export that certain content may not be correctly expressed in the PDF. Any Custom, Textured, or PostScript fills will not be present in an exported PDF, rendering it useless as a representative of your FreeHand document. But even if you have not used custom fills, you'll be greatly disappointed to discover that all spot-color content is converted to CMYK during PDF export. And if you're using OpenType fonts under OS 9 on the Macintosh, those fonts will not be embedded in the exported PDF, requiring you to convert text to outlines (Text > Convert to Path) before exporting to PDF, provided the font vendor's license allows this. At least TrueType and PostScript fonts should embed as expected. In addition, PDF export does not correctly handle bleeds. If you've specified a dedicated bleed value in the Document panel, FreeHand ignores that during PDF export and crops out any artwork outside the document bounds. If you've built bleed inside the document by creating an oversize page, the PDF page size will match the oversized page. If you've built the FreeHand document to exactly the bleed size (say, 8.75 by 11.25 inches for a letter-sized page), this is fine. But if you've just slapped artwork in the middle of an arbitrary page, the oversized PDF will complicate subsequent steps, such as imposition. This is starting to sound fairly grim, isn't it? Clearly, if you need to provide a print-ready PDF of a document containing spot-colors or custom fills, you'll have to use another method of PDF creation. And to do that, you'll have to install Adobe Acrobat Standard or Professional so you have access to Acrobat Distiller. (Downloading the free Adobe Reader application won't give you the ability to create PDF files.) Print to Adobe PDFWhen you install Acrobat, you'll see a new entry in your list of printersAdobe PDF (or Adobe Distiller, or Adobe PDF 7.0, depending on which version of Acrobat you've installed). The mechanics of printing to the imaginary PDF printer are much like those of printing to an actual printer: Choose File > Print, and then wade through the options. Since you're printing directly to PDF, you must choose the correct PDF setting under PDF Options in the Print dialog box (Figure 11.28) to ensure that font embedding and image compression and resampling are performed correctly. If you keep the setting at Use Default, you're at the mercy of the settings last used by Acrobat Distiller. Ideally, your print service provider should provide specifications for correct PDF settings. But if they don't, PDF/X-1a is a safe choice. If you have installed Acrobat 7.0, and choose it as the target printer, you will see this listed as PDF/X-1a:2001. Figure 11.28. Printing to the PDF printer. Don't forget to check the Adobe PDF Settings to ensure correct conversion. Stepping through the print dialogs, choose FreeHand MX from the menu (Figure 11.29) so you can select Quality PS Level 2. Then click the Advanced button in that same dialog so you can select options for crop and registration marks if your print service provider requires them in the supplied PDF. Figure 11.29. When printing to PDF, select the FreeHand MX option, and then select Quality PS Level 2 (left). Then, click the Advanced button for more imaging options (right).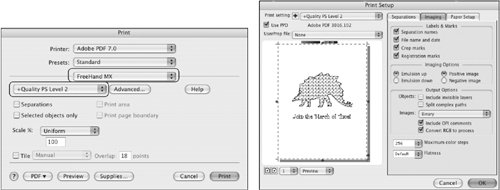 The PDF page size will be equal to the page size of the FreeHand document. Printing to PDF will maintain spot-color content, and it will correctly render custom fills. You may find, however, that it does not correctly embed some fonts. How will you know? You can visually check PDF files in Acrobat by toggling on and off the Use Local Fonts option (Advanced > Use Local Fonts) and watching for changes. For quick toggling, use the keyboard shortcut: On the Macintosh, it's However, if you must maintain bleed on the PDF you're generating, don't select the Print to PDF option. Any bleed setting specified in the Document panel will not be honored. And if the document was built on an oversized page, the entire page is rendered, which may interfere with correct imposition. Distill PostScript or EPS for Best ResultsThe most reliable method of creating PDF files from FreeHand is to export an EPS file or generate a PostScript file, and then process the file through Acrobat Distiller. This method embeds fonts, crops the PDF to the correct bounding box of art, honors bleed settings, and maintains spot-colors. Why not just tell you this and be done with it? It's helpful to know the pitfalls of other methods, so you know why this is the best way to make PDF files from FreeHand. Macintosh OS X: Save As PDFJust don't do it. In every print dialog in Macintosh OS X, you'll see the Macintosh system's built-in option to save as PDF (Figure 11.30). This option is quick and painless, so you might already suspect that it's inadequate for print production. But if you need convincing, note that this method of PDF creation provides no control over image compression or resampling, breaks FreeHand artwork into little separate slices in the resulting PDF, converts all CMYK and spot-color content to RGB, and ignores bleed settings in the Document panel. The OS X PDF-creation function is great for capturing Web pages and text files, but it's not appropriate for producing PDF files from FreeHand. Figure 11.30. The Save As PDF option in Macintosh OS X through 10.3.9 (left) provides no easily accessed options. However, the PDF button in the Print dialogs in OS X 10.4 and above (right) offers an expanded list of options.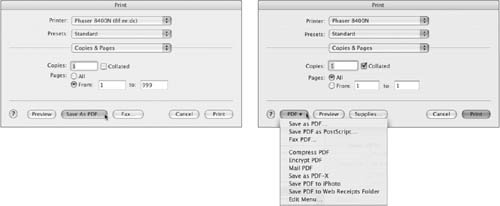
|
EAN: 2147483647
Pages: 132