Special Effects
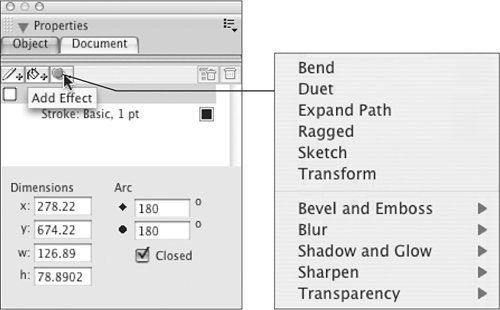
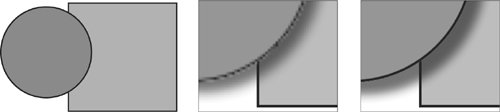
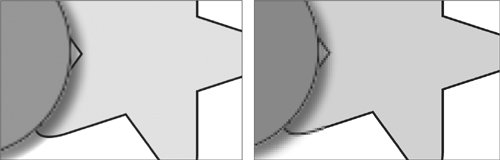
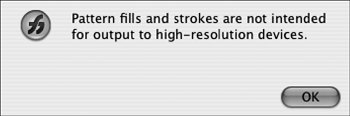
| FreeHand allows you to apply live vector and raster effects to selected objects by choosing Window > Object, and then using the Add Effects controls in the Object panel (Figure 11.6). The vector effects, such as Ragged and Sketch, enliven the appearance of a vector object without actually altering the underlying object itself. Vector effects are safe to use because the appearance of the object remains vector in nature. The raster effects, however, may rasterize some vector content, eroding sharp detail, and should be used with some reservations. Figure 11.6. The Add Effect menu in the Object panel offers both vector and raster effects. Click and hold down your mouse button on the Add Effect button. Vector effects are listed above the dividing line. Raster effects are below the dividing line, and should be used with caution. Live Vector EffectsMultiple vector effects can be applied to a single object to transform its appearance from a staid geometric to something that looks much more, well, freehand. In Figure 11.7, despite its punk hairdo, the vector shape is still a circle at heart. If the Ragged and Sketch effects are removed by using the controls in the Object panel, the shape will revert to its original bland appearance. That's why these effects are referred to as live effects. They can be changed or removed at any time. If you wish to permanently alter a vector shape that bears a live effect so that the effects becomes literal, choose Modify > Separate Attributes. (Admittedly, the name of the menu item doesn't give any clue what it does.) Figure 11.7. The Object panel shows that two live vector effectsRagged and Sketchhave been applied to the circle, resulting in the roughened version on the right. Under the hood, it's still a circle.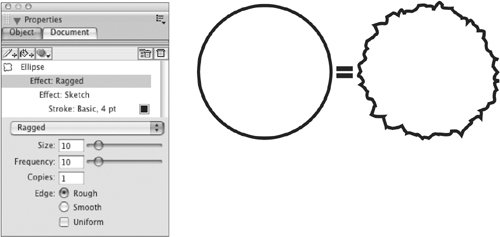 Live Raster EffectsWhile FreeHand's live raster effects, such as drop shadows and glows, leave the underlying object's shape unchanged, the effects can noticeably erode the appearance of the object (Figure 11.8). The shape carrying the effect remains vector in nature and can be edited with the vector selection and vector drawing tools, but its appearance becomes pixelated. Portions of underlying objects that interact with the raster effects are also rendered as pixels. Setting the Raster Effects value higher (File > Document Settings > Raster Effects Settings) may improve the appearance of objects, but it still isn't hard to see a demarcation at the edge of raster effects. Figure 11.8. A nice, sharp vector shape (left) loses its smooth definition when a live raster effect such as a drop shadow is applied to it (center). Increasing the Raster Effects Settings helps somewhat (right), but the edge is still rendered as pixels, not vector information. Warning: You'll be misled by the appearance of the effect when it's viewed within FreeHandthings are actually worse than they appear. When you apply a raster effect to an object, you'll see the object changeits appearance becomes pixelated. But FreeHand neglects to indicate that all underlying objects become pixelated as well (Figure 11.9). Figure 11.9. It may appear that raster effects alter only the object to which they're applied (left), but an exported EPS (right) tells the true storyunderlying objects are also pixelated by the effects. The problems with raster effects extend beyond their erosion of sharp vector appearance. Applying raster effects to a spot-color object results in that object becoming a CMYK object. And portions of any underlying spot-color objects are converted to CMYK as well. There's really no way to have a happy ending. If you just can't live without applying raster effects to objects in FreeHand, increase the Raster Effects Settings to a high value to camouflage the rasterization of vector edges. Avoid using raster effects on (or touching) spot-color objects to prevent converting spot-color objects to CMYK. Lens EffectsFreeHand allows you to create a unique sort of fill called a Lens fill. Lens fill controls are accessed through the Fill control, which is a little bucket icon at the top of the Object panel (Figure 11.10). Click on the bucket, and the default Basic color fill is applied to the selected object in the FreeHand drawing. If you wish to get fancier, click on the Basic entry near the bottom of the Object panel, and fill choices appear in a drop-down menu. Choose Lens from the drop-down menu, and then you'll see the types of Lens fills available. An object with a Lens fill can perform interesting tricks such as ghosting or magnifying what's underneath it. Lens fills are great creative toys, but there are some pitfalls with spot-color content. Figure 11.10. Choosing the Fill button in the Object panel allows you to start with a basic fill. Click Fill in the Object panel (left), and then see the types of fills available (center). Choose the Lens option to see the types of Lens fills available (right).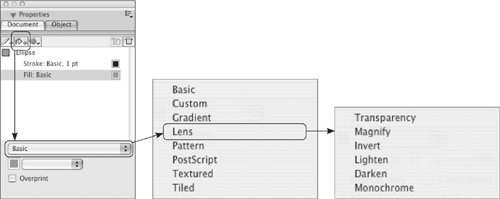 The Magnify lens effect (Figure 11.11) is fairly safe, leaving vector content unrasterized as well as preserving spot-color objects. However, it's the only lens effect that doesn't convert spot-color content to CMYK. All the remaining lens effectsTransparency, Invert, Lighten, Darken, Monochromeconvert underlying spot-color content to CMYK. But at least they don't rasterize vector objects. Figure 11.11. The Magnify lens effect is very convincing if you're drawing a magnifying glass. Special Fills and StrokesFreeHand offers an assortment of decorative fills and strokes for objects. The solid fills are straightforward and don't provide any surprises in output. But the other fill options require some preparation, and some can cause complications (or disappointment) during output. The same cautions apply to the fanciful strokes. Experiment to get a feel for the resulting output. Create a test file, and ask your print service provider to RIP and proof the effects. Then you can decide if such fills and strokes are appropriate for what you're trying to achieve. Gradient FillsFreeHand's gradient fills can maintain spot colors, and you can even create gradients that have multiple changes of color across the gradient. However, you'll find that gradient fills are prone to banding (obvious strips of color), and gradients may display hairline gaps between color steps (Figure 11.12). You might do well to consider manufacturing a gradient in Photoshop, which is smoother to begin with and will allow you to introduce a small amount of noise (usually a setting between two and three in the Photoshop Add Noise dialog) to minimize the appearance of banding. Then, save the gradient image as a TIFF file and import it into FreeHand. It's a workaround, but unless you want striations in your gradients, it's the most sensible solution. Figure 11.12. Freehand's gradient fills are prone to banding and hairline gaps. Pattern FillsPattern fills are bitmap in nature and are based on a repeating eight-by-eight grid of pixels. They were originally intended to be printed on a desktop device with a resolution of 300 dpi or lower, and they haven't evolved since those days. Acknowledging this, FreeHand even pops up an apologetic alert when you choose the Pattern fill option (Figure 11.13). Figure 11.13. When you select the Pattern fill option, FreeHand alerts you to its limitations. It's not kiddingPattern fills are primitive and fairly limited. FreeHand's Pattern fills are built by turning on and off pixels in the pattern tile area of the Object panel (Figure 11.14), which can be found under Window > Object if it's not already visible. If you stick to purely vertical and horizontal patterns, this works quite well. But if you attempt a diagonal motif, the crude, bitmapped nature of the pattern becomes obvious. (Of course, if you want that effect, you're in luck.) Just know that sending a Pattern fill to a high-resolution imagesetter will not improve its appearance. It's going to look crunchy no matter what output device is used. Figure 11.14. Pattern fills are built pixel-by-pixel (left). Vertical or horizontal patterns (center) work best. Angled patterns (right) betray their bitmapped nature. If you want smooth lines, this is not the way to get them.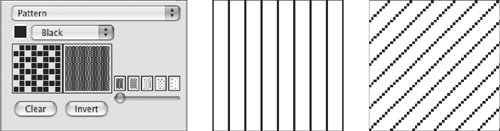 PostScript FillsHere's an option if you're a geek at heart: Write your own PostScript fill! When you select PostScript from the Fill list in the Object panel, you're presented with an empty field for PostScript code. Type or paste the code in the empty field (Figure 11.15), and press Enter when you're finished. Figure 11.15. Do you speak fluent PostScript? Then you can create PostScript fills from scratch by typing (or copying-and-pasting) PostScript code into the Object panel (left). FreeHand will only display a field of the letters PS to indicate a PostScript fill (center). You'll have to print the file or place it in a page layout to see the final results (right). (PostScript code courtesy of Olav Martin Kvern.)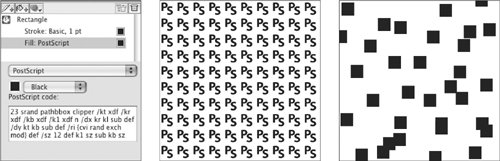 You'll see no evidence on the screen that you've succeeded, nor will you be given any warnings from FreeHand if your code is incorrect. The object will display a repeated field of the letters PS, but that's all you will see until you print the file or place the exported EPS file in another application that can display the contents, such as QuarkXPress or InDesign. How will you know if the code you've written is problematic? Well, you'll receive a PostScript error message when you attempt to RIP the file. You need to have some familiarity with PostScript to even interpret the error messages, but if you're skilled enough to write PostScript, chances are that you'll understand the error messages. However, if you've simply copied and pasted the code from some other source, you'll just have to keep your fingers crossed. If your desktop printer is a PostScript Level 2 or Level 3 printer, successful output from FreeHand is a sign that there will (probably) be no problem when you send the file to the print service provider. Sending directly from FreeHand to a non-PostScript printer such as an inkjet printer without its own RIP will produce output that looks like the display in FreeHandthe letters PS repeated over and over. And attempting to use a printer that utilizes PostScript emulationthat is, a non-Adobe translation of PostScript codemay or may not produce successful output. If you don't have a true PostScript printer, try exporting an EPS from FreeHand, and then placing that exported EPS in a page-layout program such as InDesign, QuarkXPress, or PageMaker. You may be able to print from the page-layout application to your non-PostScript printer and determine if the output is satisfactory. If you have Adobe Acrobat Standard or Professional, you can save paper by printing to the Adobe PDF printer to generate a PDF file to check your fills. If you have a version of Acrobat other than 7.0 installed, you may see Acrobat Distiller listed as a printer, but it's the same idea. (The Acrobat-related printer's name depends on the version of Acrobat installed on your computer.) Unfortunately, exporting to PDF through FreeHand's built-in PDF function won't help you determine whether textured and PostScript fills will print as you expect: Fancy fills are lost during PDF export. Note If you have only the free Adobe Reader installed, you won't find an Acrobat printer in your list of printers: Only the Standard and Professional versions of Acrobat install a printer. Textured FillsFreeHand offers Textured fills such as Burlap, Sand, Gravel, Denim, and Heavy Mezzo from the Object panel. Unlike the Pattern or PostScript fills, however, the Textured fills cannot be edited, scaled, or rotated. If you scale or rotate an object containing a Textured fill, the object dimensions or angle changes but the size and orientation of the fill does not. It's as if you're opening up a mask to reveal more or less of a static repeating texture. Some of the fills are prone to showing seams as they repeat. And, as with the PostScript fills, you won't see the true effect until you print the file to a PostScript-capable printer or export an EPS and place it in another application. While in FreeHand, you'll only see the letter C repeated to fill the object (Figure 11.16). Figure 11.16. Choosing the Textured fill option in the Object panel produces an onscreen display of Cs in the object (center). You won't see the final textured effect (right) until the file is printed or placed into another application, such as a page-layout program.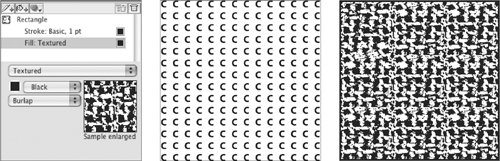 You can apply a swatch to a Textured fill, and using a spot-color swatch is allowed. As with the PostScript fills, you won't see correct output if you print directly from FreeHand to a non-PostScript inkjet printer, and you may experience errors when printing to a device that utilizes PostScript emulation. Tiled FillsFreeHand's Tiled fills are made from shapes you draw in FreeHand. Unlike PostScript and Pattern fills, you can actually see what the result will look like. First, draw a shape (or multiple shapes) in FreeHand. Then select what you'd like to use as fodder for the Tiled fill, and copy it to the Clipboard. In the Object panel, click the Paste In button to insert the content (Figure 11.17). Figure 11.17. Tiled fills begin as a drawn shape (left). Copy the shape to the Clipboard, and then use the Paste In button in the Object panel (center). FreeHand performs a step-and-repeat procedure to fill the object (right).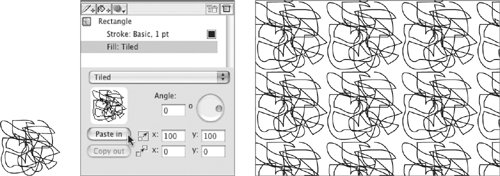 Since you're working with literal content rather than code, you can scale and rotate the tiled content within the object. If any of the pasted content uses spot colors, the spot-color definitions are maintained in the Tiled fill. In addition, you can print Tiled fills to both PostScript and non-PostScript printers. You can paste new artwork into the Object panel to replace the current Tiled fill of an object, but simply editing the original artwork doesn't change the content. There's no link between the original artwork and what was pasted into the Object panel. You'll have to make the edits to the "donor" art, copy the contents to the Clipboard again, and then repaste by using the Paste In button in the Object panel. If you apply raster effects such as shadows or glows to an object containing a Tiled fill, any spot-color content will be converted to CMYK. And piling effect upon fill can result in artwork that's so complex that it can't be output correctly, if at all. So restrain yourself from getting too carried away with all these decorative features. In some cases, you may find it necessary to jump back and forth between FreeHand and an image-editing application such as Fireworks or Photoshop to get the effect you desire. Create the finished content, save it as an image, and then import the image into FreeHand. Yes, it's more work, but it's more fun than fixing imaging errors. Custom FillsFreeHand's Custom fills are preset PostScript patterns, but you can modify the width, height, angle, and color of the applied patterns (except Black & White Noise). As with several other FreeHand fill methods, you can't see the final result in the object within FreeHand. You have to settle for viewing rows of Cs instead (Figure 11.18). Figure 11.18. Custom fills such as Circles, Hatch, and Bricks are preset fills available as options in the Object panel (left). FreeHand will only display rows of Cs in the object (center), so you just have to believe that the exported EPS (right) will image correctly. You can check the result by printing from FreeHand to a PostScript printer or by placing the EPS in a page-layout program for viewing.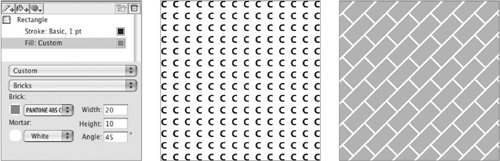 Some of the Custom fills are opaque, while others are transparent and allow underlying objects to show through gaps in the fills. Black & White Noise, Bricks, Noise, and Tiger Teeth fills are opaque. Circles, Hatch, Random Grass, Random Leaves, Squares, and Top Noise fills are transparent. The interiors of the shapes may be opaque, but the background of the filled area is transparent. Note that while you can specify a width and height for a custom fill, scaling the filled object does not scale the fill. The dimensions of the object will change during scaling, but the fill itself will not. It's as if you're looking through a hole and seeing a sheet of old wallpaper. You might open the hole wider, but the size of the pattern in the wallpaper doesn't change. It's wise to avoid adding raster effects such as blurs to objects that already have custom fills, since this may result in overly complex content that won't image predictably. Custom Halftone SettingsFreeHand offers controls for applying custom halftone settings to selected objects (Window > Halftones). You can choose angles, halftone style, and frequency. But there's a punchline to this: Most newer RIPs and desktop printers completely ignore these settings. So don't bother. If you want artsy, coarse-screened effects, use Photoshop's Color Halftone filter to create the effect, and then import the finished image into FreeHand. Extrude, Smudge, and ShadowThe Extrude, Smudge and Shadow tools allow you to add dimensionality or relatively simple motion effects to objects. These tools are all available under one control in the Tool palette (Figure 11.19). Figure 11.19. The Extrude, Smudge, and Shadow tools available in the Tool palette behave in similar ways. Position the cursor over the Extrude tool, and then click and drag to select an alternate tool from the group. The issue of cheesiness aside, use this group of tools cautiously if you have spot-color content. Almost every permutation of these tools will cause conversion of spot-color content to CMYK (Figure 11.20). Figure 11.20. Using the Extrude tool (left) converts a spot-color original shape and its extrusion to CMYK. The Smudge tool (center) leaves the original shape as spot color, but the trail of smudged shapes is rendered as CMYK. The results of the Shadow tool (right) depend on its settings. The Hard Edge Tint setting yields all spot-color components. The Soft Edge and Zoom settings for the Shadow tool, however, convert at least part of the resulting shapes to CMYK. The Extrude tool converts the parent object and its extruded sides to CMYK. The Smudge tool leaves the parent shape's spot color intact, but the trailing shapes are CMYK. The Shadow tool leaves the parent shape as spot color, but the shadow elements are composed of CMYK. There is one exception: The Hard Edge Tint setting for the Shadow tool just creates a duplicate of the parent shape, offsets the shadow shape, and screens back the content while maintaining the spot-color definition. It's hardly a shadowyou could achieve the same effect by duplicating the parent shape and applying a tint of the spot color. |


EAN: 2147483647
Pages: 132