Chapter 21: .NET Applications
 |
| |||||||||
In late 2001, Microsoft changed all the rules by introducing their new application development framework, known collectively as .NET (pronounced “dot net”). This object-oriented programming platform consists of a set of classes, known as the .NET Framework, as well as several new programming languages that build upon the Framework. .NET can be used to develop traditional desktop applications, as well as Internet/intranet applications (using the new flavor of Active Server Pages called ASP .NET). This chapter will familiarize you with the display of Crystal Reports from several different .NET program types.
The chapter assumes that the reader is not brand new to .NET development and has at least some experience writing applications in the new platform.
Desktop Applications
The traditional desktop application is not dead, even if many trends in development point to browser and Intranet-based development. In fact, the .NET Framework hopes to bring about more of a sort of hybrid application—one that relies on an Intranet backbone for data transferring but uses Windows forms as the primary user interface.
Crystal Reports can be viewed from the standard Windows Forms app in several different ways, with each way having its own pros and cons. You’ll see demonstrations of each method here.
Report Embedding
The first way to include a Crystal report in your application is to “embed” it right into the project and therefore the final executable. The advantage to this method is that you no longer have to distribute separate RPT files with your program. Follow the steps below to see a sample application that embeds a report into a Windows application:
-
Create a new Windows Forms application in either Visual Basic or C#.
-
Add a CrystalReportViewer control to the default form (you will need to scroll down in the toolbox to find it). Set the Dock property to Fill so that the viewer’s size expands as the form expands. Resize the form to a decent size so that most of parts of the Crystal Report Viewer are visible.
-
From the Solution Explorer, right-click the project name and select Add > Add Existing Item. In the Add Existing Windows dialog, change the file type to Crystal Reports and navigate on your hard drive to the location of an RPT file and select it. You should see the RPT file in your project and be able to edit the report using the Crystal Report Designer built into Visual Studio .NET.
Note Adding a Crystal report to your project in this way copies the RPT file from the location you specify into the project folder, so you will still have an unaltered copy of the report in its original location.
-
The act of adding the report to the project also created a wrapper class for the report. If you wish to see this class, click the Show All Files button at the top of Solution Explorer, and the Crystal Report node in the Treeview will be shown with a child node on it. Opening this node will reveal a VB or CS file with the same name as the Crystal report. Figure 21.1 shows the Solution Explorer with the embedded report and the generated class under it.
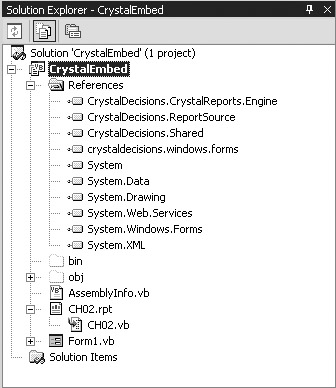
Figure 21.1. Solution ExplorerWarning You can look at the code in this file to see how Visual Studio .NET generates a class wrapper around the report, but you cannot edit this code because your changes will continually get overwritten as changes are made to the report and saved.
-
Add a ReportDocument instance to your project. This class is found in the Components tab of the toolbox. After you drag this class to your form (you can drop it on the Form Viewer that takes up the whole form), the Choose A ReportDocument dialog, shown in Figure 21.2, asks you to choose one of the report classes to tie to this ReportDocument object. This is an easy choice in this sample project, as only one report has been added to the project so far.
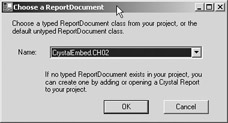
Figure 21.2. Choose A ReportDocument dialog -
Select the CrystalReportViewer object on your form and set the ReportSource property to the bound ReportDocument instance you just created. Figure 21.3 shows how this will appear in the Property Inspector.
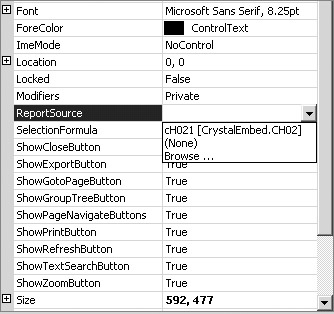
Figure 21.3. Property Inspector -
Run the project. All the hookups should be complete. Running the project should show you the desired Crystal report in the viewer, as shown in Figure 21.4.
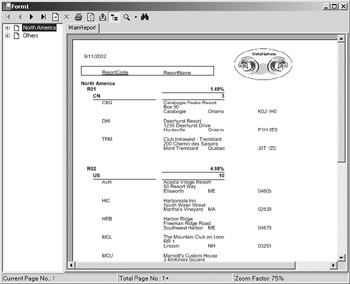
Figure 21.4. Report Viewer
Customizing the Report
Okay, you’ve embedded a report into a Windows Forms project. Usually, for a report to be useful, you must do some measure of runtime customization. For example, you often need to set the report selection criteria to specify a date range or otherwise limit the data displayed. Further customization is also possible, like suppressing detail sections to give the option of a summary-only report.
You can gain access to the Report objects through the ReportDocument object that you placed in the project. For example, this snippet of code sets the report-selection criteria:
cH021.RecordSelectionFormula = "{Resorts.ResortCode}='CBG'" aViewer.ReportSource = cH021 | Note | The formula we pass to the RecordSelectionFormula is the same syntax we use in Crystal Reports. |
Note that the second line of code rebinds the ReportDocument variable cH021 to the Crystal Viewer. This is a required step when doing any runtime manipulation to the Report object, even if you have already bound the ReportSource property to this ReportDocument variable at runtime.
Logging into a secure database is also done via the ReportDocument object. The following code snippet loops through all the tables in a report and sets the login credentials to the values found in four variables (possibly loaded from a CONFIG file, INI file, or the Registry):
Dim oTable As Table Dim oLogonInfo As TableLogOnInfo For Each oTable In cH021.Database.Tables oLogonInfo = oTable.LogOnInfo With oLogonInfo .ConnectionInfo.ServerName = FSQLServer .ConnectionInfo.DatabaseName = FSQLDatabase .ConnectionInfo.UserID = FSQLUser .ConnectionInfo.Password = FSQLPassword End With oTable.ApplyLogOnInfo(oLogonInfo) Next
You also have access to each individual report element in your report. For example, suppose you want to change the font of the report dynamically to match a user-selected font in your application. To do this, you would have to loop through every Report object and change the font. This is actually much easier than it sounds:
Imports CrystalDecisions.CrystalReports.Engine Imports CrystalDecisions.Shared Private Sub cbFontClick(ByVal sender As System.Object, _ ByVal e As System.EventArgs) Handles cbFont.Click Dim oSec As Section Dim o As ReportObject Dim f As New Font("Arial", 8, FontStyle.Italic) For Each oSec In cH021.ReportDefinition.Sections For Each o In oSec.ReportObjects Select Case o.Kind Case ReportObjectKind.FieldObject With CType(o, FieldObject) .Color = Color.Red .ApplyFont(f) End With Case ReportObjectKind.TextObject With CType(o, TextObject) .Color = Color.Red .ApplyFont(f) End With End Select Next Next aViewer.ReportSource = cH021 End Sub This code loops through every object in every section of the ReportDocument variable, which is named ch021 (this is the default name given to a variable of class ch02, which is the name of the wrapper class generated around the RPT file we imported into the project earlier). It looks for all of the FieldObjects and TextObjects in each section and, when found, changes their font to red, italic, 8 point, Arial.
The object model within the ReportDocument object gives you access to every element within the report, including all of the fields, sections, formulas, parameters, summary information, database connectivity information, and printer options. See the online help for the ReportDocument object for a complete reference to customizing the report at runtime.
Customizing the Viewer
You can also customize the CrystalReportViewer control itself in a number of ways. Each of the buttons at the top of the report, as well as the group tree to the left of the viewer, can be shown or hidden. The following code example shows or hides all of the buttons at the top of the viewer and the toolbar based on the value of a check box:
'checkbox reading "bare bones viewer". When checked, turn stuff off Dim bShow = Not cbViewer.Checked With aViewer .DisplayToolbar = bShow .DisplayGroupTree = bShow End With
You also have access to each individual button on the tool. If you wanted to prevent the user from being able to export or print from the viewer, for example, then you can simply turn those two buttons off:
With aViewer .ShowExportButton = false .ShowPrintButton = false End With
Handling Events
The viewer fires off a number of events that allow you to create interactivity with it. The complete list of events is Drill, DrillDownSubreport, HandleException, Navigate, ReportRefresh, Search, and ViewZoom (see the Visual Studio .NET online help for an explanation of what each event does).
The short event handler below updates a label named lbPage with the current page number in the viewer. It also plays a trick on the user of the program in that it prevents the user from navigating to page 3 of the report by setting the Handled property to True. Setting the Handled variable to True tells the Crystal Report Viewer that you have handled the Navigate event yourself, so it should not continue performing this function.
Private Sub aViewer_Navigate(ByVal source As Object, _ ByVal e As CrystalDecisions.Windows.Forms.NavigateEventArgs) _ Handles aViewer.Navigate If e.NewPageNumber = 3 Then e.Handled = True Else lbPage.Text = "Page " & e.NewPageNumber End If End Sub
Loading Reports on the Fly
There are definite benefits to embedding all of the Crystal Reports into an application, but there are drawbacks as well. Many times, an end user will ask for a simple change to a report (such as adding an underline or changing a font). This change can be done very quickly in a freestanding Crystal report, but making a change to an embedded report would require a recompile of the application.
The alternative to embedding the reports in an application is to leave the RPT files loose and load them into a CrystalReportViewer object at runtime. This has the disadvantage of not being able to edit your reports directly in Visual Studio .NET, but some might argue that the Report Editor that comes with Crystal Reports 9 is easier to use anyway.
Crystal Reports 9 comes with a sample .NET project that demonstrates the dynamic loading of reports in this way. The project is called Simple and by default is located in the folder C:\Program Files\Crystal Decisions\Crystal Reports 9\Samples\En\Code\.NET\WinForms\VB or C:\ Program Files\Crystal Decisions\Crystal Reports 9\Samples\En\Code\.NET\WinForms\C# (choose your favorite language).
The project consists of a CrystalReportViewer on a form, with a single button. The code behind the button is shown in Listing 21.1 and is the only code in the application.
Listing 21.1: Simple.sln
Private Sub btnSelectReport_Click(ByVal sender As _ System.Object, ByVal e As System.EventArgs) _ Handles btnSelectReport.Click Dim dlg As New OpenFileDialog() dlg.Title = "Select Crystal Reports file" dlg.Filter = "Crystal Reports (*.rpt)|*.rpt|All Files (*.*)|*.*" dlg.InitialDirectory = "C:\Program Files\Microsoft Visual ®Studio.NET\Crystal Reports\Samples\Reports" If (dlg.ShowDialog() = DialogResult().OK) Then Me.Cursor = Cursors.WaitCursor crystalReportViewer().ReportSource = dlg.FileName Me.Cursor = Cursors.Default End If End Sub
This code displays a common dialog box and prompts the user to locate an RPT file on disk, and then it displays the report in the viewer by setting the viewer’s ReportSource property. Could it be any easier?
If the report being loaded from disk needs no further modification, then loading the report using this method works perfectly well. If the report does need runtime modifications like those demonstrated above, the method of loading shown here bypasses the use of the ReportDocument object. While the code above gets the report shown on the screen, it makes it a bit more difficult to customize the report later using all of the techniques described in the previous section. By changing the above example very little, we can achieve the same result but use a ReportDocument object so we can have access to all of the cool customization features. Listing 21.2 shows the modified code.
Listing 21.2: A Bit Less Simple.sln
Private Sub Button1_Click(ByVal sender As _ System.Object, ByVal e As System.EventArgs) _ Handles Button1.Click Dim dlg As New OpenFileDialog() Dim oDoc As ReportDocument dlg.Title = "Select Crystal Reports file" dlg.Filter = "Crystal Reports (*.rpt)|*.rpt|All Files (*.*)|*.*" dlg.InitialDirectory = "C:\Program Files\Microsoft Visual ®Studio.NET\Crystal Reports\Samples\Reports" If (dlg.ShowDialog() = DialogResult().OK) Then Me.Cursor = Cursors.WaitCursor Try oDoc = New ReportDocument() oDoc.Load(dlg.FileName, OpenReportMethod.OpenReportByTempCopy) crystalReportViewer.ReportSource = oDoc Finally Me.Cursor = Cursors.Default End Try End If End Sub
There are really only two lines that differ, with a Try..Except exception-handling block thrown in for good measure. The oDoc variable is of the coveted ReportDocument type, and this variable is loaded with the report chosen by the user in the OpenFileDialog. The ReportDocument variable is then passed as the ReportSource of the viewer. By performing this intermediate step, you now have access to all of the customization abilities shown in the previous section.
Application Deployment
Once you’ve created a Windows Forms application, you often need to create a Setup project in order to deploy it on end-user machines. .NET applications are much easier to deploy than previous Visual Basic projects, but there are still some "gotchas" that you need to look out for.
The first thing to obviously make sure of is that you include any RPT files in your setup application that your program may load on the fly. Embedded reports need not be considered because, by definition, they are embedded in the application.
There are also some specific dependencies for Crystal Reports that must be installed on the end-user machine. These dependencies are called merge modules and are part of a Setup and Deployment project. To create a Setup and Deployment project, first open the Windows Forms solution that you wish to deploy, then select Add Project from the File menu. Navigate to Setup And Deployment Projects in the Project Types list, and select Setup Project from the Templates list, as shown in Figure 21.5. Give your project an appropriate name and click OK.
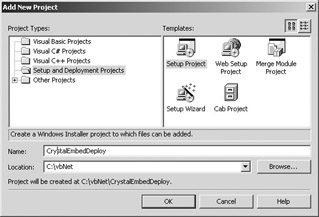
Figure 21.5. Creating a Setup and Deployment project
Once you’ve created the Setup and Deployment project, right-click the project name and select Add > Merge Module, as shown in Figure 21.6.
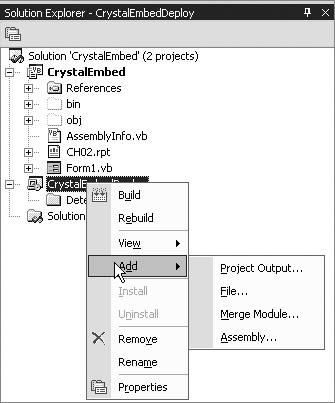
Figure 21.6. Adding merge modules
From the dialog that comes up, select the following merge modules:
Managed.msm
Database_Access.msm
Database_Access_enu.msm
Regwiz.msm.
When you add this last merge module, you will be prompted to type in your Crystal Reports license key if you have not done so in a previous project. Once you’ve entered these merge modules, along with all the other application-specific files you wish to deploy in this project, you can build the Setup project ( choose Rebuild Solution or Rebuild <projectname> from the Build menu), and all of the runtime libraries required for your program to display Crystal Reports properly will be created for you. Figure 21.7 shows the final output of the Setup project: a Setup.exe file, an MSI file, and some other support files.
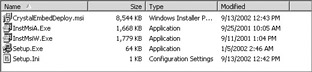
Figure 21.7. Setup project output
Running Setup.exe on an end user’s machine will make your application available for use on that computer.
| Use of content on this site is expressly subject to the restrictions set forth in the Membership Agreement | |
| Conello © 2000-2003 Feedback | |
EAN: 2147483647
Pages: 217