Levels
Levels are used to make exact adjustments to the tonal range of a layer or selection. Levels precisely adjust highlights, midtones, and shadows using a histogram. A histogram is a graph that shows the number of pixels at each level of brightness in a layer or selection.
Take a look at Color Plate 9-5 to see Levels in action. The figures in the color plate show histogram levels and how changing the tonal ranges affect the image. Compare how manually changing levels differs from the change made by the Auto Levels command.
To adjust color and tone using Levels:
-
Use the Layers palette to select a layer or the Background.
You also can set levels using an adjustment layer. To do this, click the Create new fill or adjustment layer button at the bottom of the Layers palette and choose Levels from the menu. If you create an adjustment layer, skip to Step 4. (To find out more about adjustment layers, turn to Chapter 8.)
-
If you want to use Levels on only part of the layer or selection, use the selection tool of your choice.
For directions on how to use the selection tools, turn to Chapter 7.
-
Choose Image→Adjustments→Levels.
Using the Levels dialog box shown in Figure 9-5, you can make exact adjustments to the shadows, midtones, and highlights.
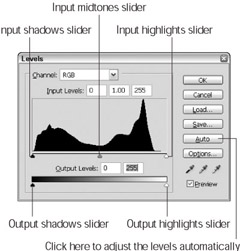
Figure 9-5: The Levels dialog box lets you set highlights, midtones, and shadows using input and output sliders. -
Make sure the Preview check box is checked.
-
If you’re a first-time user, leave RGB selected in the Channel drop-down list.
Tip If you’ve never used the Levels dialog box before, leave the Channel drop-down list set to RGB so that you can experiment with setting the levels for all the channels at the same time. After you have used the Levels dialog box and understand how it works, then try experimenting with setting each channel individually.
-
Use the various sliders shown in Figure 9-5 to adjust the shadows, midtones, and highlights.
-
To brighten highlights and increase contrast, move the Input highlights slider to the left.
-
To adjust the midtones lighter or darker, move the Input midtones slider left or right, respectively.
-
To darken shadows, move the Input shadows slider to the right.
-
To lighten the image and decrease contrast, move the Output shadows slider to the right.
-
To darken the image and decrease the contrast, move the Output highlights slider to the left.
As you move the sliders, watch the image to see the changes you are making.
-
When you’re finished adjusting the levels, click OK.
If you don’t like the levels changes you’ve made, click the Cancel button.
EAN: 2147483647
Pages: 221