Printing Picture Package Prints
Ever go to a big store at the mall dressed in your best to get your portrait taken? Chances are when you ordered your photographs, you chose from different picture packages containing maybe one 5 x 7 for your mother, a 4 x 6 for your dog, and a million wallet-sized photos that you never know what to do with.
Well, with Photoshop you can create and print custom picture packages, and if you don’t want 27 wallet-sized photos, you don’t have to include them. Follow these steps to set up your own picture package:
-
Choose File→Automate→Picture Package.
The Picture Package dialog box (shown in Figure 6-7) appears, ready for action.
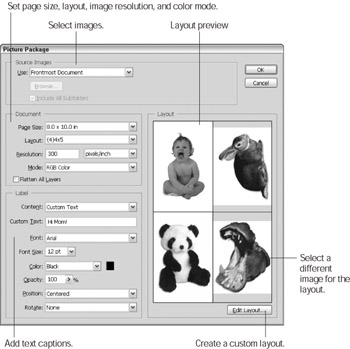
Figure 6-7: Creating enough pictures for your whole clan is easy. (Don’t forget Mom!) -
Choose a Page Size and Layout.
In the Document area, you can select from three different page sizes and a whole slew of layout options — and there’s even a layout option that will print a million tiny wallet-sized photos (nah, just kidding!).
Tip If you have a hankering to create a personalized layout, you can use the Picture Package Edit Layout dialog box. To access it, click the Edit Layout button at the lower right corner of the Picture Package dialog box.
-
Find the images you want to use.
With the Use drop-down list in the Source Images area you can select File, Folder, Frontmost Document, or Selected Images from the File Browser. If you select a folder or file, click the Browse button to locate said folder or file. If you have several images open in Photoshop, the Frontmost Document choice refers to the image that is active (it is in front of the other images and its title bar is not grayed out).
-
To create a Picture Package with more than one image, click on one of the thumbnails in the preview area.
The Select an Image dialog box appears, letting you select a file for that position in the picture package.
-
Specify Resolution and Color Mode.
Depending on what you are preparing the picture package for — as a catalog page for the Web, printed as gifts for your family — you will need to set the proper resolution and color mode. If you need to refresh your knowledge about resolution, take a look at Chapter 4; for information about color modes look at Chapter 5.
-
Check the Flatten All Layers option to squash your image, if you want to.
When this option is checked, all the layers are flattened together onto one layer. If this option is not checked, Photoshop automatically puts each of your images and labels on a separate layer, that way you can edit the captions and move the images around before printing, if you want to.
-
Select the content for picture captions and format them, if you wish to add them.
If you want to add text or a description to the picture package, use the Content drop-down box in the Label area to select a descriptive item such as the image’s filename, copyright information, a description, image credit, title or custom text. If you choose to add custom text, use the Custom Text box to type a personalized caption.
-
Click OK.
Photoshop roars into action with amazing speed and agility, creating your picture package in the blink of an eye (actually, it might take 5 or 10 blinks depending upon how many images you selected). When Photoshop is done, a picture package something like the one shown in Figure 6-8 appears in the image window.
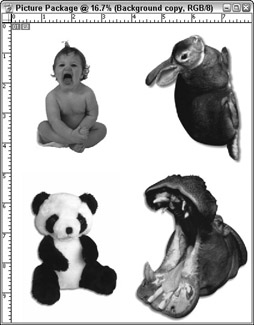
Figure 6-8: Making presents for friends and family are especially easy! -
Save the picture package and then print it.
| Tip | You can also access the Printer Package plug-in via the Automate menu in the File Browser. For more about the File Browser and how to use it, turn to Chapter 3. |
EAN: 2147483647
Pages: 221