Image Maps
An image map designates where specially selected areas or hotspots appear on an image in a Web page. Each hotspot is linked to a URL. When people browsing the Web page click the hotspot, they are transported to the URL.
Using the tools in ImageReady, you can create irregularly shaped image maps that follow the contour of an image. In addition, you can create image maps using layers.
Creating an image map using layers
Using ImageReady, you can create an image map using the colored pixels on a layer. If you edit the layer — move it, transform it, or edit it in any way — ImageReady automatically updates the layer-based image map.
To create an image map, follow these steps:
-
In ImageReady, use the Layers palette to select a layer.
Remember The layer that you use to create a layer-based image map must contain transparent areas; otherwise, the entire layer will be one giant image map.
-
Choose Layer→New Layer Based Image Map Area.
-
In the Image Map palette, select a shape for the hotspots.
Use the Shape drop-down list to create square, circular, or polygonal hotspots. Figure 19-7 shows polygonal hotspots around the dice.
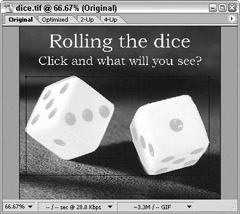
Figure 19-7: The dice on the dice layer are surrounded by polygonal hotspots. -
In the Image Map palette, enter a Web address in the URL text box.
When you enter the Web address in the URL text box, be sure to type http:// before the Web address (it should look something like this: http://www.dummies.com). In addition, enter alternate text in the Alt text box as shown in Figure 19-8. This text will appear when someone browsing the Web page passes the mouse over the hotspot and while waiting for graphics to load.
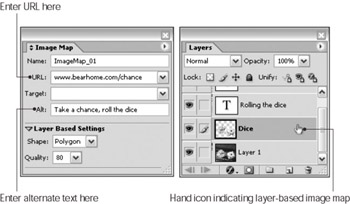
Figure 19-8: As soon as you enter a URL in the Image Map palette, a tiny hand icon appears near the layer name, indicating that the layer contains an image map.When the URL is entered in the Image Map palette, a tiny hand icon appears near the layer name in the Layers palette. This hand icon indicates that the layer contains a layer-based image map.
-
Repeat Steps 1–4 to create image maps using any other layers.
 Preview the image in a browser by clicking the Preview in Browser button in the Toolbox. Previewing the image enables you to test out the hotspots you created. You can also optimize and save the layered image with its image map as described in Chapter 18, then upload the image and associated HTML file that ImageReady generates to your Web service provider.
Creating an image map using tools
Using the image map tools in the ImageReady Toolbox, you can create image map hotspots that are shaped around the contours of image elements.
-
 Select either the Rectangle Image Map, Circle Image Map, or Polygon Image Map tool from the Toolbox.
 -
Create the hotspot around the area.
If you selected the Rectangle Image Map tool or Circle Image Map tool, drag a rectangular or circular area in the image window.
If you selected the Polygon Image Map tool, click where you want the image map boundary to start, and then continue to click around the contour of the area. When you have surrounded the area, double-click to close the image map, or click the starting point to close the shape.
Figure 19-9 shows the Polygon Image Map tool in action, creating a polygonal hotspot around the left die.
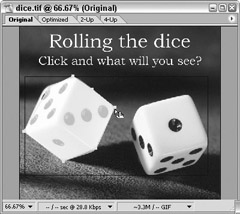
Figure 19-9: Use the image map tools in the Toolbox to create hotspots around Web page elements. In this figure, the left die has been mapped. -
In the Image Map palette, enter a Web address in the URL text box.
When you enter the Web address in the URL text box, be sure to type http:// before the Web address. In addition, enter alternate text in the Alt text box (refer to Figure 19-8).
-
Repeat Steps 1–3 to create another image map hotspot.
If you preview the image in a browser by clicking the Preview in Browser button in the Toolbox, you can test out the hotspots you created. You also can optimize and save the layered image with its image map as described in Chapter 18, and then upload the image and associated HTML file that ImageReady generates to your Web service provider.
Working with image maps
You can convert layer-based image maps to tool-based image maps, change their shape, hide them if you need to edit an image or work on another aspect of a Web page, and, of course, delete them. Here are the basics:
- To convert a layer-based image map to a tool-based image map: Use the Image Map Select tool to select the image map you want to convert. Then, choose Promote Layer Based Image Map Area from the Image Map palette menu as shown in Figure 19-10. Only tool-based image maps can be reshaped, so it’s important to know how to convert a layer-based image map if you want to reshape an image map area.
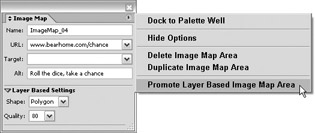
Figure 19-10: Choose promote Layer Based Image Map Area from the Image Map palette menu to convert a layer-based image map to a tool-based image map. -
To reshape a tool-based image map: Select the Image Map Select tool from the Toolbox. Select the image map you want to reshape in the image window. Drag the image map boundary handles to reshape the image map as shown in Figure 19-11.
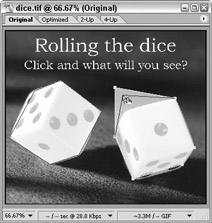
Figure 19-11: Drag the image map boundary handles to reshape the image map area. -
To duplicate an image map: Use the Image Map Select tool to select the image map you want to copy. Then choose Duplicate Image Map Area from the Image Map palette’s menu. You can then use the Image Map Select tool to move the duplicate image map to the place where you need it.
-
To hide image maps in the image window: Choose View→Show→Image Maps. Choose the Image Maps command again to view the image maps.
-
To delete an image map: Use the Image Map Select tool to select the image map you want to delete. Then choose Delete Image Map Area from the Image Map palette’s menu.
EAN: 2147483647
Pages: 221
- ERP System Acquisition: A Process Model and Results From an Austrian Survey
- The Effects of an Enterprise Resource Planning System (ERP) Implementation on Job Characteristics – A Study using the Hackman and Oldham Job Characteristics Model
- Data Mining for Business Process Reengineering
- Healthcare Information: From Administrative to Practice Databases
- A Hybrid Clustering Technique to Improve Patient Data Quality