Web Image Basics
There is a basic formula for creating an image for the Web — create an RGB image in Photoshop, adding all the bells and whistles that Photoshop has to offer, save it, jump to ImageReady, create any special animations or Web effects that you need in ImageReady, then save the image for Web output using the options the Optimize palette has to offer.
When you choose optimization settings, there are four key issues you’ll have to keep in mind: the dimensions of the image (its height and width), the number of colors used in the image’s color palette, the bit depth or color depth of the image (this is the amount of color information available for each pixel), and the file format the image is saved in (GIF, JPEG, or PNG).
Image size
The first thing you need to do when creating images for the Web is to consider the size of the viewing area and image resolution. There’s a little formula you can use to figure out how large the image area is that you’ll be designing for:
Viewing area width / image resolution = max pixel width
Viewing area height / image resolution = max pixel width
When selecting screen area settings for a computer monitor, three possible settings are available: 640 pixels x 480 pixels, 800 pixels x 600 pixels, and 1024 pixels x 768 pixels.
The most common setting for most computers that folks use is 800 pixels x 600 pixels, so Web images should typically be created for this screen size. Also, remember that the browser window takes up some of the screen real estate, so you’ll need to decrease the width and height of your image by about an inch, making the viewing area about 720 pixels wide x 530 pixels high.
Images created for the Web should be set a 96 ppi (pixels per inch). A higher image resolution just makes the file size bigger and does not increase image quality.
| Tip | Mac monitors view images at 72 ppi, whereas Windows monitors view images at 96 ppi. Setting Web images at 96 ppi lets both types of monitors view Web graphics equally well. |
So, to plug the numbers in to the formula from above:
720 pixels wide / 96 ppi = 7.5 inches wide
530 pixels high/ 96 ppi = 5.5 inches high
How does this formula affect you as a Web graphics creator? The most important thing is to remember that the combined widths and heights of the design elements on the Web page must be smaller than these dimensions. For instance, suppose you want to create a horizontal navigation bar that runs along the top of the Web page. From the formula above, you’ll know that it should be less than 720 pixels wide (and even smaller if you want to center the navigation bar and have a bit of space on either end).
Colors and color depth
Color depth (or bit-depth) determines how much color information is available for each pixel in an image. The lower the color depth in an image, the fewer colors the image can contain. Fewer colors and smaller color depth in a Web graphic reduces file size, making the graphic load faster in a Web page.
Reducing the number of colors and the color depth in an image can result in grainy looking edges and colors that are less vibrant, so you have to find out where the balance is between file size and image display quality. Table 18-1 shows the relationship between the number of colors an image has in its palette and the color depth of the image.
| If an Image Has This Many Colors. . . | Then Its Color Depth Is. . . . |
|---|---|
| 256 | 8 |
| 128 | 7 |
| 64 | 6 |
| 32 | 5 |
| 16 | 4 |
| 8 | 3 |
| 4 | 2 |
| 2 | 1 |
You can reduce the number of colors and the color depth in an image using Photoshop’s File→Save for Web command or ImageReady’s Optimize palette. Both features let you preview how an image looks with fewer colors before you save it that way. (Both the Save for Web command and the Optimize palette are discussed in “Saving Web Files” later in this chapter.)
Dithering
Dithering is the term used to describe the mixing of two colors that are available in an image’s color palette to create an approximation of a color that is not available in the color palette. Dithering is used to make images that have a fewer colors look like they have more colors and shades.
Alas, dithering is not a sure fix. Although it can create the impression of more colors, it can give an image a grainy look, as shown in Figure 18-8.
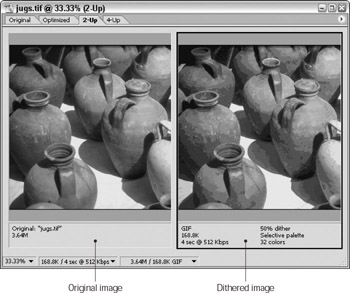
Figure 18-8: When an image is dithered, it does appear to have more colors, but it can become grainy looking.
| Tip | Dithering tends to work best with photographic images that contain gradual changes in color and tone. |
Anti-aliasing
Anti-aliasing is the term used to describe the blending created between an object’s edges and the background. When an object is anti-aliased, increasingly transparent pixels are added to the object’s edges to help smooth the transition. If an object is not anti-aliased, its edges appear sharper because there is no blending transition. Figure 18-9 shows an anti-aliased image (left) with an area magnified (right) to make the anti-aliasing more apparent.
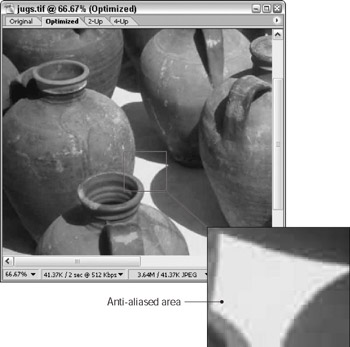
Figure 18-9: The trans-parent pixels in this anti-aliased image make a smooth transition to the background (left). When a portion of the image is magnified, the anti-aliasing becomes more apparent (right).
When saving an image for the Web, you can control how much anti-aliasing is used in the image by using the Matte setting. This setting is available when you use the Save for Web command in Photoshop or the Optimize palette in ImageReady. (Both the Save for Web command and the Optimize palette are discussed in “Saving Web Files” later in this chapter.)
Selecting Web-safe colors
ImageReady and Photoshop both offer a Web Safe Color palette. The Web Safe Color palette is made up of the 216 colors that the Windows and Mac browsers have in common. To load the Web Safe Color palette in either program choose Window→Swatches to open the Swatches palette. Choose Web Safe Colors from the palette menu, as shown in Figure 18-10. A dialog box appears, asking whether you want to replace the current swatches with Web Safe Colors. Click Replace. From here on out, only Web Safe Colors are available in the Swatches palette.
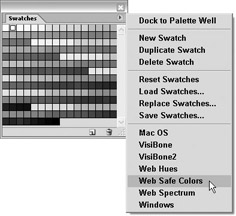
Figure 18-10: Use the Swatches palette menu to select Web Safe Colors.
Compression and Web file formats
You can choose one of three Web graphic file formats: GIF, JPEG, and PNG. Each format has its strengths and weaknesses. And each file format uses a mathematical compression formula to reduce the file size of an image and make it load faster on the Web.
GIF file format
The GIF file format can contain 8-bits (8 color levels) and up to 256 colors. This file format is best for high-contrast images with sharp edges, including type. The GIF file format is used to retain transparency and create animations.
JPEG file format
The JPEG file format can contain 24-bit images with millions of colors. This file format works best for photographs and images that display subtle color changes, such as lighting effects.
But there’s a trade-off with this file type (actually, there are two):
-
That large 24-bit JPEG image can be compressed down to the size of an 8-bit GIF, but when the JPEG is loaded into a Web browser, the file has to be decompressed, which takes time.
-
JPEG uses lossy compression, meaning that some file information is lost each time a JPEG is opened, edited, saved, and closed in either Photoshop or ImageReady. So, when creating an image for JPEG format, finish all editing before saving it as a JPEG.
PNG file format
The PNG file format was originally created to replace the GIF format (because of patent disputes) and is actually an improvement upon the old GIF standard.
The PNG file format saves transparent pixels using a process called alpha transparency. Alpha transparency is divided up into 256 levels of opacity, from totally transparent to totally opaque. In a PNG image, each pixel is assigned an alpha transparency setting.
There are two PNG formats, PNG-8 and PNG-24. PNG-8 can contain up to a maximum of 256 colors (8-bits, hence the -8 after PNG). PNG-24 can contain millions of colors and is similar to the JPEG file format. Because both PNG formats use lossless compression, no data is lost when images are saved and resaved.
The PNG format is great but there are a few drawbacks.
-
You can’t save animations as PNG files.
-
PNG-24 files don’t compress as much as JPEG files, so file size is bigger.
-
The PNG format is only supported by the later file browsers: Microsoft Internet Explorer 4.0 and later, and Netscape Navigator 6 and later, and Safari, the new standard browser on the Mac.
Optimization
When creating images for the Web, you’ll need to keep in mind the four key issues that are discussed in this section: image dimensions, the number of colors an image has, the image’s color depth, and file format the image is saved in.
Each issue has its plusses and minuses.
As you discover in the “Color and color depth” section, there’s a balance between reducing the number of colors (thereby reducing the file size) and maintaining image quality. Dithering and anti-aliasing can help when the color palette is reduced, but both options can add a grainy quality to an image. In addition, dithering adds extra information in a file, thereby increasing file size.
In the “Compression and Web file formats” section, I explain that not all file types are created equal. One is great for saving animations (GIF), another is great for saving photographs, but loses image data each time it’s saved (JPEG), and another handles transparency like a GIF file and can save photographs, but doesn’t compress as much (PNG).
What to do? Photoshop and ImageReady are there to help you make the choices when saving graphics for the Web. Both the Optimize palette in ImageReady and the File→Save for Web command in Photoshop help you select the correct file type for your image and all the options such as dithering, anti-aliasing, and transparency while letting you preview the image before saving. Turn to the next section, “Saving Web files,” for a discussion of both these features.
EAN: 2147483647
Pages: 221
- Integration Strategies and Tactics for Information Technology Governance
- A View on Knowledge Management: Utilizing a Balanced Scorecard Methodology for Analyzing Knowledge Metrics
- Managing IT Functions
- Governing Information Technology Through COBIT
- Governance Structures for IT in the Health Care Industry