Reshaping and Transforming Paths
When you reshape a path you can drag anchor points to move segments and drag direction points to change the curve of a segment. You also can add and delete anchor points and convert anchor points from smooth points to corner points and vice versa.
With the entire path selected you can use the transformation commands found on the Edit menu to scale, rotate, skew, distort, and add perspective to an entire path. If you select a few anchor points along a path, you also can use the transformation commands on those selected points, transforming only a portion of the path.
After you are pleased with the shape of a path, you can fill it, add an outline to the path by applying a stroke, and convert it to a selection.
Reshaping a path
As you reshape a path, you’ll use the Direct Selection tool to drag anchor points and direction points, the Add Anchor Point tool and Delete Anchor Point tool to add anchor points to and remove anchor points from the path, and the Convert Point tool to change corner points into smooth points and vice versa.
-
Select the path you want to reshape in the Paths palette.
The path will appear in the image window.
-
 Select the Direct Selection tool from the Toolbox.
 -
Click on the path in the image window to view its anchor points.
-
Start reshaping the path.
Figure 16-16 shows a path being reshaped, anchor points being added and removed, and anchor points being converted from one type to another.
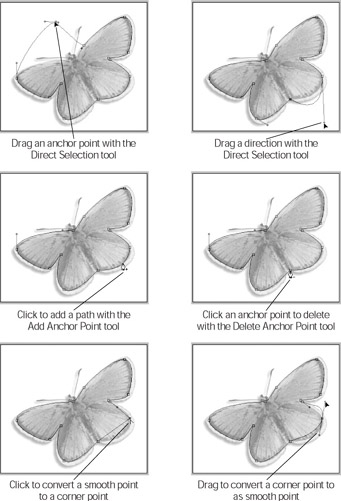
Figure 16-16: You can move segments, anchor points, and direction points to reshape a path.-
To move a segment of the path: Drag an anchor point or drag the segment.
-
To change the shape of a segment: Select an anchor point by clicking it (the tiny anchor point changes from a hollow square to a filled one), and then drag the direction point. If you move a selection point connected to a smooth point, the two segments on either side of the smooth point also move. If you move a selection point connected to a corner point, only the segment near the selection point moves.
-
 To add an anchor point to a path: Select the Add Anchor Point tool from the Toolbox, position the mouse over the line segment where you want to add the anchor point, and then click.
 -
 To delete an anchor point from a path: Select the Delete Anchor Point tool from the Toolbox, position the mouse over the anchor point you want to delete, and then click.
 -
 To convert a smooth point into a corner point: Select the Convert Point tool from the Toolbox, position the mouse over the smooth point you want to change and click.
 - To convert a corner point into a smooth point: Select the Convert Point tool from the Toolbox, position the mouse over the corner point you want to change, press the mouse button, and drag.
-
-
When you are finished reshaping the path, click outside the path to deselect it.
Transforming paths and points
Using the Direct Selection tool, you can select an entire path for transformation or you can select just a few anchor points.
-
Select the path you want to transform in the Paths palette.
The path appears in the image window. If you are transforming the entire path, skip to Step 3.
- Select the Direct Selection tool from the Toolbox and use it to select the anchor points you want to transform.
To select an anchor point, position the mouse pointer over the anchor point and click. To select multiple anchor points, hold down the Shift key while clicking.
-
Choose a transformation command from the Edit→Transform menu.
Depending upon whether you are transforming an entire path or are transforming selected anchor points, choose either the Transform Path option or Transform Points option.
As shown in Figure 16-17, a box with handles appears around either the entire path or the selected points.
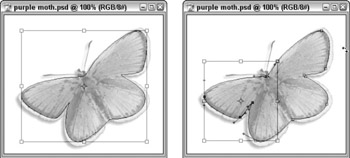
Figure 16-17: Drag the handles to perform a transformation on an entire path (left) or on selected anchor points (right). -
Drag the handles to perform the transformation.
Transformations are discussed in detail in Chapter 7.
- When the transformation is complete, click the Commit button on the Options bar to accept the transformation.
 Click the Cancel button on the Options bar to cancel the entire transformation.
Filling a path
Paths can be filled with solid color, a pattern, or imagery from a history state using the History palette. (History states and the history palette are discussed in detail in Chapter 14.) Here’s how to fill a path:
-
Select the path you want to fill in the Paths palette.
You can fill either a closed path or an open path.
- Select the Direct Selection tool from the Toolbox.
-
Use the Layers palette to select the layer on which you want the fill to appear.
Remember Only a fill appears — not an outline of the path. To create an outline of a path, turn to “Adding a stroke to a path” later in this chapter.
-
Select the color, pattern, or history state that will fill the path.
-
To fill the path with a solid color: Choose a Foreground color using the Color picker, the Color or Swatches palette, or the Eyedropper tool.
-
To fill a path with imagery from a history state: In the History palette click in the column to the left of the state you want to use. The tiny History Brush icon appears next to the history state.
-
To fill a path with a pattern: Select a pattern using the Fill Path dialog box discussed in Step 5.
-
-
Right-click (Control+click on a Mac) inside the path and choose Fill Path from the context-sensitive menu.
In the Fill Path dialog box shown in Figure16-18, you can select a fill, blending mode, and opacity.
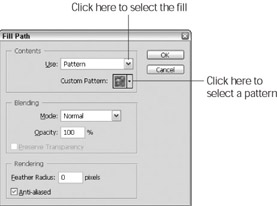
Figure 16-18: Use the Fill Path dialog box to fill the path with the Foreground color, a pattern, or imagery from a history state. -
In the Contents area, select a fill type from the Use drop-down list.
Select Foreground Color, History, or Pattern. If you choose Pattern, select a pattern using the Pattern picker in the dialog box.
-
Click OK to close the dialog box and fill the path.
As shown in Figure 16-19, the pattern fills the entire path area but doesn’t add an outline to the path. (See the next section “Adding a stroke to path” for directions on how to do this.)
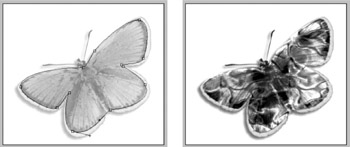
Figure 16-19: The original path is shown on the left and the filled area is shown on the right.Tip To quickly fill a path with the current Foreground color, click the Fill path button at the bottom of the Paths palette.
Adding a stroke to a path
You can use the attributes — brush size and hardness, opacity, blending mode, flow, and so on — from many of the painting tools to add a line around a path (a stroke).
-
Use the Paths palette to select the path you want to stroke.
You can select either an open path or a closed path. Figure 16-20 shows the selected path in the Paths palette and the image window.
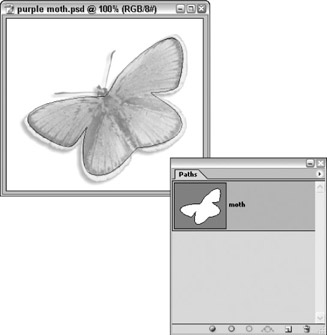
Figure 16-20: Select a path in the Paths palette that you want to stroke. -
In the Layers palette, select the layer where you want the stroke to appear.
-
Choose a tool from the Toolbox.
There are 15 tools you can choose from to create the stroke. They are shown in Figure 16-21.
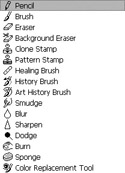
Figure 16-21: These are the tools you can choose from to create the stroke. -
Use the Options bar to select settings for the tool you selected in step 3.
Using the Options bar, you can use the Brush Preset picker to select a brush and hardness, a blending mode, opacity, airbrush capabilities, flow, and any other options associated with the tool.
-
Select a Foreground color.
-
Click the Stroke path button at the bottom of the Paths palette (shown in Figure 16-20).
Figure 16-22 shows the path from Figure 16-20 with a stroke.
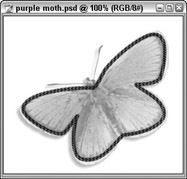
Figure 16-22: The path stroked with a custom brush stroke selected using the Brushes palette.
Converting paths to selections
After creating a path, you can quickly turn it into a selection by selecting the path in the Paths palette, and then clicking the Load path as selection button at the bottom of the Paths palette.
EAN: 2147483647
Pages: 221