Adjusting Your Eraser
The Eraser tool comes in three eraser modes. To switch modes, select an option from the Mode drop-down list on the Options bar shown in Figure 14-1.

Figure 14-1: The Options bar offers three eraser modes: Brush, Pencil, and Block.
Two eraser modes Brush and Pencil, work with brushes. You change the eraser’s size by changing the brush size in the Brush Preset picker. In addition, you can adjust the Opacity setting to partially reveal the image or, in a layered image, make pixels only partially transparent. (For a refresher on changing brush size and opacity, review Chapter 12.)
The third option, Block, changes the eraser to the square, hard-edged, fixed-size eraser. The options in the Brushes palette aren’t available for the block eraser, nor are the Opacity slider bar or any of the other settings on the Options bar, except Erase to History. The Block Eraser can be useful when you want to completely erase general areas, but you probably won’t take it up very often.
Figure 14-2 shows the Eraser tool in action. The image consists of two layers. The upper layer shows a checkered flag. The lower layer shows crayons. In my example, I made sure the Lock transparent pixels button in the Layers palette wasn’t selected. Then, on the left side of the image I erased the upper layer’s pixels to transparency, revealing the crayon layer beneath. Next, I selected the Lock transparent pixels button on the Layers palette and erased again, this time on the right side of the image. With the Lock transparent pixels button selected, the Eraser tool erased to the default Background color (white) leaving a white area.
The Magic Eraser tool
![]() If you’re familiar with the Magic Wand tool (see Chapter 7), then the Magic Eraser tool is a cinch. The Magic Wand tool and the Magic Eraser tool operate virtually identically, except that the wand selects and the eraser erases.
If you’re familiar with the Magic Wand tool (see Chapter 7), then the Magic Eraser tool is a cinch. The Magic Wand tool and the Magic Eraser tool operate virtually identically, except that the wand selects and the eraser erases.
When you click a pixel with the Magic Eraser tool, Photoshop identifies a range of similarly colored pixels, just as it does with the Magic Wand tool. But instead of selecting the pixels, the Magic Eraser tool makes them transparent, as shown in Figure 14-3.
| Remember | In Photoshop transparency requires a separate layer. So if the image is flat, consisting of only the Background layer, Photoshop automatically moves the image to a new layer. Any erased areas become transparent. Hence the checkerboard pattern denoting transparency as shown in Figure 14-3. |
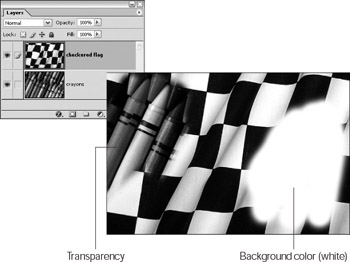
Figure 14-2: I erased the flag layer on the left side to trans-parency, revealing the crayons layer. On the right side, I erased the upper layer to reveal the white Background color.
Notice in Figure 14-3 that the Magic Eraser tool deleted some portions of the white squares, but not all of them. This is a function of the Tolerance value on the Options bar. Just like the Magic Wand tool’s Tolerance value, the Magic Eraser tool’s Tolerance value determines how similar a neighboring color has to be to the clicked color to be made transparent. A higher value affects more colors; a lower value affects fewer colors.
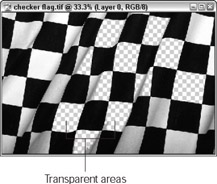
Figure 14-3: Clicking on several white areas of the checkered flag with the Magic Eraser tool leaves transparency (shown in Photoshop with the checkerboard pattern).
The other options work as follows:
-
Anti-aliased: To create a soft fringe around the outline of your transparent area, leave this option selected. If you prefer a hard edge — as when using a very low Tolerance value, for example — deselect this option.
-
Contiguous: To delete contiguous colors only — that is, similar colors that touch each other — select this option. If you prefer to delete all pixels of a certain color, deselect the Contiguous option.
-
Use All Layers: To tell Photoshop to factor in all visible layers when erasing pixels, select this option. The Magic Eraser tool continues to erase pixels on the active layer only, but it erases them according to colors found across all layers.
-
Opacity: To make the erased pixels translucent instead of transparent, lower the Opacity value. Low values result in more subtle effects than high ones.
The Background Eraser tool
![]() The Background Eraser tool deletes background pixels as you drag over them, as shown in Figure 14-4. If the image is flat, consisting of only the background layer, Photoshop floats the image to a new layer to accommodate the transparency.
The Background Eraser tool deletes background pixels as you drag over them, as shown in Figure 14-4. If the image is flat, consisting of only the background layer, Photoshop floats the image to a new layer to accommodate the transparency.
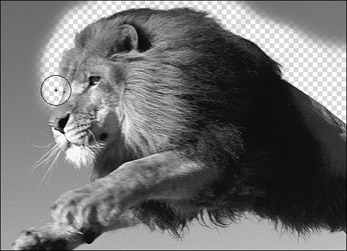
Figure 14-4: Drag around the edge of an image with the Background Eraser tool to erase the background but leave the foreground intact.
The tool is intelligent enough to erase background pixels and retain foreground pixels provided — and here’s the clincher — that you keep the cross in the center of the eraser cursor squarely centered on a background color pixel. Move the cross over a foreground pixel, and the background eraser deletes foreground pixels as well. As Figure 14-5 demonstrates, it’s the position of the cross that counts.
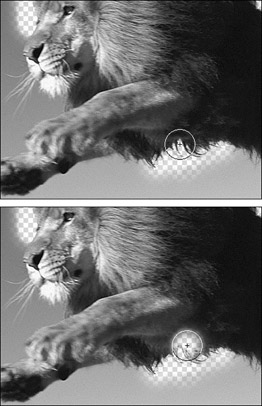
Figure 14-5: Keep the cross of the background eraser cursor over the background you want to erase (top). If you inadvertently move the cross over the foreground, the foreground gets erased (bottom).
| Tip | To change your mouse cursor from a picture of the selected tool to a precise crosshair, choose Edit→Preferences→Display & Cursors (Photoshop→ Preferences→Display & Cursors on a Mac) to open the Preferences dialog box. Select the Precise radio button in the Other Cursors area, and then click OK to close the dialog box. |
| Tip | Like the standard Eraser tool, the Background Eraser tool responds to the brush size specified in the Brushes palette or the Brush Preset picker. Use the bracket keys [ and ] to make the brush size larger or smaller. |
You can also modify the performance of the Background Eraser tool by using the options on the Options bar.
-
Brush Presets picker: Use the picker to access various settings to customize the size and appearance of your eraser tip. If you’re using a pressure-sensitive drawing tablet, the last two options allow you to determine the size and tolerance by the pressure you apply with the stylus pen or thumbwheel. These settings are covered in detail in Chapter 12.
-
Limits: To erase similarly colored pixels as long as they are contiguous with the color immediately under the cross, select this option. To erase all similarly colored pixels, whether contiguous or not, select the Discontiguous option. The Find Edges options searches for high-contrast areas — edges — as you brush and emphasizes them.
-
Tolerance: Raise the Tolerance value to erase more colors at a time; lower the value to erase fewer colors. Low Tolerance values are useful for erasing around tight and delicate details, such as hair.
-
Protect Foreground Color: Select this check box to prevent the current Foreground color (by default, black) from ever being erased.
-
Sampling: Determine how the Background Eraser tool decides what it should and should not erase with the options in the Sampling drop-down list box. The Continuous setting tells the eraser to continuously sample which colors should be erased as you drag. If the background is pretty homogenous, you may prefer to use the Once option, which samples the Background color when you first click and erases only that color throughout the drag. Select the Background Swatch option to erase only the current Background color (by default, white).
EAN: 2147483647
Pages: 221