Turning to ImageReady
You know, by reading this chapter to this point, you already know everything you need to know to create Web images, animated GIFs, and sliced graphics. You can therefore close this book now, and go back to watching television, go make a sandwich, or get reacquainted with your kids or pets. Life is short, so don't linger here unless you want to know more about ImageReady. Yes, ImageReady, the companion application that's drawing its last breaths as we speak, because it will be gone when the next version of Photoshop is released. All of its Web-graphic-creation juices will have been sucked out and funneled into Photoshop, which already has all the Web- image-creation power you need. Well, almost. You be the judge, if you're still reading.
-
Switching to ImageReady: As if to say, "Yes, we know we should have rolled these two programs into one, we're sorry," Photoshop and ImageReady are hot-linked to each other. (You may have already noticed the Edit in ImageReady button at the bottom right of Photoshop's Save For Web command.) To take the image that you're editing in Photoshop and open it up in ImageReady, click the icon at the bottom of the Toolbox. Note that you can't have a file open simultaneously in both applications, so if you employ either of these methods to open ImageReady, the active image will be open only in ImageReady.
Tip To switch back to Photoshop ” and take your ImageReady edits with you ” click the icon at the bottom of the ImageReady toolbox. Figure 14-30 shows the icons and offers some advice on how to keep straight which program you're in.
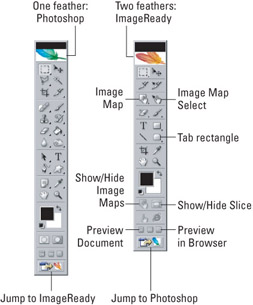
Figure 14-30: Photoshop (left) and ImageReady (right) are so similar that it's easy to lose track of which program you're using. The trick is to keep an eye on the top of the Toolbox, which features one blue feather in Photoshop and two red/orange feathers inImageReady. The tools unique to ImageReady are labeled on the right-hand toolbox.Photoshop CS2 You can also right-click on a thumbnail within Photoshop's new Bridge and choose Edit in ImageReady to open that image directly in ImageReady. And whether you're in Photoshop or ImageReady, you'll find a list of both applications' open documents at the bottom of the Window menu. Choose one, and the document will open up in the current application.
Caution You can also press the keyboard shortcut, Ctrl+Shift+M ( z +Shift+M). This is mentioned as a cautionary note because you can accidentally press it when trying to create a new layer (Ctrl+Shift+N) or send a selection to its own layer (Ctrl+Shift+J) ” the M, the N, and the J are so close together on the keyboard, it's just bound to happen. When it does, you have to wait literally seconds for ImageReady to launch, during which you're quite sure you could've finished the job and shipped it off to the client ” not to mention walked the dog, eaten lunch , and taken a nap. So be careful when your fingers venture near the M key. Or better yet, just reassign the shortcut (in Photoshop, at least) by visiting Edit Keyboard Shortcuts.
To switch applications (after they're both open) without transferring images and modifications, just switch applications normally using Alt+Tab ( z +Tab on the Mac).
-
Color management: The first thing you'll notice upon transferring a Photoshop image into ImageReady is that the colors shift. This is because, by default, ImageReady unwisely ignores Photoshop's active RGB space. Fortunately, you can set things straight with a command. Assuming your image is profiled (see "Working with sRGB"), choose View Preview Use Embedded Color Profile. Like magic, ImageReady now displays the same colors you saw in Photoshop.
-
Image optimization: Unlike Photoshop, ImageReady lacks the Save For Web command and its accompanying dialog box. That's because ImageReady was the original model for the Save For Web command. As shown in Figure 14-31, the image window itself sports the exact same four tabs found inside Save For Web ” Original, Optimized, 2-Up, and 4-Up ” and they serve the very same purposes. The optimization settings are contained in the floating Optimize palette (Window Optimize). To edit colors in a GIF image or make them transparent, use the Color Table palette.
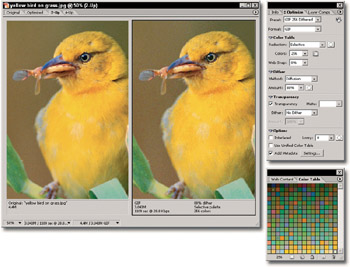
Figure 14-31: ImageReady's central image window (left), Optimize palette (upper right), and Color Table palette (lower right) were the inspiration for Photoshop's Save For Web dialog box. -
Saving your work: To save your original image ” with layers , slices, and other extras ” choose File Save or Save As, both of which invariably save to the PSD format. To save to a different image format, such as TIFF, chooseFile Export Original Document. (ImageReady cannot save a layered TIFF file.) To save Web images and HTML data, choose File Save Optimized As or press Ctrl+Alt+Shift+S ( z +Option+Shift+S on the Mac). You can also use File Save Optimized or Ctrl+Alt+S ( z +Option+S on the Mac) to update changes to your Web files, a real advantage over Photoshop's Save For Web.
-
What you'll see, what you won't: In most ways, ImageReady is a slimmed down version of Photoshop, but there are plenty of differences. For example, ImageReady has layers and even its very own Layer Comps palette, but not channels or paths. Happily, in ImageReady CS2 you will find some core filters that were missing before, including Median, Add Noise, Find Edges, Maximum, Minimum, and High Pass. You can also preview most effects in the full image window. You still have Levels but not Curves, and there are still no adjustment layers. Layer effects are handled in a huge Photoshop-style dialog box, rather than inside a handy palette as before Photoshop CS.
Tip In ImageReady (post ImageReady CS) it's possible to select multiple objects at once. You can Shift+click layers in the Layers palette, or even marquee+drag around elements inside the image window. And after you've got multiple items selected, you can apply layer commands to them, such as duplicate, delete, link, and merge, or group them together by pressing Ctrl+G ( z +G on the Mac). Add the Shift key to that shortcut to ungroup layers. You can Alt+drag (or Option+drag) multiple elements to clone them. And another great feature: If you're dragging an object to align it with other elements, the smart guides (those pink lines discussed earlier in the book, in Chapter 3) pop up to keep you from getting out of line.
-
Creating image maps: There's no denying that ImageReady is a derivative program, but it has a few tricks up its sleeve. These include the ability to create image maps . Like slicing, an image map divides a Web design or graphic into multiple pieces. But whereas slices are always rectangular, an image map may include ovals and polygons. A typical example of an image map is a map of the world in which each country is a separate button. Here, slicing on its own would be impractical because a rectangular slice would overlap many countries at once. The better solution would be to create one big graphic with irregularly shaped buttons drawn over each country ” in other words, an image map.
There are two ways to create an image map button. One is to assign an object, such as a country, to its own layer and then choose Layer New Layer Based Image Map Area. This creates a button that automatically updates with the layer contents, but by default, the button is rectangular. To rectify this, bring up the Image Map palette (Window Image Map) and in the Layer Based Settings section, select Polygon from the Shape pop-up menu, as in Figure 14-32.
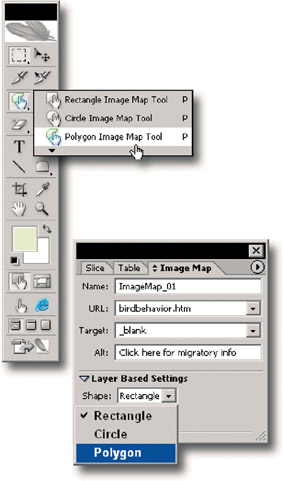
Figure 14-32: ImageReady lets you draw image map buttons using the tools shown on the left. If you make a button using Layer New Layer Based Image Map Area, set the Shape option to Polygon to trace the layer's outline (bottom).The other method is to draw your buttons manually using the image map tools, which you can select from the keyboard by pressing the P key. Naturally, you can mix and match these techniques; and however you make your button, you need to tell the browser where to go when a visitor clicks inside it. To do this, select the button and enter a URL into the Image Map palette.
-
Adding JavaScript rollovers: If there's one thing ImageReady excels at, it's rollovers. For those who aren't familiar with them, a rollover is a collection of JavaScript functions that makes a button change according to the actions of the mouse cursor. The most common example is a button that highlights or animates when you roll the cursor over it ” hence the term "rollover."
Rollovers are composed of states ” much like history states ” one state for the normal appearance of a button, one for the "over" appearance, and so on. Your job is to define the contents of each state (usually by turning on and off layers or layer effects) and its boundaries. Because rollovers are more often than not buttons, the new Web Content palette (Window Web Content) tracks every slice and image map button you create. This makes it a snap to define the rollover boundaries: just click a slice or button name in the palette to tell ImageReady this is the spot you want to animate.
Next, click the tiny page icon at the bottom of the Web Content palette to add a new rollover state. By default, ImageReady makes this an Over State, meaning that this is the image you see when the cursor hovers over the button. Use the Layers palette to set up one or more layers strictly for this state, as in the right example in Figure 14-33. Then click the preview icon (or press Y) and move your mouse over the button to see the rollover in action.
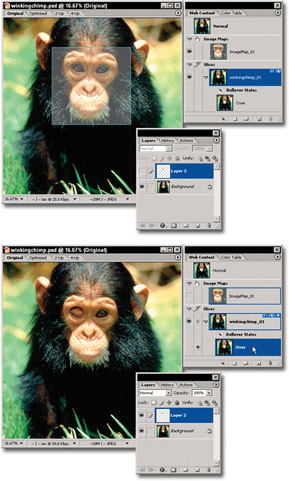
Figure 14-33: Here, the chimpanzee winks at you when you mouse over his face. The eyelid and lashes are on a separate layer, and are hidden except in an Over state. You can choose what's going to be visible in each state of your rollover, using the visibility buttons next to each layer in the Layers palette. Use the Web Content palette to set up and change states. -
Export layers to Flash: ImageReady provides a crucial bridge between Photoshop and Macromedia's Flash, the Web-standard software for creating vector animations. Although Photoshop is an excellent place for blocking out a Web design, complete with vector shape and text layers, Flash can't import a layered Photoshop file. No problem. Just jump over to ImageReady and choose File Export Layers as Files, which brings up the Export Layers as Files dialog box shown in Figure 14-34.
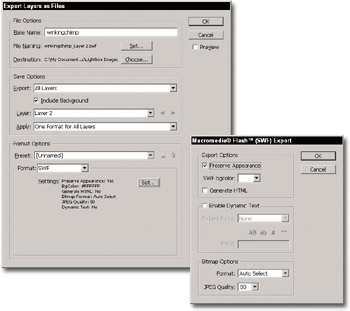
Figure 14-34: ImageReady CS2's Export Layers as Files and Macromedia Flash (SWF) Export dialog boxes are just the ticket when you want to import a layered Photoshop file into Flash.In the File Options section, specify a base name for your separate images, as well as file naming conventions and a destination folder for your images. In the Save Options section, you'll probably want to leave the Export pop-up menu set to All Layers, with Include Background checked. You can set the Apply popup menu to Separate Format for Each Layer and then use the arrows to the right of the Layer pop-up menu to move between your layers, assigning different Format Options to each layer if you wish. Then in the Format Options section, choose SWF (the native Flash format) from the Format pop-up menu.
Clicking the Set button opens the Macromedia Flash (SWF) Export dialog box, also pictured in Figure 14-34. If a text or shape layer can't be exported as vectors into Flash, the Preserve Appearance check box rasterizes the layer. You can set a background color for your Flash animation with the SWF bgcolor popup menu. Clicking the Generate HTML check box creates an HTML file in addition to the SWF file, containing info about the background color, image size , and formatting options. Because we're aiming for direct Flash import, clicking Enable Dynamic Text is pointless because SWF dynamic text doesn't import into Flash. Finally, the Bitmap Options allow you to set the format for exported bitmap images. Leaving the Format option set to Auto Select is usually a safe bet. After you've exported your Photoshop layers as SWF files, you can then import them into Flash as layers by choosing File Import Import to Stage.
So there you have it, a quick introduction to ImageReady, a program that first spun off from Photoshop as an independent commercial application in 1998, only to be bundled with Photoshop a year later. When Photoshop CS3 (or whatever it will be called) is released, ImageReady's power will be completely transferred to Photoshop, and there will be no jumping to ImageReady, no clicking Edit in ImageReady ” there will be no ImageReady. Will anyone cry? Not likely. Will this book be a lighter carry to the checkout? Nope, because the pages lost to a separate ImageReady section will be gained as the post-CS2 Photoshop versions of image map, rollover, and slice-management tools will be covered in excruciating detail.
EAN: 2147483647
Pages: 95