Using Photomerge to Create a Panorama
Until the last release of Photoshop (version CS), the ability to create a panoramic composite from a group of images was something you could only do with Photoshop Elements. The Photomerge command in Photoshop is virtually identical to the Elements version ” and that's not a drawback, despite Elements being a sort of "lite" version of Photoshop. There's nothing pared down about the Photomerge feature, and it's quite effective at taking a series of images and merging them into a single, wide, panoramic shot. Of course, the only catch is that the images you plan to merge need to have been shot under specific circumstances ” the same setting, the same size film, the same orientation of the camera, and so on. If you painstakingly stood there at the Grand Canyon, however, and took a series of shots of a very wide view and now you have each section of the view represented by two or more images, you're good to go with Photomerge.
To get started, choose File Automate Photomerge or open the Bridge and choose Tools Photoshop Photomerge. If you don't access the command through the Bridge, choosing it will display the Photomerge dialog box, as shown in Figure 13-23. At first glance, you might think Photomerge is a simple command. All you need to do is choose which files you'd like to merge and whether or not Photoshop should "Attempt to Automatically Arrange Source Images" (as per the check box at the bottom of the dialog box). Right? Alas, those sweet naive dreams are soon shattered when you click OK and find yourself presented with the giant, imposing beast of a dialog box shown in Figure 13-24. This, as they say, is where the magic happens.
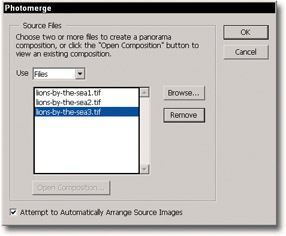
Figure 13-23: The Photomerge dialog box lets you choose the images that will make up your panorama.
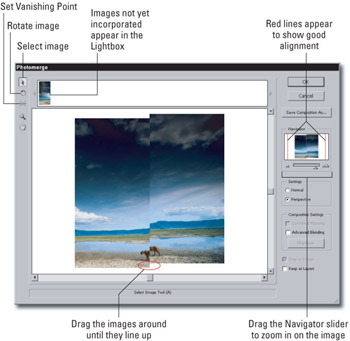
Figure 13-24: The very large Photomerge dialog box makes every attempt to create a panorama from a group of photographs, but more often than not, you need to manually adjust the images to get the best results ” and the process is simple.
By default, Photomerge tries its best to make sense of the pixels in your images and match certain areas of one photo with similar areas of another. But it's something of a gamble: most of the time you'll see at least a few portions of your image that could use some fixing. You adjust the individual placement and rotation of the images in a panorama using the Select Image and Rotate Image tools available in the upper-left corner of the dialog box. The bottom two tools ” the Zoom and Hand tools ” work the same as they do everywhere else in the program. Between these two sets of tools is the Set Vanishing Point tool, which will be covered in a moment.
| Tip | If you adjust the settings without getting the results you want, try removing one of the images if the area it covers is already captured by the other images on-screen. To remove an image, simply select the arrow tool (technically known as the Select Image tool), click on the image, and drag it to the lightbox strip at the top of the screen, labeled in Figure 13-24. Giving the Photomerge command too much information about your scene can be a bad thing, and you may want to leave some of the images up in the Lightbox until you're ready to incorporate them. The Lightbox is also the all-purpose repository for any image that Photoshop cannot figure out how to fit within the panorama. If you'd like to reintroduce an image, simply drag it from the Lightbox and drop it back into the work area. |
By default, Photomerge assembles the images into a flat, jagged puzzle that rotates the images to fit each other but does not distort them in any way. If you'd like Photomerge to try bending and distorting the photos in an attempt to make them fit better, select the Perspective radio button ” shown selected in Figure 13-24. When the Perspective setting is selected, the command will contort the images and present a more accurate, nearly 3-D view of your scene. You can select the Set Vanishing Point tool and alter the perspective by clicking on the different images in the composition. The resulting panorama is shown in Figure 13-25, assembled , in the Photomerge dialog box.
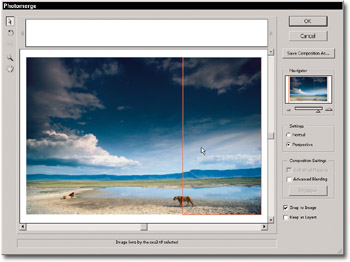
Figure 13-25: All pieced together, the 3-piece panorama is nearly ready. The red box indicates which of the pieces is active, and as soon as everything's lined up, you can click OK to save the Photomerge.
The two options in the Composition Settings section of the Photomerge dialog box let you correct for certain problems inherent in the Photomerge process. For example, the Perspective setting does a great job of distorting the images to ensure that they all fit together in the composition, but it also often results in a sort of "bow tie" shape for your final composition. The Cylindrical Mapping check box, available only when the Perspective setting is selected, corrects this by bending the more extreme corners of the composition back towards the center. Even more useful is the Advanced Blending option, which attempts to smooth over the common color and luminance shifts between images that can be dead giveaways of a computer- generated panorama. Both Composition Settings options make for pretty intense renders , so you might want to click the Preview button to see a lower-resolution preview while working in the dialog box.
Selecting the Keep as Layers check box creates a new image consisting of a layer for each original image and a background layer. This new image maintains the positioning determined by the Photomerge command but loses all the blending.
| Tip | Powerful as it may be, the Advanced Blending option can sometimes let you down when trying to stabilize the colors among the images in a panorama. A good trick for getting around this is to perform a color correction pass on your individual images before you merge them using the Match Color command, as described in Chapter 11. |
If you've carefully arranged the images in your panorama and would like to return sometime later and continue adjusting the settings, click the Save Composition As button to save a version of your Photomerge settings for these particular images that you can open and edit at any time. To do so, choose File Automate Photomerge and then click the Open Composition button in the first dialog box that appears.
As mentioned earlier, the way in which the original images were photographed is perhaps the most important factor in determining the results of a panorama created with Photomerge. The most crucial thing to keep in mind when shooting photos that you plan to merge is that the greater the consistency in focal length, camera angle, exposure, and position, the easier it will be for Photoshop to merge the resulting images. If within your series one or more of the photos are shot at a different orientation ” with the camera turned on its side, for example, when all the rest were shot with the camera held horizontally ” you'll need to use the Perspective option to accommodate the inconsistency this creates.
To further improve your panorama, Adobe recommends an image-to-image overlap of 15 to 40 percent and that you avoid using any sort of lens that will distort your images (such as a fisheye lens). Finally, the use of a tripod or another stabilizing surface can mean the difference between an expert merge and an expressionist fiasco.
EAN: 2147483647
Pages: 95