Batch Processing
Much of the work you do in Photoshop may be creative, involving a lengthy series of steps that are unique to a particular project. But some or even most of your work may revolve around fairly regular and repeatable activities. For example, when processing digital photos, you may want to apply a consistent set of Levels adjustments, sizing, and Unsharp Mask settings. The Actions palette is fine for adjusting such images one at a time. But if you need to attack more than one image, turn to Photoshop's Batch command.
As mentioned earlier in this chapter, you can get to the Batch command in the Bridge Automate menu. But this handy command also dwells in the File Automate submenu. The Batch command processes whole folders full of images in a batch, hence the term batch processing . And although it may sound highly technical, it's actually quite straightforward. The hardest parts , in fact, are recording the action in the first place and negotiating Photoshop's sometimes confusing (but ultimately comprehensible) options.
Let's say you want to add specialty borders to a bunch of image files. Photoshop ships with a set of actions called Frames.atn that does exactly that. After choosing Frames.atn from the Actions palette menu, test a few of the actions from that set on a photo, as shown in Figure 13-21. Although many of the effects are interesting, you might finally settle on Photo Corners. Having selected the action, you are now prepared to apply Photo Corners to two, ten, or several hundred images. The question, of course, is how.
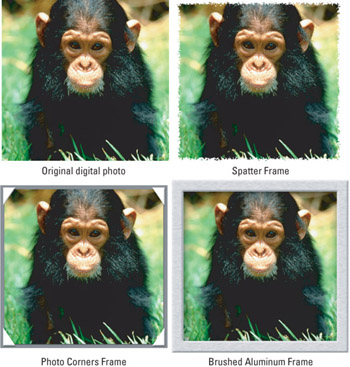
Figure 13-21: A photograph (top left) subjected to three of Photoshop's predefined Frames actions.
The following steps walk you through the task of batch processing a folder of files. This isn't the only way to use the Batch command ” Photoshop offers several additional variations with which you can experiment if you like ” but these steps represent the best approach for most types of jobs.
STEPS: Applying an Action to Multiple Images
-
Round up the image files to which you want to apply your action. By far the easiest approach is to gather the images into a single folder. The Bridge is great for this too, incidentally. You can create a new folder by right-clicking(Control+clicking on the Mac) in the thumbnail view. Then move or copy the images you want to batch.
-
Create a folder to collect the images after Photoshop is done processing them. If you're opening images from a folder, you can have Photoshop save to the same folder, but this saves over the original files. Better to save the files elsewhere so that you can refer to the originals if you're not pleased with the results.
-
Inside Photoshop, select the action that you want to apply from the Actions palette. This step isn't absolutely necessary, but it frees you from having to select an action inside the Batch dialog box, which is less convenient .
-
Add a Save operation to the end of the action. Frankly, you shouldn't have to perform this step. But the way the Batch command handles file saving leaves something to be desired (see Step 10), so it's better if you take it over yourself. All you need to do is open a sample image. You already selected the action in the last step, so just click the record button to append an operation to the end of it. Then choose File Save As and save the image in the destination folder created in Step 2. It's important to specify the file format you think you'll want to use. (Photo Corners results in layered files, so choose the native PSD format.) However, the file name does not matter. Click the Save button to save the file and then click the stop icon at the bottom of the Actions palette to stop recording.
-
View the images in the Bridge. Open the Bridge and train it on the folder of images you created in Step 1. This gives you a chance to visually confirm that these are indeed the photos you want to edit.
-
From the Bridge menu bar, choose Automate Batch. You can also choose File Automate Batch from within Photoshop. In either case, the dialog box shown in Figure 13-22 appears, with the action you selected in Step 3. (See how convenient that is?) Don't be put off by the glut of options ” the Batch dialog box is a peach after you get to know it.
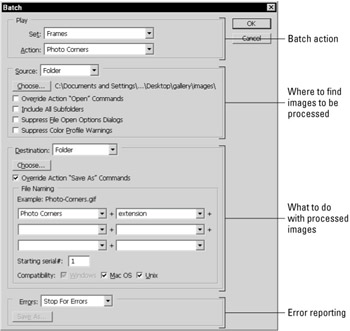
Figure 13-22: Here the Batch command is all set up to open the images last viewed in the Bridge, run the Photo Corners action on them, and save each image to a folder on your hard drive. -
Turn on Suppress Color Profile Warnings. This way, Photoshop won't bug you every time it opens an image, which defeats the purpose of batch processing. Hopefully, your current color settings won't do any damage to the files. If you have any concerns, exit out of the Batch dialog box and press Ctrl+Shift+K ( z +Shift+K) for the Color Settings command. Then select U.S. Prepress Defaults from the Settings pop-up menu and click OK.
Batch processing hyperspeed If you're looking for maximum performance, there are two ways to crank up batch processing to its top speed;
-
First, turn down the image cache. Press Ctrl+K, Ctrl+8 ( z +K, z +8 on the Mac) to display the Memory & Image Cache panel of the Preferences dialog box and then change the Cache Levels value to 1.
-
Second, turn off the History palette's automatic snapshot feature. Choose History Options from the History palette menu. Then deselect the Automatically Create First Snapshot check box. Both steps work wonders in improving Photoshop's response time.
As for the other check boxes, leave Override Action "Open" Commands and Include All Subfolders turned off. The first one is to be used only if your action contains an Open operation, which most likely it does not; the second opens images in folders inside the current folder. If you followed the advice in Step 1, all the images are in one folder, so subfolders are irrelevant. And if you're dealing with Camera Raw images ” discussed at the end of this chapter ” the new Suppress File Open Options Dialogs check box keeps the Camera Raw dialog box from repeatedly opening for every file.
-
-
Select the destination folder. First, select Folder from the Destination pop-up menu, and then click the Choose button and locate the folder you created in Step 2.
-
Turn on Override Action "Save As" Commands. This is the most confusing step, so if you don't want to be confused , just turn on the check box and mosey along to Step 10. But if you like to learn, read on.
When turned on, this option looks for a Save operation inside the action, which you created back in Step 4. Then it merges the naming conventions that you'll specify next (hence the term override ) with the file format you recorded into the action. It also saves the images without asking permission. Were you to turn this check box off, the Batch command would ask you to confirm the saving of each and every file, which of course would defeat the whole purpose. When you turn the option on, Photoshop displays a treatise on the subject. Feel free to tell it to bug off.
-
Assign the File Naming conventions as desired. These conventions were discussed earlier in this chapter. If you have any questions, please see the section on batch renaming.
-
Ignore the Errors option. If it fails, it fails. You'll find out soon enough.
-
Click OK. Photoshop begins batch processing your images, starting with the first image in alphabetical order.
It's a good idea to watch the first image from start to finish to make sure everything goes smoothly, particularly the save operation. (Photoshop should close each image after it finishes saving it.) But after the first image, you should probably leave Photoshop and your computer alone to work their wonders. A watched pot never boils, and a watched batch is a waste of your valuable time. You're supposed to be out there engaging in interesting carbon-based activities while Photoshop slaves away in your absence.
EAN: 2147483647
Pages: 95