The ShadowHighlight Command
The Shadow/Highlight Command
The lens on a camera is an astonishing thing, but there are still certain areas where it just doesn't hold a candle to the good old human eye. Every waking moment of every day, for instance, the irises in our eyes are constantly adjusting our pupil size to determine the amount of light that gets in so we can perceive as much as possible. Modern cameras try their best to keep up with complicated and varied lighting situations, but you're often stuck having to choose between sacrificing the darker areas of an image or overexposing the lighter areas. For example, how many times have you photographed someone against the sky, only to find the sky perfectly exposed and your subject so dark its details can barely be seen?
Photoshop's Shadow/Highlight command helps with just that sort of backlighting problem. Although the command has the power to both pull an image's shadows out from the darkness and push the highlights of an image into midtones, you'll get the most impressive immediate results by applying the command to an image with dark shadows. Choose Image Adjustments Shadow/Highlight to bring up the dialog box shown in Figure 12-38. Note that in the figure the check box labeled Show More Options has been clicked, resulting in an expanded version of the basic dialog box; were this not done, only the Amount sliders for the Shadows and Highlights sections of the dialog box would be visible. Instantly, you should see a difference; the simple default settings go a long way toward fixing many a shadowy image.
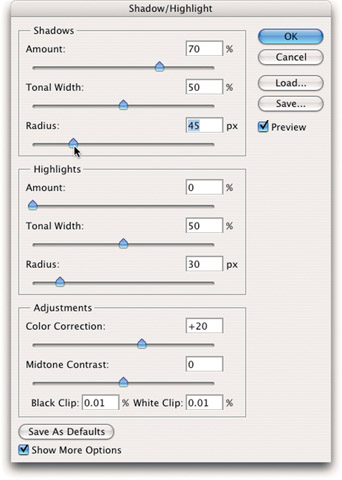
Figure 12-38: The Shadow/Highlight dialog box lets you correct exposure problems in specific areas of an image without harming other areas.
The Shadow/Highlight command examines the image and, according to your settings, deems certain spots to be "shadows" and others "highlights." From there, you adjust the sliders to tell Photoshop just how much brightening or darkening it should perform on those areas. It's a smart feature that's deceptively easy to master. Of course, there is some slight counterintuitiveness going on, as the Shadows amount lightens the image, and raising the Highlights amount darkens it. Position your cursor over an Amount slider and a tool tip pops up to explain that you're adjusting the amount of correction .
So, assuming you've clicked the Show More Options check box, take a close look at all the controls:
-
Amount: As noted, in the Shadows section, the Amount slider lets you specify the degree to which the shadows in an image will be lightened. In the Highlights section, the slider controls how much the highlights will be darkened. A value of 0 percent yields no change in the image; a value of 100 percent results in maximum brightening of the shadows (in the Shadows section) or darkening of the highlights (in the Highlights section). The default Shadows Amount setting of 50 percent is a safe place to start when lightening shadows in an image.
-
Tonal Width: This setting adjusts the range of the pixels that get modified by the command. In the Shadows section, higher values increase the range of shadow areas that get lightened and lower values concentrate on only the darker regions of the image. In the Highlights section, higher values increase the range of light areas that get darkened and lower values restrict the adjustment to only the lighter regions . The default Tonal Width value in both sections is 50 percent. If you find that the command is lightening too much of an image, lower the value in the Shadows section to correct it.
-
Radius: The Shadow/Highlight command determines which areas are shadows and which are highlights by examining each pixel compared to the pixels that surround it. This prevents every stray dark pixel from being classified as a shadow and subsequently lightened, for example. Adjust the Radius sliders to determine the size of each pixel's "neighborhood," or, in other words, the number of surrounding pixels that are taken into account when each pixel is categorized as shadow or highlight.
Tip Radius is the setting you'll most likely need to adjust on an image-by-image basis. The default setting of 30 pixels is a good place to start, but keep in mind that by increasing the Radius value you apply a less exacting change to the image, and by decreasing the value you lose some of the contrast.
Below the Shadows and Highlights sections is a third area labeled Adjustments. It contains the following options:
-
Color Correction: Occasionally, the Shadow/Highlight command can make the colors in an image a little less vivid . The Color Correction slider lets you adjust the saturation of the color in the affected portion of the image. In grayscale images, this option is replaced with a general Brightness setting.
Tip You can achieve an interesting effect by increasing the Amount value in the Shadows section and ramping down the Color Correction setting. The result is an image in which all pixels formerly in the shadowed areas become completely grayscale. In addition to producing an interesting effect, it also lets you glimpse exactly which pixels are being affected.
-
Midtone Contrast: This setting increases or decreases the contrast of the mid- tone pixels in the image. Generally speaking, higher values mean a darker image and lower values produce a lighter, more even result.
-
Black Clip and White Clip: These values let you adjust the maximum settings for how light the adjusted shadow pixels will be and how dark the adjusted highlight pixels will be. Although the limit for both values is 50 percent, it's probably a good idea that you never even approach that high a value. On the contrary; keep these settings as low as you can to provide for smooth transitions and healthy contrast levels in your images.
The Shadow/Highlight dialog box lets you save your settings and then load them later using the Save and Load buttons . If you want to designate your current settings as the default for the command, click the Save As Defaults button at the bottom of the dialog box.
| Tip | It's been mentioned before, but it's worth repeating: The Histogram palette is a great way to keep track of brightness and tonal changes to an image. So it serves as a great reference while you're working in the Shadow/Highlight dialog box. |
Looking at Figure 12-39, note that the first example shows a nicely composed shot that has been marred by the brightness of the sun (the sun's not shown, but its impact is obvious) creating the high-contrast shadows the subjects are standing in, causing the camera's iris to close and render the subject all but black. To create the middle image, the Shadow/Highlight command was applied with the default settings, and they do a pretty great job of pulling light back into the shadows without harming the brightness or detail in the surrounding sky. In the final image on the right, the Shadows Amount was increased to 75 and the Tonal Width to 60. For this image, that's about as far as you can go without starting to degrade the image quality.
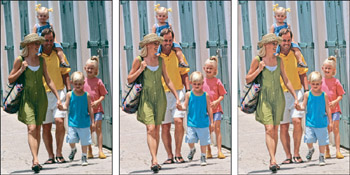
Figure 12-39: The Shadow/Highlight command does an expert job of recovering the details (see middle and right images) originally lost to the shadows (left image).
EAN: 2147483647
Pages: 95