Hue Shifting and Colorizing
Whereas the Variations command enables you to shift colors in an image based on brightness values and Match Color shifts colors in an image based on the colors in a different image, another command lets you shift colors wholesale, modify some colors independently of others, raise and lower saturation values without affecting luminosity, and coat an image with a uniform tint. This wonderful command is Image Adjustments Hue/Saturation, and it's one of Photoshop's most overlooked gems.
Adjusting the Hue and Saturation values
Choose the Hue/Saturation command or press Ctrl+U ( z +U on the Mac) to display the Hue/Saturation dialog box, shown in Figure 11-13. The figure actually shows two versions of the dialog box, first, as it appears when editing all colors in a selection or layer and second, as it appears when editing a specific range of colors, in this case red. These options are discussed in more detail in a moment, but for now, be content in the knowledge that Hue/Saturation lays out a world of color challenges and opportunities before you.
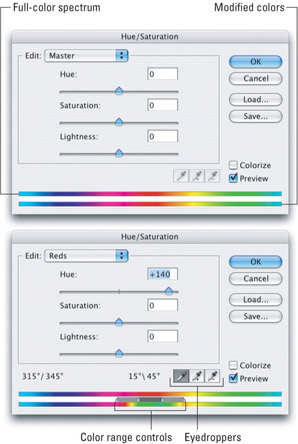
Figure 11-13: The Hue/Saturation dialog box as it appears when editing all colors in the active layer(left) and when editing a select range of colors (right).
Unlike Variations, Hue/Saturation relies on numerical values and more complex and more precise controls. But the command continues to subscribe to that most fundamental of digital color conventions, the rainbow spectrum wheel. As illustrated in Figure 11-14, Hue/Saturation sees red, yellow, green, and the others in the same positions diagramed for Variations in Figure 11-6. But whereas Variations presents you with strategically positioned thumbnails, Hue/Saturation measures colors in degrees. As you may recall from eighth -grade Geometry, a circle is measured in 360 degrees, starting at the 3 o'clock position (better known to us as Red), and progressing in a counterclockwise direction. As the figure shows, the primary colors of light and pigment are spaced in 60-degree increments and secondary colors occur every 30 degrees.
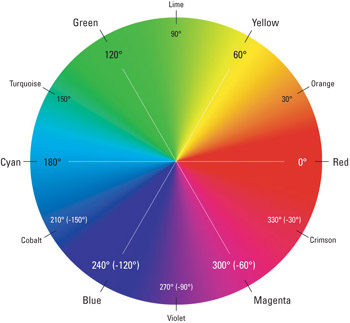
Figure 11-14: The Hue/Saturation command observes the same color circle as Variations. But instead of adding colors and subtracting complements,Hue/Saturation revolves hues around the circle according to a prescribed angle, either positive or negative.
Hues can be measured absolutely (that is, yellow is at 60 degrees, green is at 120 degrees, and so on) or relatively (red shifted counterclockwise 150 degrees becomes turquoise). If all this sounds a little thick, don't worry. It'll become increasingly clear after running through the three main options: Hue, Saturation, and Lightness.
-
Hue: The Hue slider bar measures colors on the 360-degree rainbow wheel. Under normal circumstances (that is, when Colorize is turned off), you can adjust the Hue value from negative to positive 180 degrees. As you do, Photoshop rotates selected colors around the wheel. This means you can literally turn any color in an image into any other color just by dragging a slider triangle, a real boon when editing product and fashion photography.
For example, consider the comfy beach towels in Figure 11-15. The first image has the towel as it appeared in the original photograph, which is red. But thanks to Hue/Saturation, it doesn't have to remain that way. Change the Hue value to +60 degrees and the towel becomes yellow. Shift the Hue +120 degrees and the towel becomes green. A Hue value of either positive or negative 180 degrees produces exactly the same result, a cyan towel. A Hue value of “120 degrees is the same as a 240-degree shift (after all, 360 minus 120 equals 240), which gives us blue. To make the towel magenta , enter “60 degrees, which is the same as a 300-degree rotation.
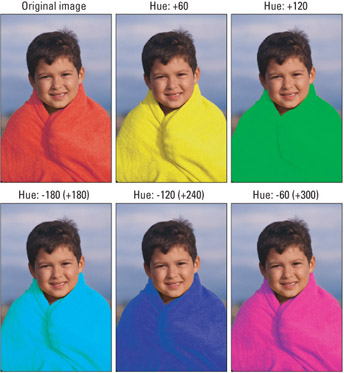
Figure 11-15: Shoot one item and make it any color you like. You can make a red towel any other primary color by entering Hue values in multiples of 60 degrees. The Hue option accepts values only as high as +180 degrees; to achieve greater shifts (bottom row) enter negative values.It stands to reason that if you can change something to any primary color, you can change it to a secondary or tertiary color as well. Figure 11-16 shows examples. Notice that the saturation and brightness of colors remain unchanged throughout Figures 11-15 and 11-16. This means low-saturation colors, such as the blacks and grays, change very little from one Hue setting to the next .

Figure 11-16: Just because an item starts off as a primary color doesn't mean it has to stay that way. By entering Hue values in every other multiple of 30 degrees (according to the labels), we're able to dye this towel in secondary colors.Bear in mind that the Hue option applies relative color transformations. So applying a Hue value of 60 degrees to an object that starts out red makes it yellow. But apply that same value of +60 degrees to an orange image, such as the beach umbrella in Figure 11-17, and Photoshop converts it to lime. Therefore, 60-degree Hue adjustments change the umbrella from one secondary color to another; offset that model by 30 degrees to recolor it in primaries.

Figure 11-17: The Hue value changes colors in an image relative to its original colors. So an orange object, subject to 60-degree Hue adjustments, progresses from one secondary color to another.If an image contains multiple colors, all colors rotate to new relative positions in the rainbow wheel. Figure 11-18 features multiple iterations of a beach cabana's red and white roof against a cobalt blue sky. Applying various Hue values shifts these and other colors inside the image to new relative locations.
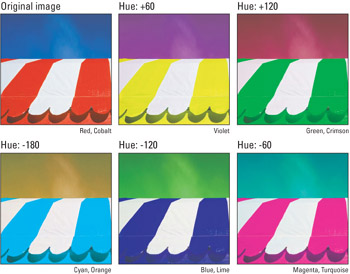
Figure 11-18: Assuming that the Edit pop-up menu is set to Master (as by default), the Hue option shifts all colors in an image to equal degrees. Saturation and luminosity levels remain constant. -
Saturation: The Saturation value changes the intensity of colors. Under normal circumstances, the Saturation value varies from “100 for gray to +100 for the most vivid hues. The only exception occurs when the Colorize check box is active (as discussed in a moment), in which case saturation becomes an absolute value, measured from 0 for gray to 100 for maximum saturation.
Figure 11-19 shows a photograph of the proverbial message in a bottle . But alas, the colors are unacceptably drab. So we punched up the Saturation value to 50%. (You'll rarely want to make really extreme changes ” +80%, for example) The final image shows the result of raising the color saturation to a similar level using the Variations command. As you can see, where the Variations command deepens colors as it saturates them, Hue/Saturation protects the luminosity, making it an easier command to predict.
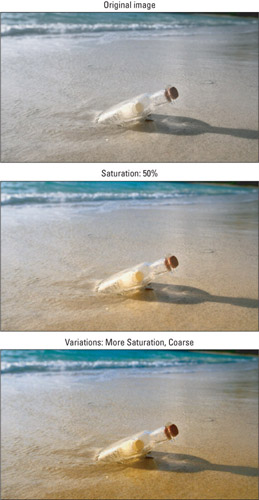
Figure 11-19: You can add drama to an otherwise drab image (top) by increasing the Saturation. Here saturation was increased to 50% (middle) and the Variations command was used (bottom).You'll also find the Saturation option helpful when shifting hues in an image. Thanks in part to the way Photoshop calculates CMYK conversions as well as the way our eyes perceive color, some hues naturally appear more saturated than others. The top row of Figure 11-20 shows that lovely beach umbrella again (in the Magenta range this time). A Hue value of +75 percent shifts the colors toward the oranges, but what a dreary result it is, as the middle example shows. Fortunately, you can make the sun shine by raising the Saturation value to +40 percent.
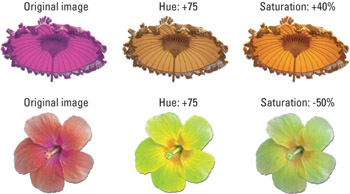
Figure 11-20: Some Hue shifts result in drab colors (top middle) that necessitate an increase in the Saturation value (top right). Others produce colors so hot they violate the printable CMYK gamut (bottom middle). Often, the solution is as simple as reducing the Saturation (bottom right).The opposite turns out to be true when we shift the flower in the lower left by 75 degrees. Applying such a Hue value produces absurdly vibrant colors thathaven't a hope of printing properly. As the middle flower illustrates, the result has too many spots of flat color that lack definition. Fortunately, by lowering the Saturation to “50 percent, that realistic definition can be restored without harming the hues.
Note It's worth noting that the Saturation value can't raise or lower the intensity of a color unless it has some intensity to work with in the first place. For example, no amount of saturation adds color to a grayscale image. To accomplish that, you have to turn on the Colorize check box, as discussed later in "Colorizing images."
-
Lightness: You can, if you want, darken or lighten an image by varying the Lightness value from negative to positive 100. But you don't want to. The problem with the Lightness value is that it unwisely compresses the brightness range of an image, either lightening black when you enter a positive value or darkening white when you enter a negative value. The result is a dulling of shadows or highlights and a general reduction in photographic detail. On rare occasion, you might use this option to modify the shade of a solid fill, gradient, or other very small range of colors. Otherwise, limit yourself to the Hue and Saturation values and modify the brightness of an image in a separate pass using the Levels or Curves command, as discussed in the next chapter.
As with the Match Color command, you can track the behavior of specific colors when adjusting the Hue/Saturation options. As shown in Figure 11-21, the Info palette tracks the individual RGB and CMYK values of the pixel beneath your cursor in the image window. The number before the slash is the value before the color adjustment; the number after the slash is the value after the adjustment.
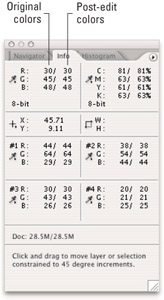
Figure 11-21: When you move the eyedropper outside a color adjustment dialog box and into the image window, the Info palette lists the color values of the pixel beneath the cursor before (left) and after (right) the adjustment. You can also Shift-click to deposit as many as four fixed targets that the Info palette will track as you work.
| Tip | You don't have to settle for just one color readout either. Shift-click in the image window to add up to four fixed color targets, just like those created with the dedicated Color Sampler tool (the alternative eyedropper in the Toolbox). To move a color target after you've set it in place, Shift-drag it. To delete a target, Shift+Alt- click it (Shift+Option-click it on the Mac). |
Note that Shift-clicking sets targets only when the Edit pop-up menu is set to Master; otherwise Shift-clicking adjusts the editable range (as explained in the next section). So set your targets and then adjust the Edit option.
The Info palette and color targets are equally useful when working inside the Channel Mixer, Levels, Curves, or any other dialog box that previews its changes in the full image window. These techniques are also applicable to adjustment layers . Best of all, targets set from inside one dialog box will remain in force throughout others, so you can always rest assured of color-tracking continuity.
Editing independent color ranges
One of the primary advantages of the Hue/Saturation dialog box is that it enables you to edit one range of colors in an image independently of another. Consider the example in Figure 11-22. The first image shows a favorite snack floating on an independent layer. A soft drop shadow has been applied to give this already hefty creation added depth. Next, the pizza is set against a tile background.
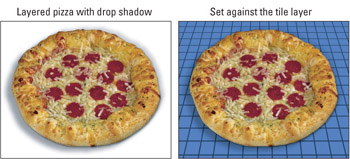
Figure 11-22: A scrumptious pizza relegated to an independent layer and assigned a drop shadow (left), next composited against a sturdy tile background (right).
The effect is plausible (though not necessarily elegant) and simple, but what if you change your mind about the color scheme? No problem, you can change the colors with Image Adjustments Hue/Saturation. In Figure 11-23, the colors of the tile background have been shifted from the blues to the reds using a Hue value of +120 degrees and a Saturation value of “50 percent. This is easy enough, because the tile is separated off onto its own layer. But what if next, you want to adjust the colors of the pepperoni independently of the crust? For example, say you need to make that pepperoni look more like Italian sausage? Because these elements coexist on a single layer, changing the former can have some rather unappetizing effects upon the latter, as the second example in Figure 11-23 shows.
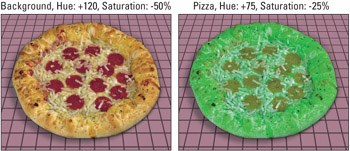
Figure 11-23: "Look what I found under the couch Marge!" By default, the Hue/Saturation command changes all colors in a selection or layer at a time, making it very easy to apply different hue and saturation settings to the tile background (left) and pizza (right). Isolating colors inside a layer, however, is another matter.
You could of course select the pepperoni using Select Color Range, as explained in Chapter 4. But because topping and crust are such different hues, theHue/Saturation command can isolate the colors without the help of Color Range or any other selection technique. The linchpin is the Edit pop-up menu. Labeled in Figure 11-24, the Edit option controls what colors in the active selection or layer are affected by the Hue/Saturation command. If you select the Master option, as by default, Hue/Saturation adjusts all colors equally, as in Figure 11-23 and previous figures. If you prefer to adjust some colors in a layer independently of others, choose one of the predefined color ranges, named for the RGB and CMY primaries. You can also press a keyboard shortcut, from Ctrl+1 for Reds to Ctrl+6 for Magentas ( z +1 to z +6 on the Mac).
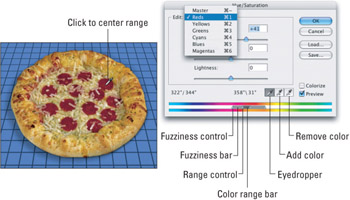
Figure 11-24: To edit some colors in a layer independently of others, select a general range from the Edit pop-up menu. Then use the color range controls at the bottom of the dialog box to modify the range or the fuzziness .
Figure 11-25 illustrates the extent of the six predefined Edit ranges. The Reds range from 345 to 15 degrees. Naturally, if you were to modify just the Reds while leaving all non-red pixels unchanged, you'd end up with some jagged transitions between modified and unmodified pixels. So Photoshop softens the edges with 30 degrees of extra fuzziness at either end of the red spectrum, thereby applying incremental changes to colors as far away as 45 degrees up north and 315 degrees down south. The fuzziness of one range of colors overlaps the fuzziness of its neighbors. Therefore, secondary colors such as orange, lime, turquoise, and others do not fall squarely inside any predefined range but rather receive partial coverage from two next-door neighbors.
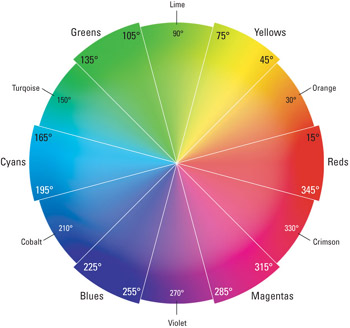
Figure 11-25: The six predefined color ranges offered by the Edit pop-up menu. Each range extends from a primary color 15 degrees in both directions. To ensure smooth transitions, the range then tapers off over the course of another 30 degrees in both directions.
The predefined Edit options are presets only; you can, and should, modify them to suit your needs. After you select an Edit option, you can use the color ramp controls to broaden or narrow the range of colors affected by the Hue and Saturation options.
Labeled in Figure 11-24, the color range controls work as follows :
-
Color range bar: Drag the central color range bar to move the entire color range.
-
Fuzziness bar: Drag one of the two horizontal fuzziness bars (located to the left and right of the color range bar) to broaden or narrow the color range without affecting the fuzziness.
-
Range control: Drag the range control to change the range while leaving the fuzziness points fixed in place. This enables you to expand the range and condense the fuzziness, or vice versa.
-
Fuzziness control: Drag the triangular fuzziness control to lengthen or contract the fuzziness independently of the color range.
Tip By default, the Hue/Saturation dialog box positions red at the center of the color ramps, with cyan at either end. This is great when the range is red or some other warm color. But if you're working with a cool blue or green range, the controls get split between the two ends. To move a different color to the central position, press the Ctrl key ( z on the Mac) and drag inside the color ramp. The spectrum revolves around the ramp as you drag.
Better yet, you can set a range just by clicking in the image window. Your cursor automatically changes to an eyedropper when you move it outside theHue/Saturation dialog box. Photoshop centers the range on the exact color you clicked. For example, to change the color of the pepperoni independently of the crust, first select Reds from the Edit pop-up menu to establish the base color range. Then click inside a red portion of the pepperoni to make sure you have the right shade of red selected. The example on the right in Figure 11-26 shows the results of setting the Hue value to +40 degrees and the Saturation value to “30 percent. Because the reds were isolated, the crust remains the same inviting color.
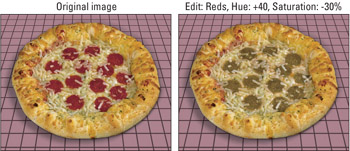
Figure 11-26: After selecting Reds from the Edit pop-up menu, the Hue value was changed to +40 degrees and the Saturation value to “30 percent (right). If you're wondering why the sauce on the crust didn't shift too, it's because the crust was masked out. After all, who doesn't want sauce on their pizza?
| Tip | You can also use the eyedropper to expand or condense the color range. To add colors to the editable range, Shift-click or Shift-drag inside the image window. To remove colors from the range, press the Alt key (Option on the Mac) and click or drag in the image. You can also use the alternative plus and minus eyedropper tools, but why bother? Shift and Alt do the job just fine. |
| Caution | Despite its considerable power, bear in mind that the Edit pop-up menu can't distinguish between hues that are any less than about 15 degrees apart. Figure 11-27 shows an example. The sky, ocean, and our hero's trunks are all floating in the same zone somewhere past cyan (180 degrees) but before cobalt (210 degrees). If you attempt to shift one, you're shifting them all unless you select the areas you want to recolor in advance, and then modify them independently. 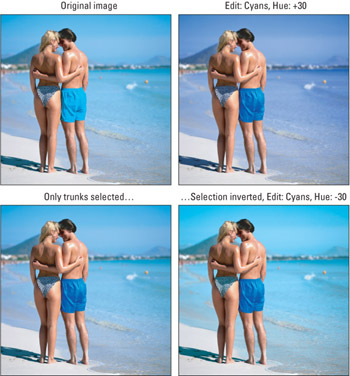 Figure 11-27: Starting with the original image (upper left), the first attempt to shift the Cyans shifts the sea and sky as well (upper right). With only the trunks selected, you're free to edit them independently (bottom left), and the sea and sky too, if you like (bottom right). |
Colorizing images
Turn on the Colorize option in the lower-right corner of the Hue/Saturation dialog box to apply a single hue and saturation level to a selection or layer, regardless of its previous coloring. All brightness levels remain intact, although you can adjust them incrementally using the Lightness slider bar (a practice strongly advised against).
When the Colorize check box is active, Hue and Saturation become absolute values, measured from 0 to 360 degrees and 0 to 100 percent, respectively. A Hue value of 0 is red, 30 is orange, and so on, as shown earlier in Figure 11-14, all the way around to 360 degrees, once again for red. A Saturation value of 0 percent is gray, regardless of the Hue value (although it may be black or white depending on the luminosity of the original pixels); 100 percent is color at its high-octane best.
| Note | Color ranges are not permitted when colorizing. The moment you select the Colorize check box, Photoshop dims the Edit pop-up menu and sets it to Master. This means if you want to limit the extent of a colorization, you have to define a selection before choosing Hue/Saturation. |
For an example, look at Figure 11-28. As you can see in the first image, the woman 's hat and bathing suit appear to be magenta. Fine, let's try pushing them toward purple. In the example to the right, you see the results of selecting a color range and using the Hue/Saturation command to shift the magentas “35 degrees. But, something isn't right: parts of the selection have shifted and some look like they haven't changed a bit ” or if they have changed, those changes don't seem to complement the rest of the ensemble. What gives?
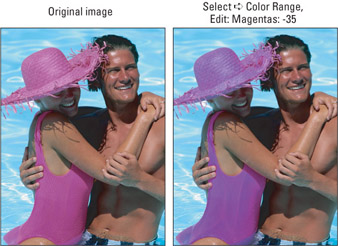
Figure 11-28: Starting with the original image (left), an attempt to change the color of the swimsuit and hat using the Hue/Saturation command's range controls just didn't work (right).
The problem is that even though our lady's outfit looks magenta, it isn't. Not entirely, anyway. The suit is actually remarkably iridescent, reflecting light off thousands of tiny textile surfaces. As a result, the areas of the suit and hat catch an amazing array of low-saturation hues that the Edit pop-up menu can't isolate without picking up colors elsewhere.
Time to use Colorize. In the first example of Figure 11-29, you see the results of the Colorize check box applied to the entire image. This can help you get a sense of the exact shade you're looking for.
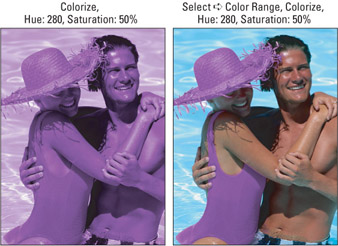
Figure 11-29: Turning on the Colorize check box gives you a sense of the specific Hue and Saturation values you'll eventually want to use(left). Then, undo that change, select the area you want to modify, and reapply Hue/Saturation with your last colorization settings (right).
The second image in Figure 11-29 shows the result of making a selection using the Color Range command, which is well suited to isolating areas consistent in saturation and luminosity. Then by pressing Ctrl+Alt+U ( z +Option+U on the Mac) you can reapply your last Hue/Saturation settings, with Colorize turned on and the same Hue and Saturation values. It's a stronger effect than was achieved using the Edit option, and it avoids changing colors elsewhere in the image.
If the edges of your colorized selection look a little ratty, you can touch them up in a jiffy using the Brush tool, as shown in Figure 11-30. In the Color palette, switch to HSB Sliders. First, change the foreground color to match the Hue and Saturation values you used in the Hue/Saturation dialog box. You can do this by choosing the HSB Sliders command from the Color palette menu and entering the values in the H and S option boxes. Set the B (Brightness) value to 100 percent. Next, select the Brush tool and change the brush mode to Color by pressing Shift+Alt+C (Shift+Option+C on the Mac). Then paint as needed. The effect is identical to applying Colorize from the Hue/Saturation dialog box.
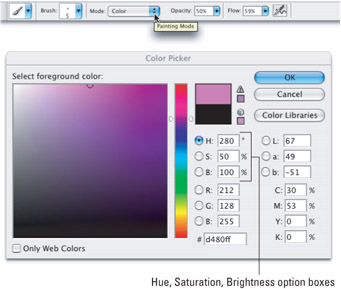
Figure 11-30: By entering the same Hue and Saturation values into the H and S option boxes of the Color Picker, you can paint in the same Colorize effects by then setting your brush mode to Color.
EAN: 2147483647
Pages: 95