The Pixelate Filters
The Filter Pixelate submenu features a handful of commands that rearrange your image into clumps of color :
-
Color Halftone: This highly practical filter allows you to suggest the effect of a halftone pattern. When applied to a CMYK image, Photoshop simulates a commercially reproduced color separation. Otherwise, the filter merely affects those channels that it can. For example, when working inside an RGB image, the Channel 4 value is ignored because there is no fourth color channel. (Alpha channels are ignored.) When working on a grayscale image or mask, the Screen Angles value for Channel 1 is the only angle that matters.
-
Crystallize : This filter organizes an image into irregularly shaped nuggets. You specify the size of the nuggets by entering a value from 3 to 300 pixels in the Cell Size option.
-
Facet: Facet fuses areas of similarly colored pixels to create a sort of hand- painted effect.
-
Fragment: Makes a jumbled, trembling effect, like the photographer was being shaken violently by thugs.
-
Mezzotint: This filter renders an image as a pattern of dots, lines, or strokes. See the upcoming "Creating a mezzotint" section for more information.
-
Mosaic: The Mosaic filter blends pixels together into larger squares. You specify the height and width of the squares by entering a value in the Cell Size option box.
-
Pointillize: This filter is similar to Crystallize, except it separates an image into disconnected nuggets set against the background color. As usual, you specify the size of the nuggets by changing the Cell Size value.
The Crystal Halo effect
By applying one of the Pixelate filters to a feathered selection, you can create a Crystal Halo effect, named for the Crystallize filter, which tends to deliver the most successful results. The following steps explain how to create a Crystal Halo, using the planets in Figures 9-8 and 9-9 as examples.
STEPS: Creating a Crystal Halo Effect
-
Select the foreground element around which you want to create the halo.
-
Choose Select Inverse. Or press Ctrl+Shift+I ( z +Shift+I on the Mac). The halo appears outside the foreground element, so you have to deselect the foreground and select the background.
-
Press Q to switch to the Quick Mask Mode. Now you can edit your selection and see the results of your changes.
-
Copy the mask. Press Ctrl+A and Ctrl+C to select the entire mask and copy it to the Clipboard. (That's z +A, z +C on the Mac.) You'll need this image later to complete the effect.
-
Choose Filter Other Minimum. As explained in the previous chapter, this filter enables you to increase the size of the deselected area. The size of the Radius value determines the size of the halo you create. 50 was entered because a generous 50-pixel halo was desired.
-
Choose Filter Blur Gaussian Blur. Then enter a Radius value equal to the amount you entered into the Minimize dialog box, in this case, 50 pixels. The result appears on the left side of Figure 9-8.
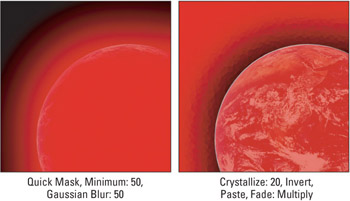
Figure 9-8: Create a heavily feathered selection outline (left) and then apply the Crystallize filter, invert the mask, and paste the original selection (right). -
Choose Filter Pixelate Crystallize. Enter a moderate value in the Cell Size option box. Here, the value 20 was chosen to convert the blurred edges to a series of chunky nuggets. The filter refracts the edges, almost as if you were viewing them through textured glass.
-
Invert the mask. Press Ctrl+I ( z +I on the Mac) to swap the blacks and whites. This deselects the area outside the halo.
-
Paste the copied selection outline. Press Ctrl+V ( z +V on the Mac) to paste the version of the mask you copied in Step 4.
-
Choose Edit Fade, and then Multiply. To blend the original mask with the crystallized version, press Ctrl+Shift+F ( z +Shift+F on the Mac) and choose Multiply from the Mode pop-up menu. This burns one mask into the other, leaving only the halo selected, as in the right example in Figure 9-9.
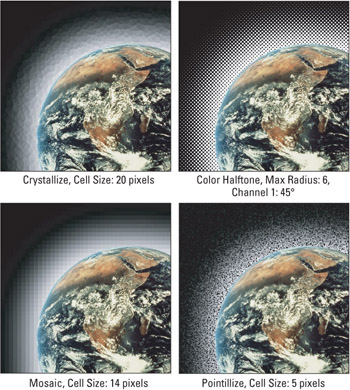
Figure 9-9: These images illustrate the effects of applying each of four filters to a heavily feathered selection in the Quick Mask Mode and then filling the resulting selection outlines with white. -
Press Q to return to the marching ants mode, then use the selection as desired. Press Ctrl+Backspace ( z +Delete on the Mac) to fill the selection with white, as shown in the top left image in Figure 9-9.
Figure 9-9 shows several variations on the Crystal Halo effect. To create the upper- right image, Filter Pixelate Color Halftone was substituted for the Crystallize filter in Step 7. To create the lower-left image, the Mosaic filter was applied in place of Crystallize, using a Cell Size value of 14 pixels. Finally, to create the lower-right image, Pointillize was applied with a Cell Size of 5 pixels.
Creating a mezzotint
A mezzotint is a special halftone pattern that replaces dots with a random pattern of swirling lines and wormholes. Photoshop's Mezzotint filter is an attempt to emulate this effect. Although not entirely successful ” true mezzotinting options can be properly implemented only as PostScript printing functions, not as filtering functions ” the Mezzotint filter's options do allow you to achieve some pretty interesting results.
The filter itself is straightforward. You choose Filter Pixelate Mezzotint, select an effect from the Type list, and press Enter or Return. A preview box enables you to see what each of the ten Type options looks like. Figure 9-10 shows off four of the effects at 300 ppi.
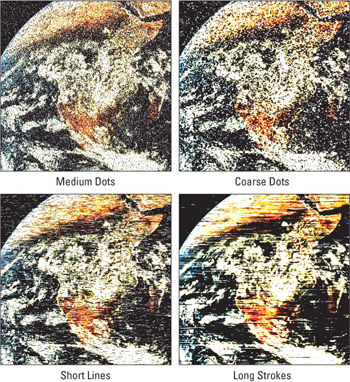
Figure 9-10: The results of applying the Mezzotint filter set to each of four representative effects. In each case, the filter changes all pixels in each channel to black or white.
When applied to grayscale artwork, the Mezzotint filter always results in a black- and-white image. When applied to a color image, the filter automatically applies the selected effect independently to each of the color channels. Although all pixels in each channel are changed to either black or white, you can see a total of eight colors ” black, red, green, blue, yellow, cyan, magenta , and white ” in the RGB composite view. The upper-left example of Figure 9-10 shows an image subject to the Mezzotint filter in the RGB mode.
If the Mezzotint filter affects each channel independently, it follows that the color mode in which you work dramatically affects the performance of the filter. For example, if you apply Mezzotint in the Lab mode, you again whittle the colors down to eight, but a very different eight ” black, cyan, magenta, green, red, two muddy blues, and a muddy rose ” as shown in the middle-left example of Figure 9-11. If you're looking for bright happy colors, don't apply Mezzotint in the Lab mode.
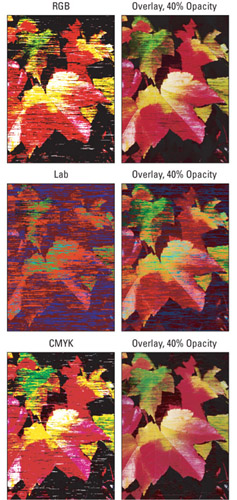
Figure 9-11: The left-hand column shows the results of applying Mezzotint with theType option set to LongStrokes in each of the three main color modes, RGB, Lab, and CMYK. To temper the effect (right column), chooseEdit Fade Mezzotint after applying each filter, changing the Mode setting to Overlay, and the Opacity value to 40 percent.
In CMYK, the filter produces roughly the same eight colors that you get in RGB ” white, cyan, magenta, yellow, violet -blue, red, deep green, and black. However, as shown in the bottom-left example of Figure 9-11, the distribution of the colors is much different. The image appears lighter and more colorful than its RGB counterpart . This happens because the filter has a lot of black to work with in the RGB mode but very little ” just that in the black channel ” in the CMYK mode.
The right column of Figure 9-12 shows the effects of the Mezzotint filter after using Edit Fade to mix the filtered image with its original. In each case, Overlay was chosen from the Mode pop-up menu and the Opacity value set to 40 percent. As you can see, fading Mezzotint creates more subtle and functional effects.
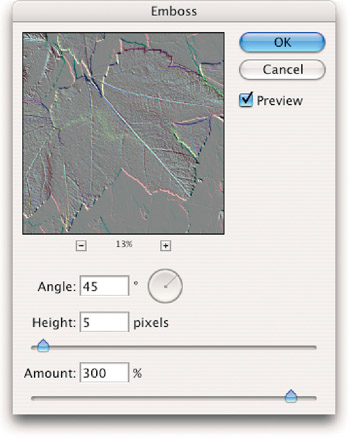
Figure 9-12: The Emboss dialog box lets you control the height of the filtered image and the angle from which it is lit.
EAN: 2147483647
Pages: 95